
Getting Started
Welcome to the Additional Terms for WooCommerce documentation!
In the world of e-commerce websites, having clear and seamless terms and conditions is of utmost importance. Disputes often arise when users are unaware of the site’s regulations and policies. Let’s consider an example of an online course website. They have a policy that allows refunds only within the first 48 hours after enrollment, with a significant administrative fee deducted from the refund amount. Now, imagine a new user who quickly clicks the terms checkbox during the general website policy without thoroughly reading them. After a few weeks of participating in the premium course, the user realizes it doesn’t meet their expectations and requests a refund, assuming it will be a full one. However, the support team refers to the website’s policy and explains the 48-hour refund window and administrative fee. The user is frustrated because they didn’t see or agree to these specific terms during the checkout process. They claim they wouldn’t have enrolled in the course if they had been aware of these strict refund conditions, insisting on a full refund. This situation could have been avoided if the website had a separate checkbox specifically for the refund policy during the checkout process, making it more likely for users to notice and review the special terms before making a purchase.
Such instances highlight the critical need for an additional terms and conditions checkbox for your shop. There are numerous other examples where this feature would be crucial, such as GDPR compliance policies, age agreements, or acceptance of delivery delays. Whether you want to post products at the right time or offer gift wrapping options, having an easily accessible checkbox to ask users about these additional terms can enhance transparency and ensure users are fully informed before making a purchase.
This is where the Additional Terms for WooCommerce plugin comes into play. It empowers you to add extra terms or acceptable checkboxes on your checkout page, allowing users to explicitly agree to specific terms and conditions associated with your shop. You have the flexibility to decide whether the checkbox is a required or optional field, and the plugin will record the acceptance of these additional terms in the order notes for your tracking convenience.
Throughout this documentation, we will explore the various settings provided by the Additional Terms for WooCommerce plugin. You will learn how to configure and utilize these settings according to your preferences. So, let’s get started and create your first additional agreement checkbox with the Additional Terms for WooCommerce plugin!
Creating an Additional “I Agree” Checkbox for the Checkout Page
To improve transparency and ensure your users are fully aware of detailed terms and conditions associated with your shop, you can easily add an extra “I agree” checkbox to the checkout page using the Additional Terms for WooCommerce plugin. Follow the steps below to set it up:
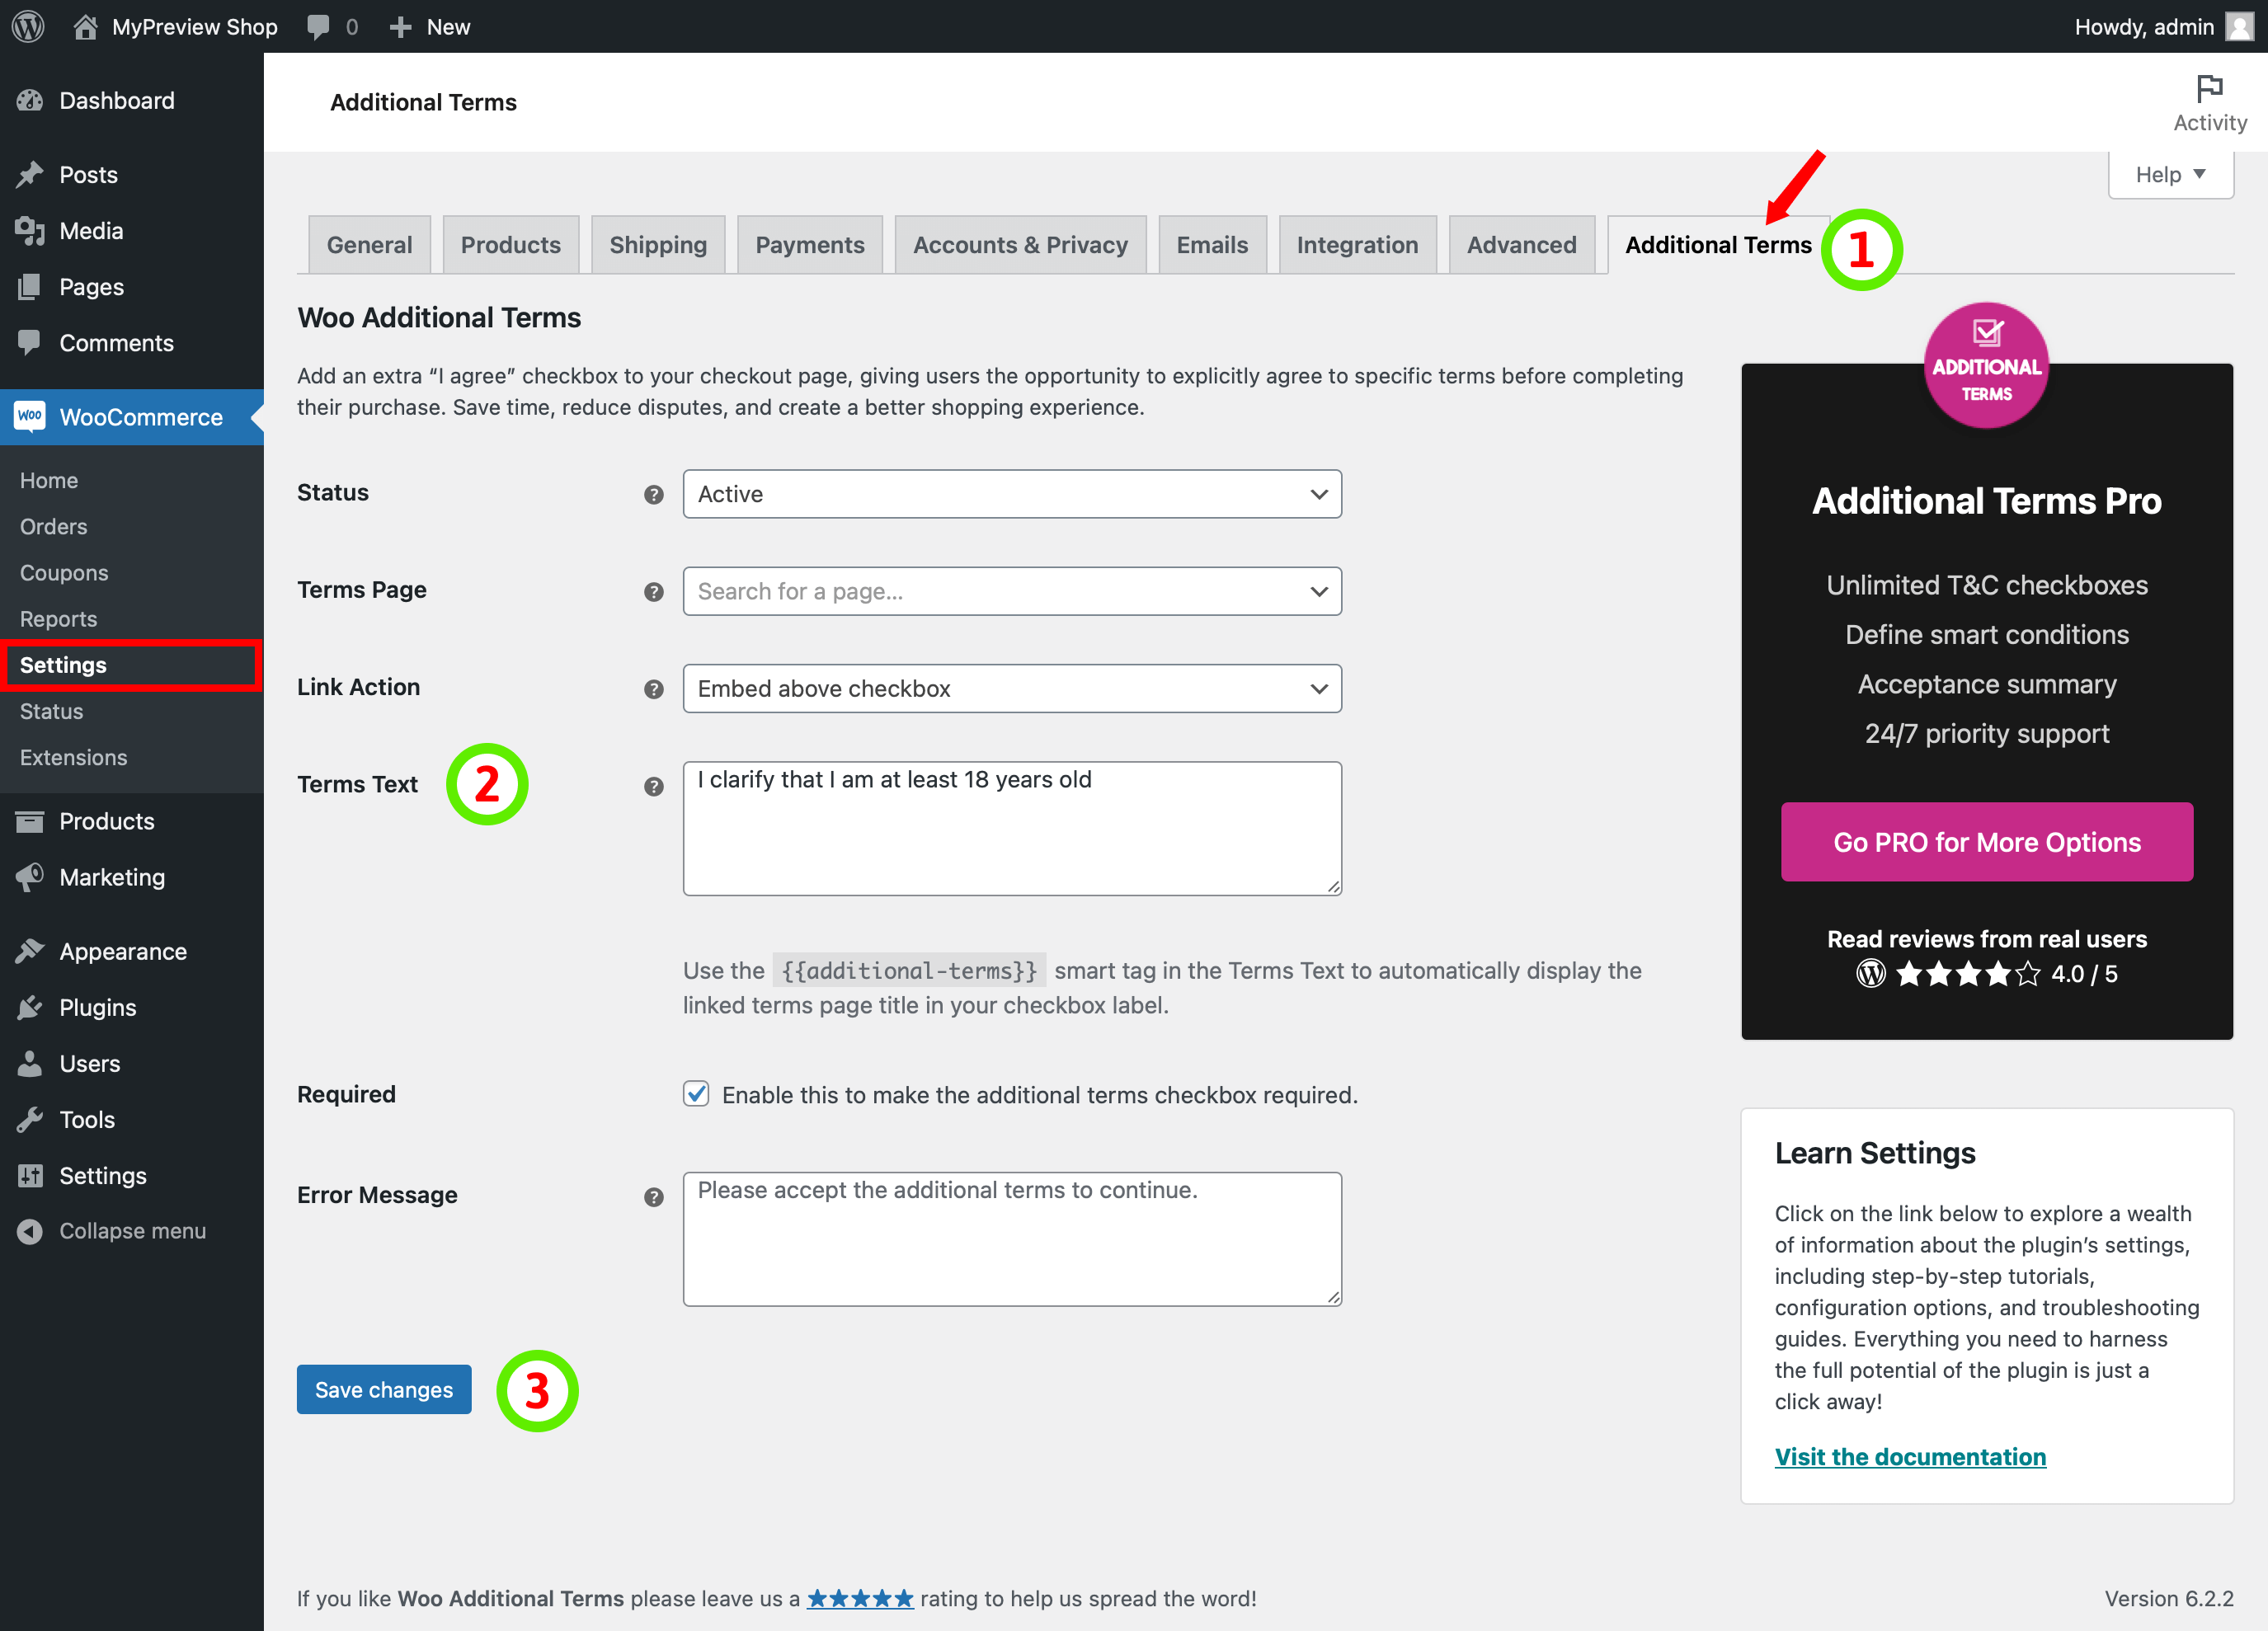
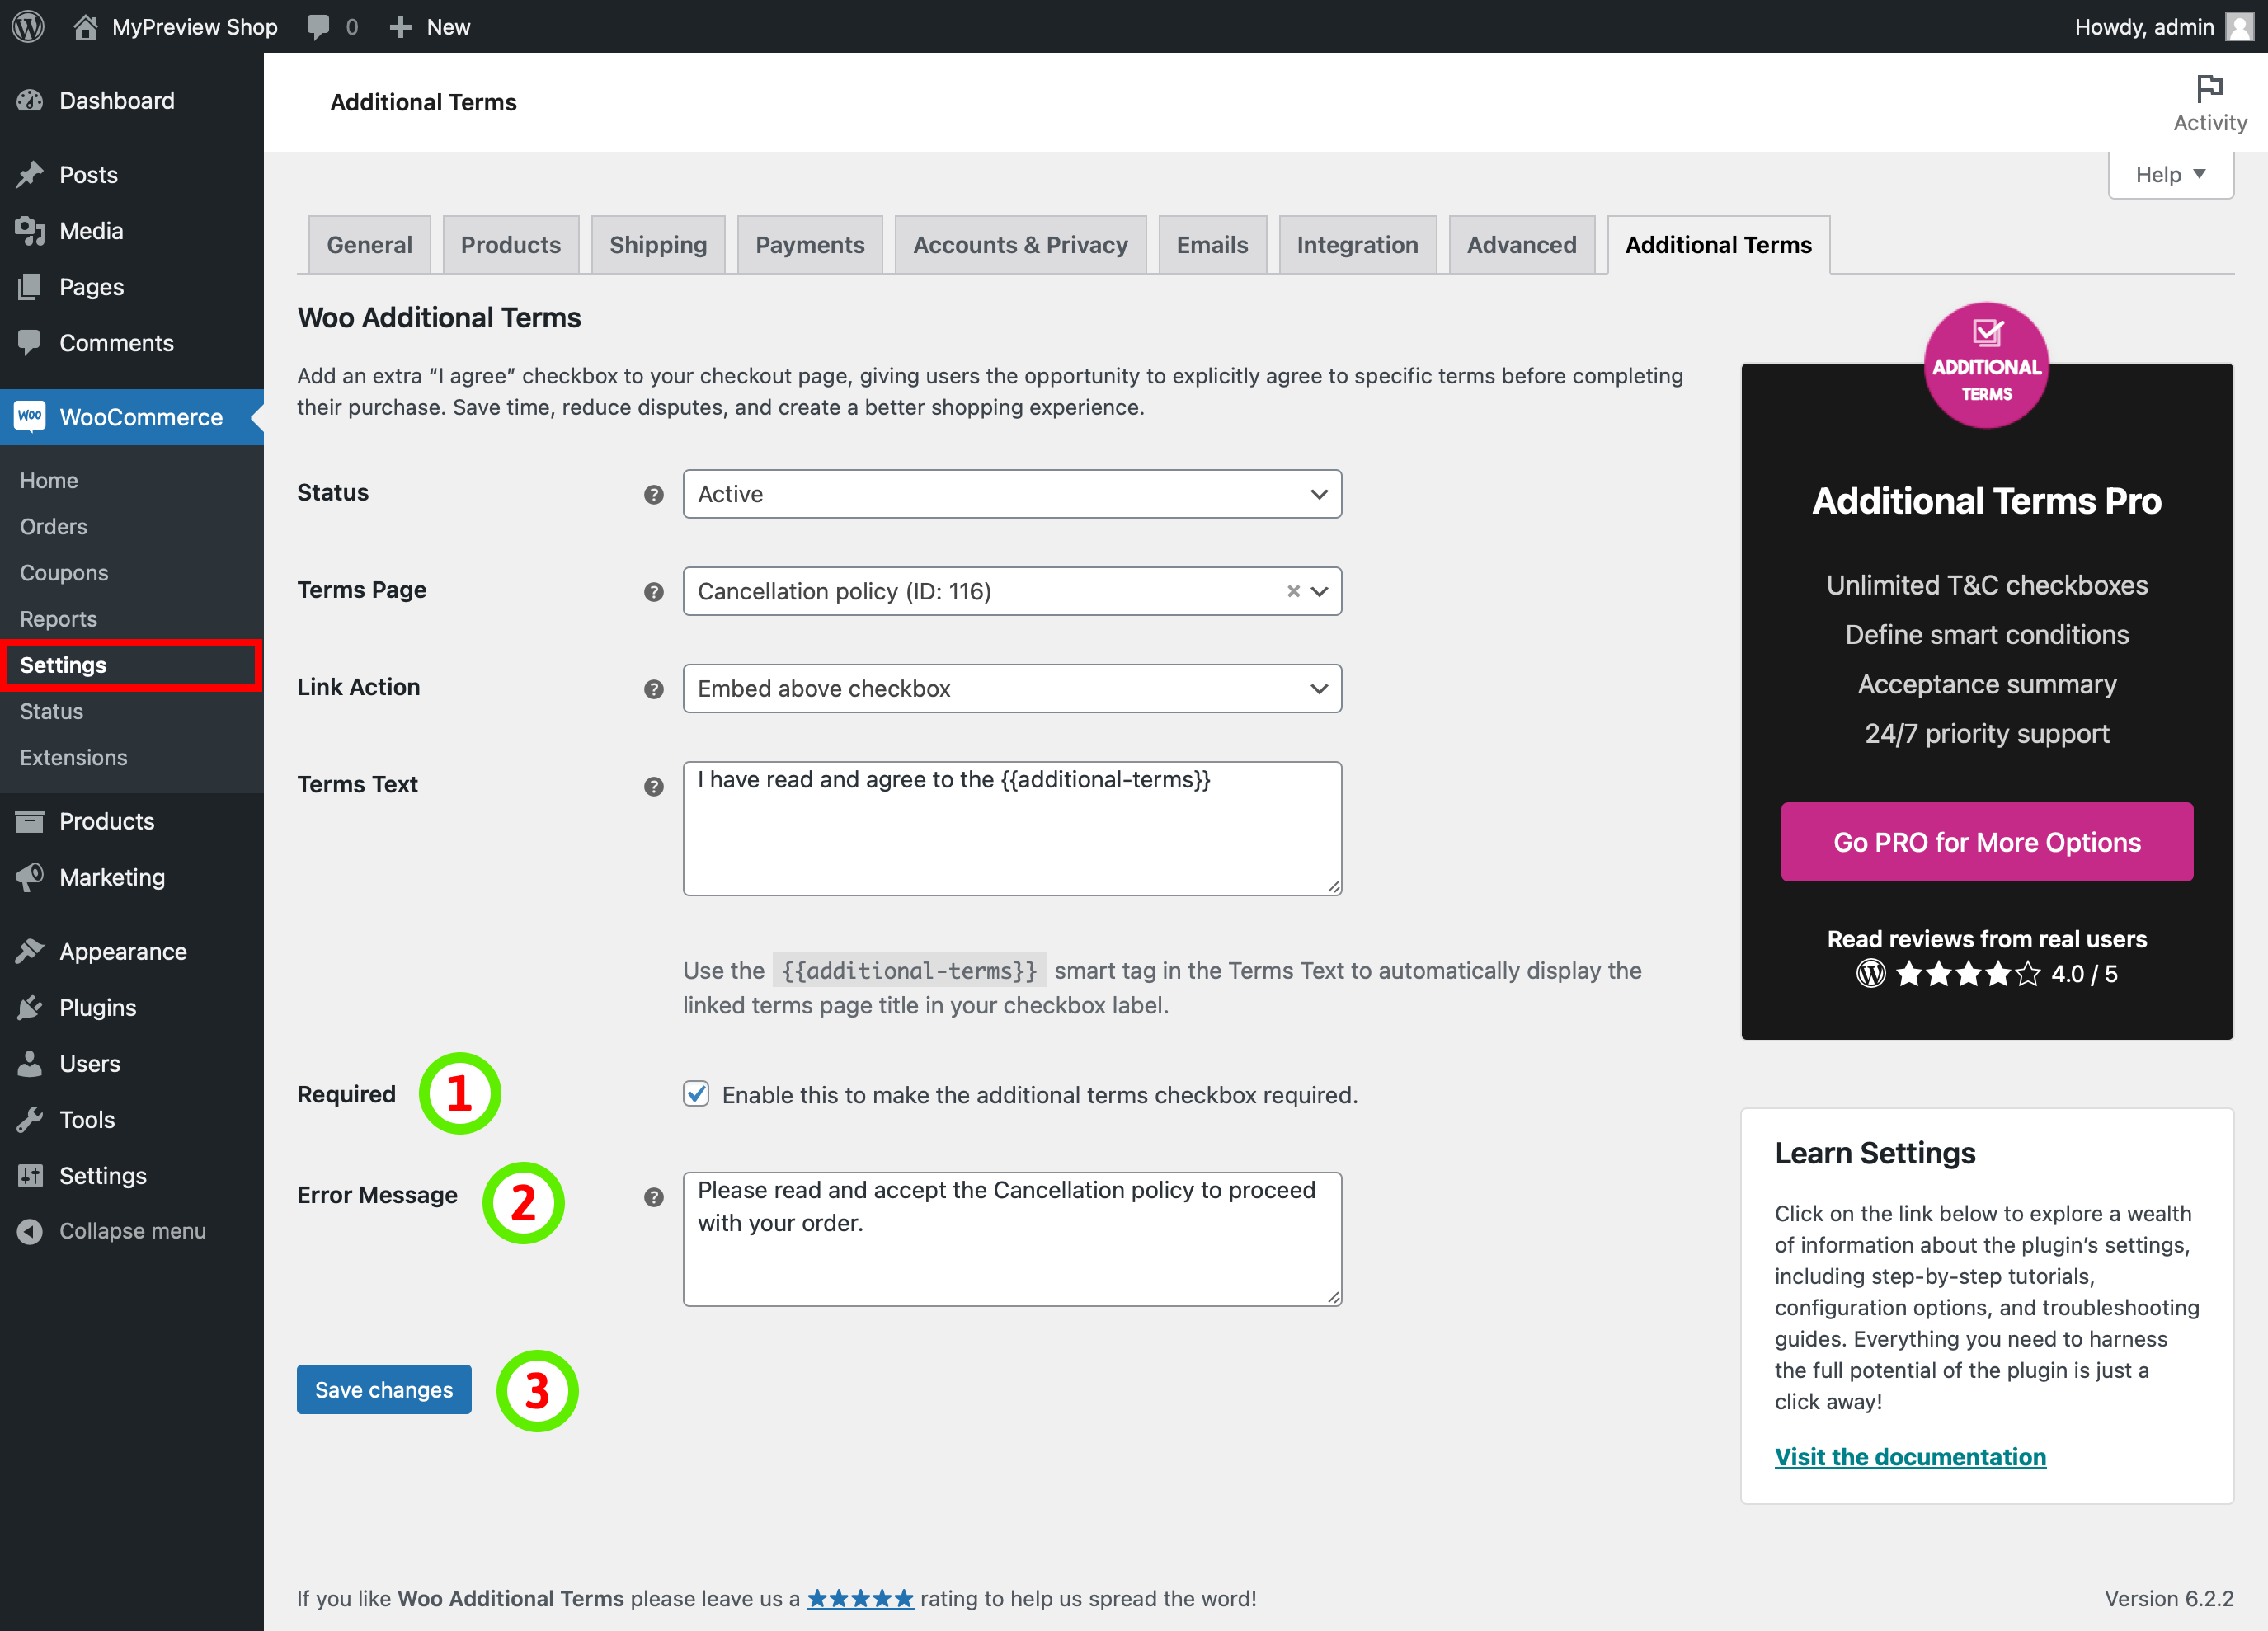
- Navigate to WooCommerce -> Settings -> Additional Terms.
- Add Terms Text: In the “Terms text” field, enter the label you want to display as the checkbox label text on the checkout page.
- Save Changes: After adding the desired terms text, click on “Save changes” button to save your modifications.
By following these simple steps, you have successfully created an extra “I agree” checkbox that will be displayed on the checkout page. Users will now have the opportunity to explicitly agree to the specific terms and conditions you’ve set for your shop, ensuring a smoother and more informed purchasing process.
Changing Checkbox Status
The plugin allows you to control the visibility of the Additional Terms checkbox at your convenience without the need to edit your other setting data. You have the freedom to switch the checkbox on and off whenever necessary, depending on the circumstances that align with your business requirements. This feature is particularly useful when you require customers to acknowledge certain conditions or clarifications during certain times, such as seasonal promotions or when you are on vacation and need to inform them about potential delivery delays.
To modify the status of the Additional Terms checkbox, follow these simple steps:
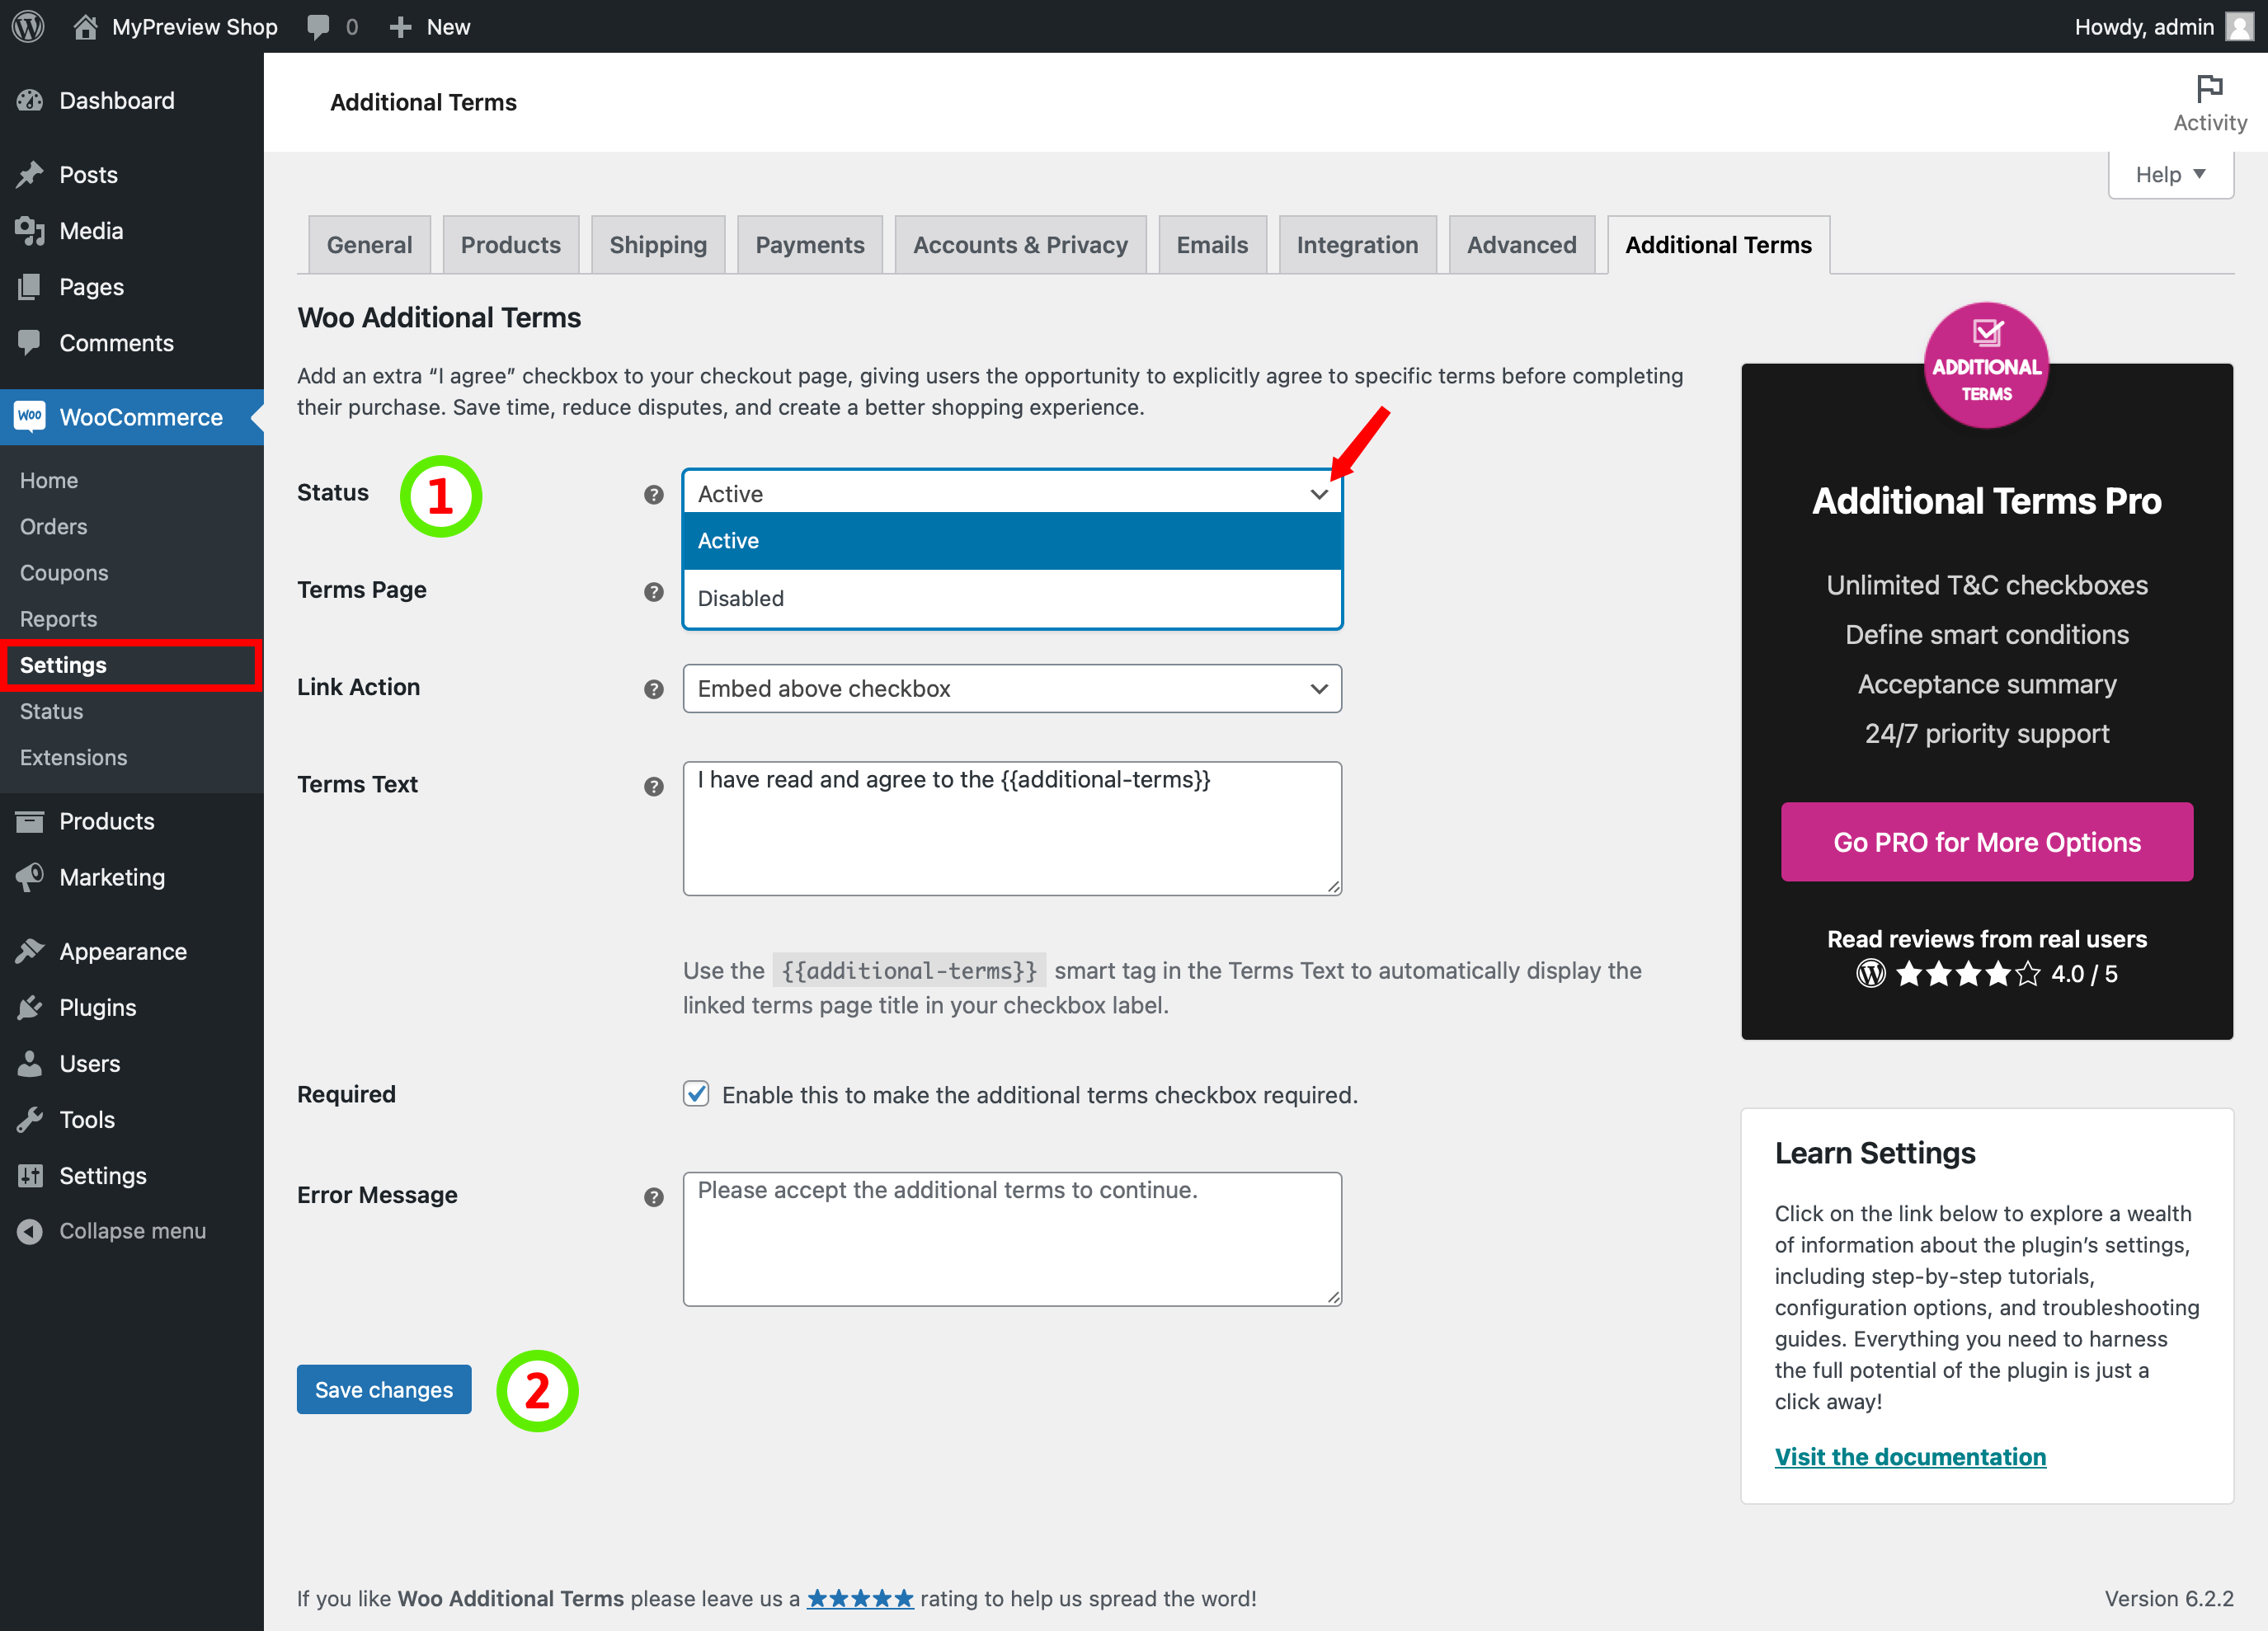
- Locate the Status Field: Navigate to the “Additional Terms” settings page and look for the “Status” field.
- Select Status: Choose the desired status for the checkbox - whether you want it to be active and displayed on the checkout page or disabled and remove it from the checkout.
- Save Changes: After selecting the appropriate status, click on the “Save Changes” button to save your modified settings.
Linking Your “I Agree” Checkbox to the Terms and Conditions Page
With the Additional Terms for WooCommerce plugin, you have the flexibility to link the “I agree” checkbox to a specific terms and conditions page. This allows you to display the relevant terms page title within the checkbox label, ensuring users are fully informed about the associated terms before purchasing. Follow the steps below to set up this feature:
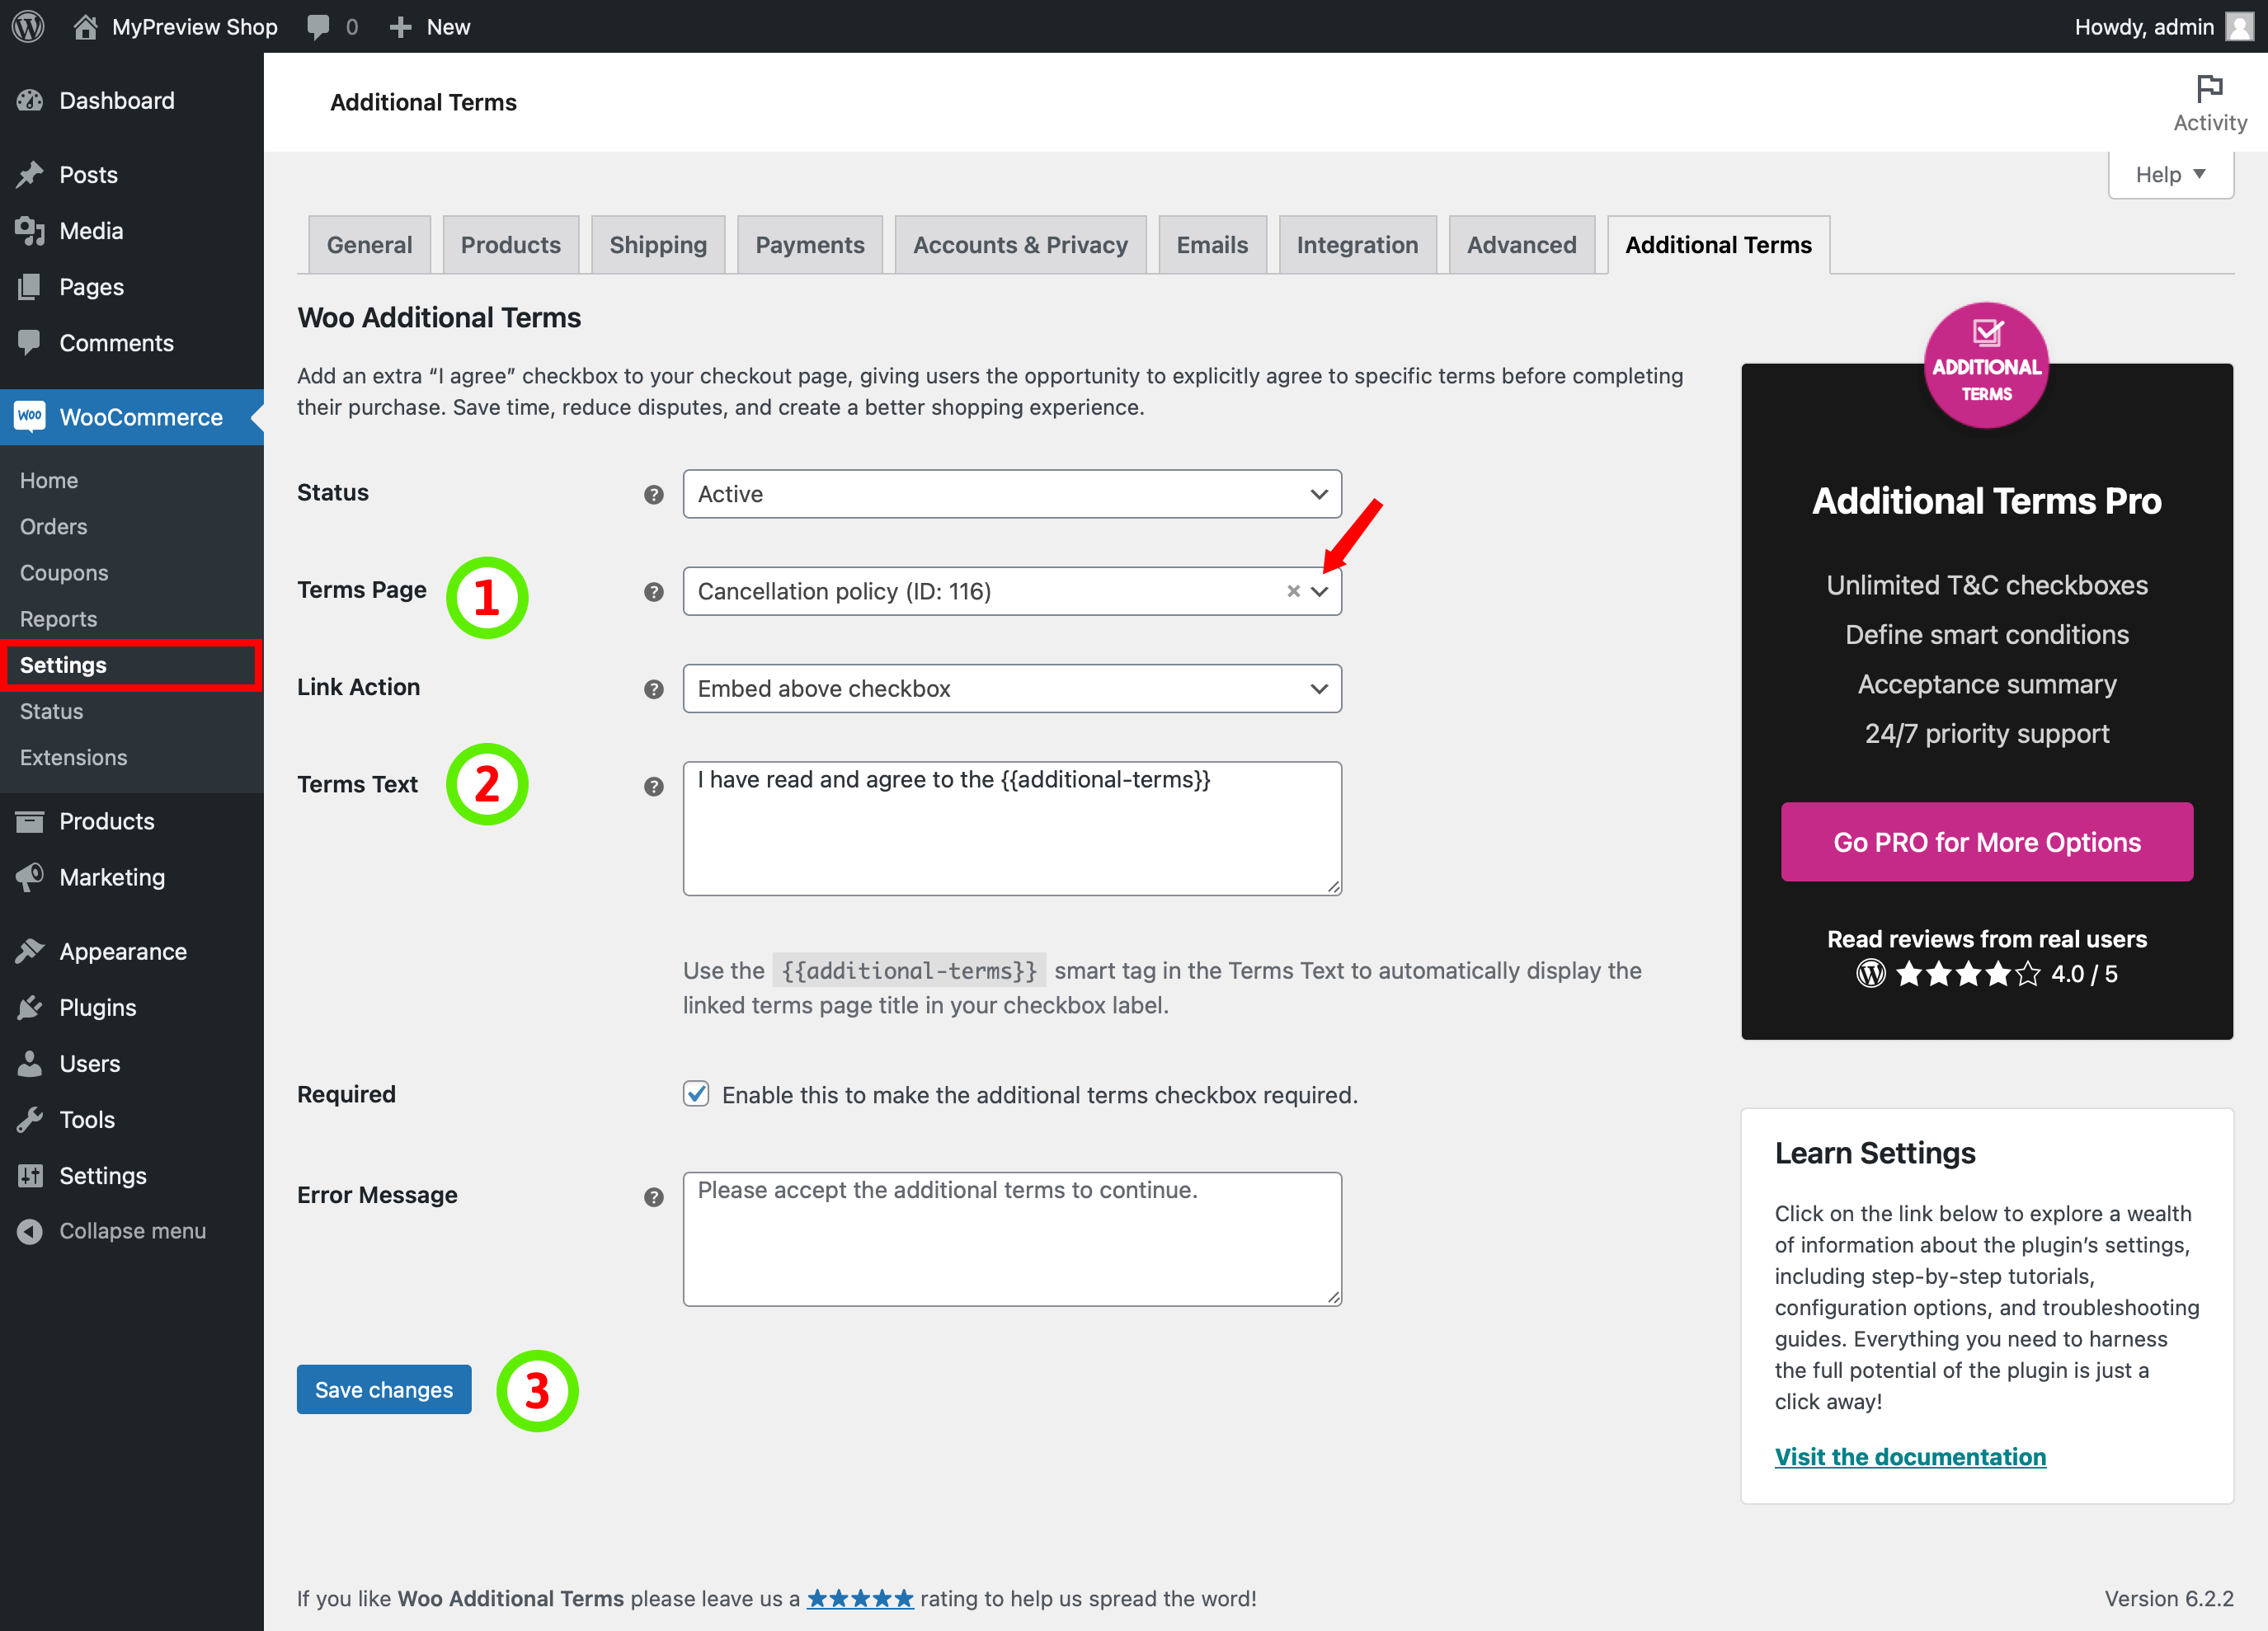
- Select the Terms Page: You can find the “Terms Page” field in the Additional Terms settings page. Using this dropdown field, you can effortlessly search for the specific terms and conditions page you want to link to the checkout checkbox and click on the appropriate page from the dropdown list to select it.
-
Insert the Linked Page Title: Inside your “Terms Text” field, place the smart tag
{{additional-terms}}at the desired location where you want the linked terms and conditions page title to appear. The smart tag acts as a placeholder that will automatically be replaced with the page title linked to your selected terms and conditions page when viewed on the checkout. - Save Changes: After customizing your terms checkbox with the desired content and smart tags, click on the “Save changes” button to save the modified settings.
Customizing Link Action for Terms and Conditions Page
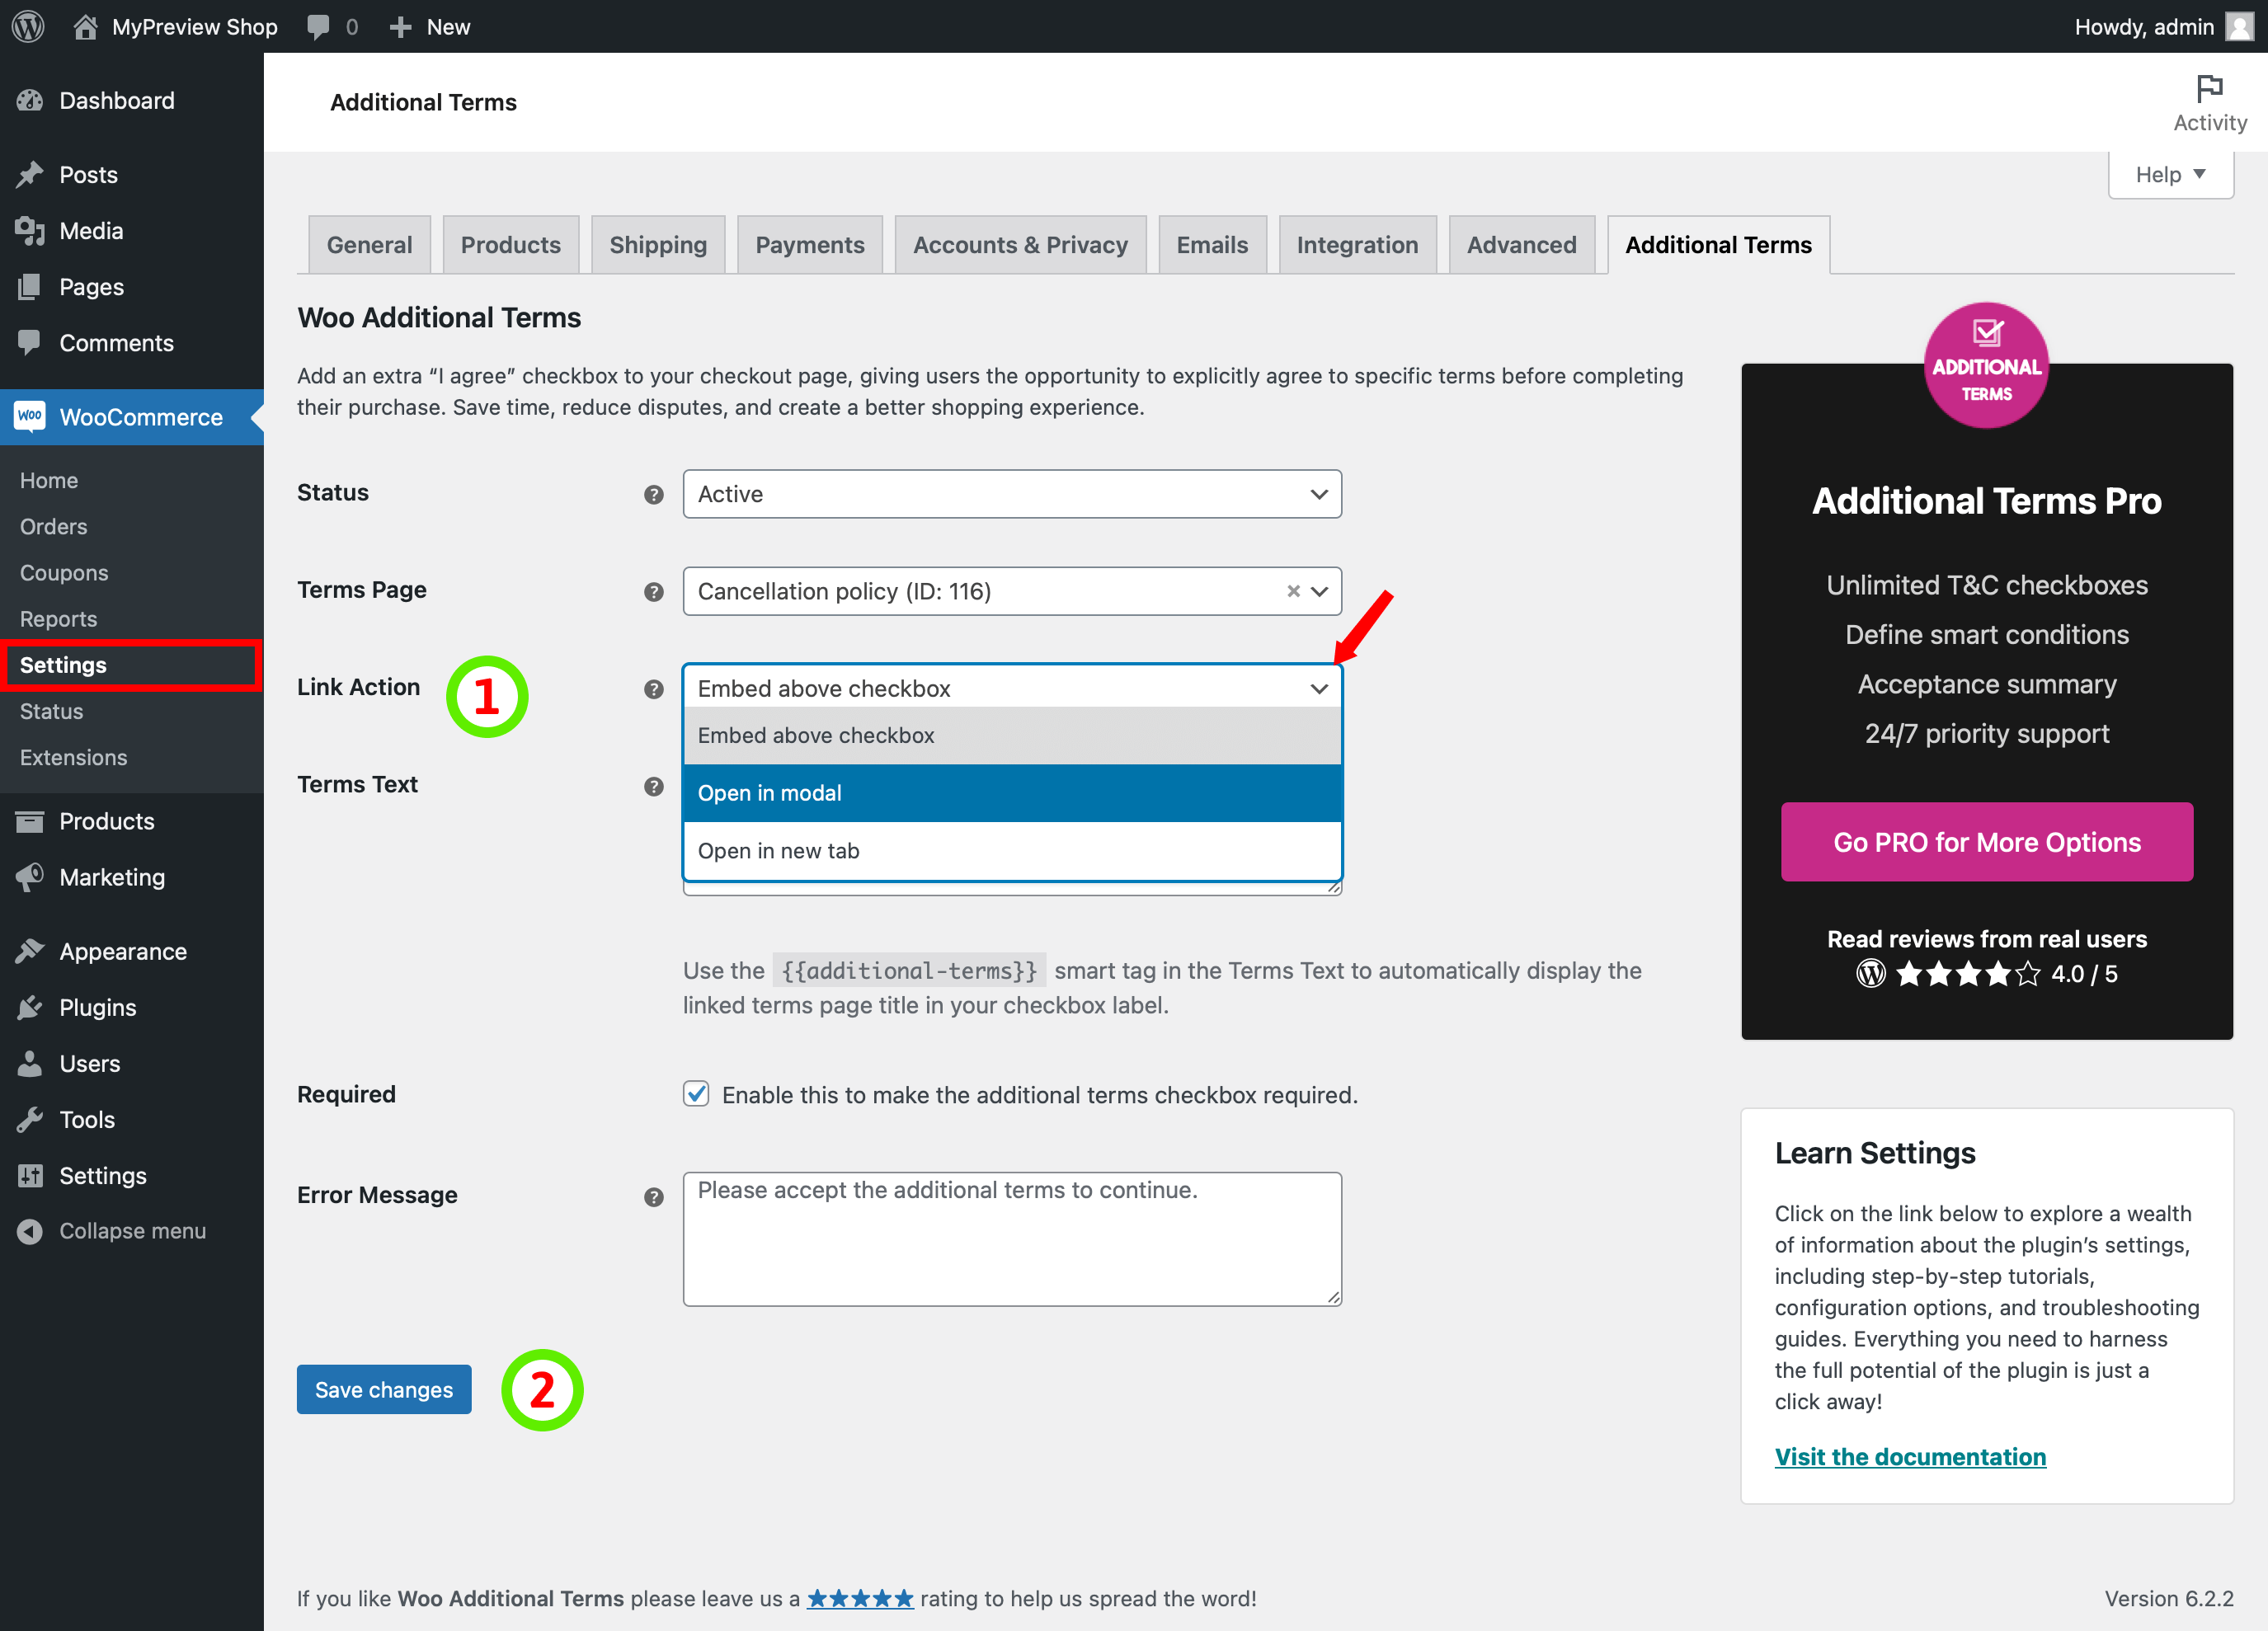
You can decide how users visit the terms and conditions page selected in the “Terms Page” field by customizing the link behavior. The link behavior is controlled through the “Link Action” dropdown menu, which allows you to choose what happens when users click on the linked page title represented by the {{additional-terms}} smart tag in the “Terms Text” field. There are three options available for customizing the link behavior:
- Embed Above Checkbox: This option allows you to display the specified terms and conditions content above the checkbox. When users click on the linked title, the terms content will be shown above the checkbox for their convenience and easy access.
- Open in Modal: Choosing this option will open a modal popup displaying the specified terms and conditions content. This modal popup provides a focused and attention-grabbing way to present the terms to the users without navigating away from the current page.
- Open in New Tab: Selecting this option will open the specified terms and conditions page in a new browser tab. This ensures that users can access the terms without losing their current progress or interaction on the checkout page.
Follow these steps to customize the link behavior:
- Locate the Link Action field: Find the Link Action field in the “Additional Terms” settings page. This is where you can set the desired behavior for the linked title.
- Select Link Action: Choose one of the three options available. “Embed above checkbox,” “Open in modal,” or “Open in new tab” based on your preference and the user experience you want to provide.
- Save Changes: Once you have selected the action for the linked title, click on the “Save Changes” button to save your modified settings.
By customizing the link action, you can enhance the user experience and ensure that your terms and conditions are easily accessible and understood by your users.
Selecting the Checkbox Requirement on the Checkout Page
The Additional Terms checkbox on the checkout page can be configured to be either optional or required, depending on your specific business needs.
- Optional Checkbox: When the Additional Terms checkbox is set to optional, it provides your customers with the freedom to decide whether they want to check the box during their purchase or not. This option is ideal for situations where you wish to offer certain benefits or add-ons to your customers, giving them the choice to opt-in or opt-out. For instance, if you run a gift shop and want to offer customers a free postcard, setting the checkbox as optional allows them to indicate whether they want to receive the postcard or not.
- Required Checkbox: On the other hand, selecting the Additional Terms checkbox as required forces users to check it during the checkout process. This is particularly useful when you want customers to explicitly agree to certain terms and conditions before completing the purchase. For example, if you have specific terms of sale that customers must accept, such as a return policy or privacy agreement, making the checkbox required ensures that they acknowledge and agree to these terms.
Here's how you can set the checkbox requirement:
- Locate the Required Checkbox: Navigate to the “Additional Terms” settings page and look for the “Required” checkbox field.
- Check or Uncheck the Field: To make the Additional Terms checkbox required, check the corresponding field. If you want to make it optional, simply uncheck the field.
- Enter Error Message (For Required Checkbox): You will see an “Error message” field if you set the checkbox as required. In this section, you can enter the specific error message you want to display during checkout when a user has not checked the checkbox.
- Save Changes: Once you have made your selection, click on the “Save Changes” button to save your modified settings.
By following these steps, you can easily configure the Additional Terms checkbox to align with your business needs, ensuring a seamless checkout process that is in line with your terms and conditions agreement.
Additional Terms Block
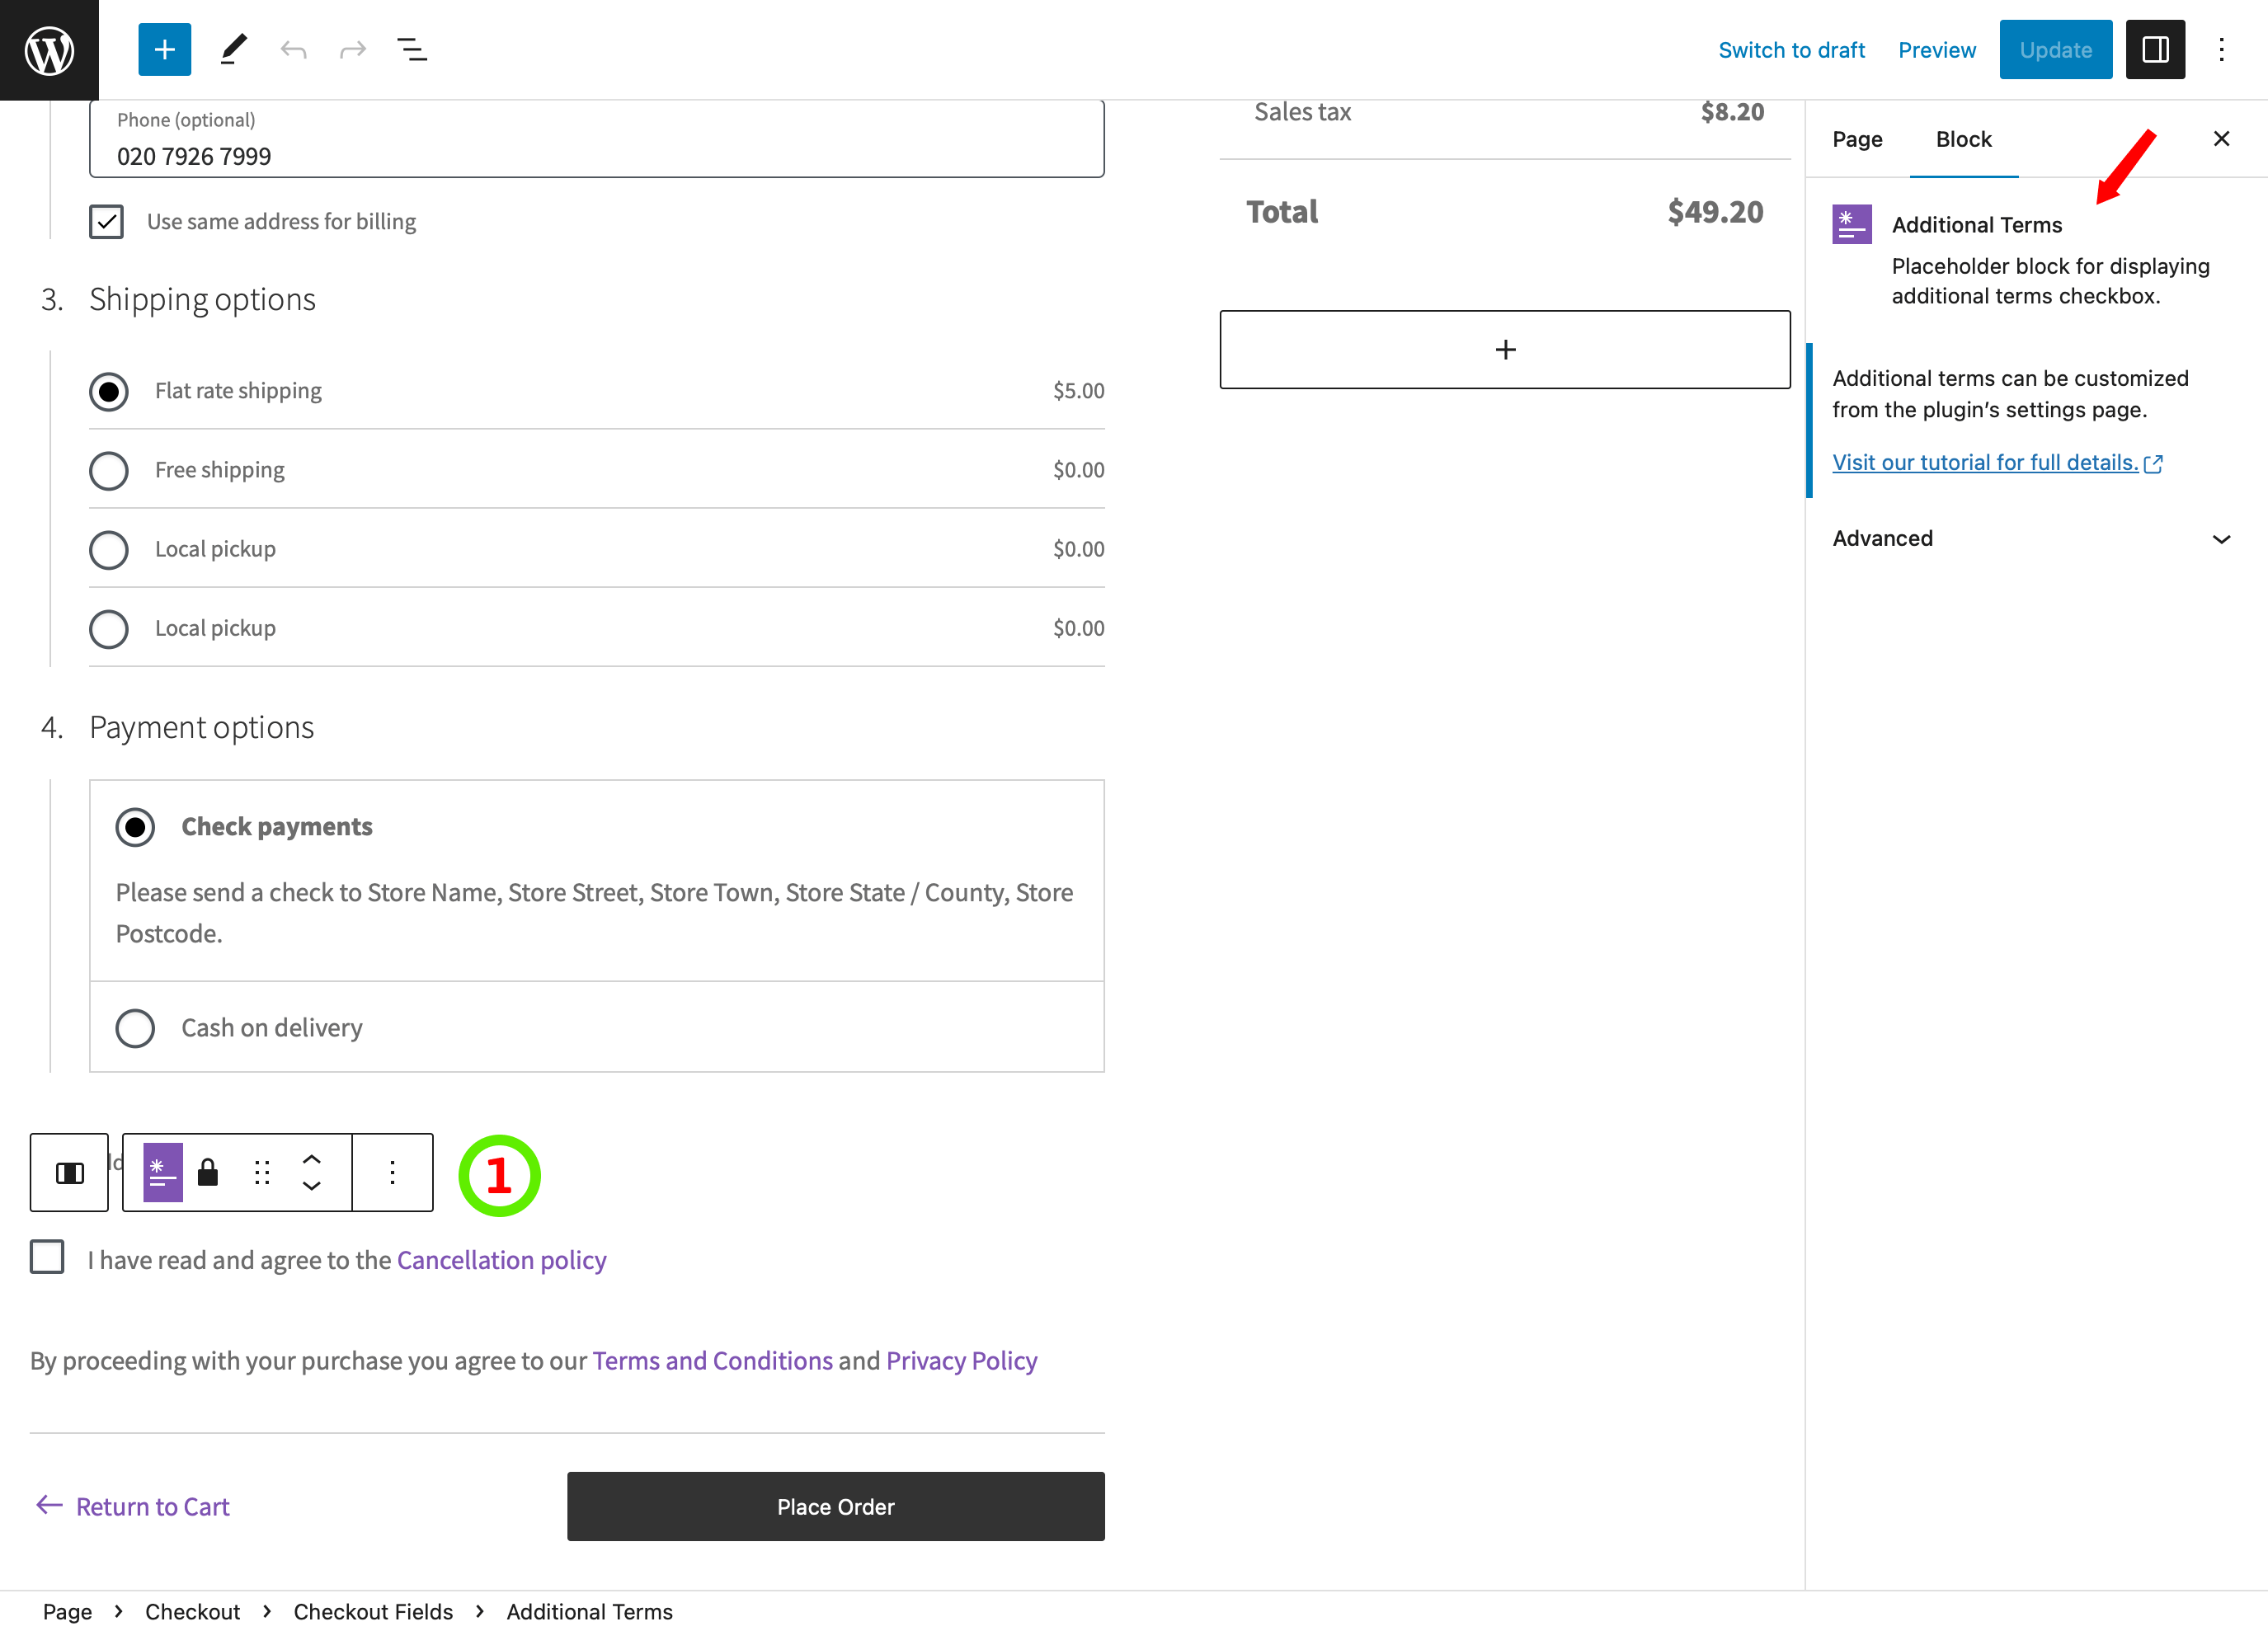
Once you have successfully created an additional terms checkbox, it will automatically appear alongside the WooCommerce terms and conditions on the checkout page. This is achieved by utilizing the WooCommerce checkout shortcode [woocommerce_checkout].
Moreover, if you prefer to build your checkout page using the WooCommerce Checkout block, the Additional Terms block will seamlessly integrate within the checkout block, offering you the flexibility to position the terms checkbox as per your specific requirements.
Tracking the Acceptance of Additional Terms Checkbox
The ability to review customer acceptance of the additional terms checkbox on the order edit page is of immense value, particularly in dispute resolution, as it provides tangible evidence of customers agreeing to your terms and conditions. Moreover, this feature empowers you to determine whether customers have opted for an additional service provided through an optional checkbox. To track the acceptance of orders, follow the steps below:
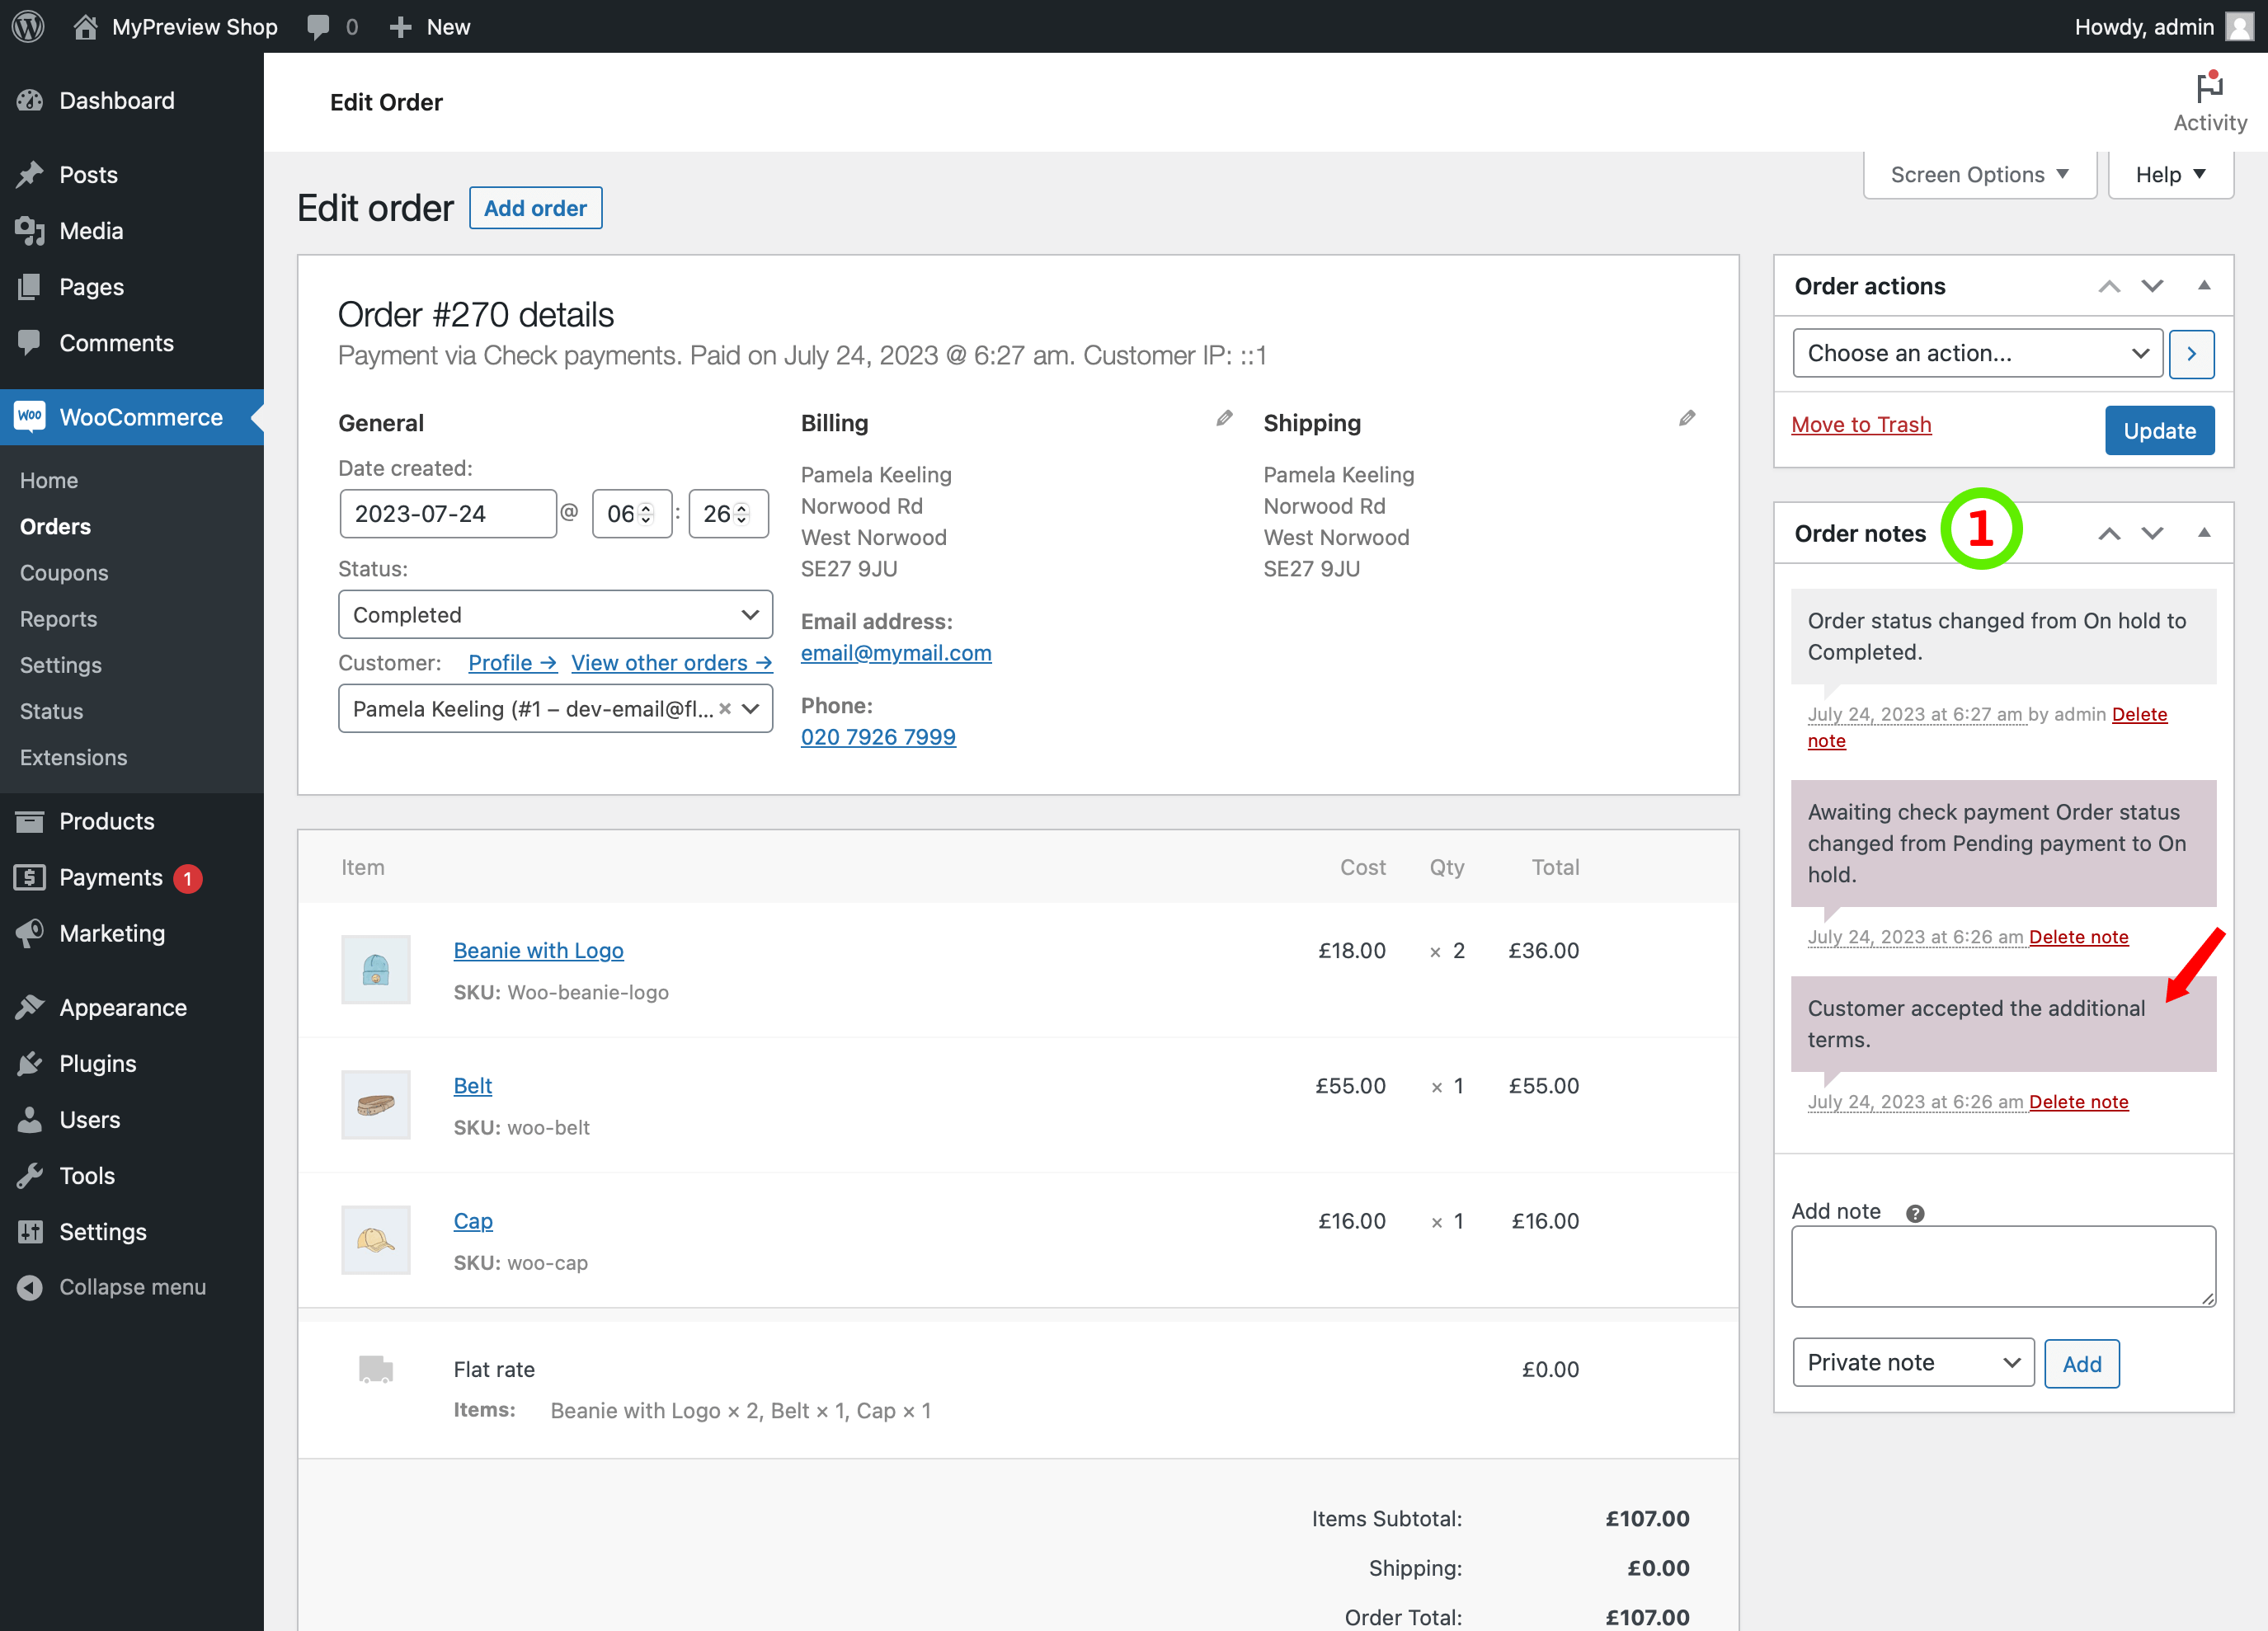
- Navigate to Order Edit: Click the order on the Orders page to navigate to the order edit page.
- Review Order Notes: In the Order Note section, you can review the notes related to the customer’s acceptance of the additional terms. If the customer has checked the checkbox, you will see the note “Customer accepted the additional terms.” However, if the checkbox remains unchecked, the note will indicate, “Customer did not accept the additional terms.”
Troubleshooting Common Issues
You may encounter issues or difficulties while using the Additional Terms for WooCommerce plugin. Here are a few common problems and their potential solutions:
Checkbox Not Displaying on the Checkout Page:
- Check that you have correctly entered the checkbox label text in the Terms text field.
- Verify that you have selected the “Active” status for the Status field.
The Link to the Terms Page is Missing:
- Ensure you have selected the correct terms page from the dropdown in the Terms Page field.
-
Check that you have inserted the correct smart tag
{{additional-terms}}in the “Terms Text” field where you want the linked terms and conditions page title to appear.
If the above troubleshooting steps do not resolve the issues you are facing, consider reaching out to the support or consulting the plugin’s documentation for further assistance.
Frequently Asked Questions:
Can I temporarily hide the additional terms checkbox?
Yes, you have the ability to control the visibility of the Additional Terms checkbox on the checkout page. You can temporarily deactivate the checkbox by switching the status field to Disable.
How do I link the checkbox to my terms and conditions page?
To link the checkbox to a terms and conditions page, follow these steps:
- In the “Additional Terms” settings page, use the “Terms Page” dropdown to select the desired terms and conditions page.
-
Insert the smart tag
{{additional-terms}}in the “Terms Text” field where you want the linked page title to appear. - Save your modified settings.
Can I use the plugin to offer an optional service through a checkbox?
You can uncheck the Required field in the “Additional Terms” settings page to offer an optional service. It will make the checkbox optional for customers during checkout. You can then track customer acceptance of this optional service in the Order Notes on the order edit page.
If you have any additional questions or need further assistance, please refer to the plugin documentation or contact our support for help.
Developers Guides
Customizing Closed Store with CSS and JavaScript
When integrating the additional terms checkbox to the checkout page using the Additional Terms plugin, a specific class, namely woo-additional-terms-enforce-terms is automatically appended to the <body> tag of of the checkout page.
To make use of the woo-additional-terms-enforce-terms class, follow these steps:
-
Identifying the Class:
- Inspect the HTML code of your website using the browser’s developer tools.
-
Locate the
<body>tag and check if the “woo-additional-terms-enforce-terms” class is present. - If the class is found, you can proceed with applying customizations.
-
Applying CSS Styles:
- Open your CSS stylesheet or the custom CSS editor.
-
Use the
woo-additional-terms-enforce-termsclass as a selector to target specific elements or sections of your checkout page. - Apply custom styles to modify the appearance, layout, or behavior of the targeted elements.
-
Utilizing JavaScript:
-
If you need to add specific behaviors or functionality, you can use JavaScript in combination with the
woo-additional-terms-enforce-termsclass. - Include your JavaScript code in a separate script file.
-
Use the
woo-additional-terms-enforce-termsclass as a selector or check if it exists before applying your custom JavaScript logic. - Implement the desired actions or modifications based on your requirements.
-
If you need to add specific behaviors or functionality, you can use JavaScript in combination with the

