Getting Started
Welcome to the documentation for the Woo Store Vacation plugin! This powerful extension for WooCommerce allows you to effortlessly customize the behavior of your shop when you’re on vacation. Whether you’re taking a well-deserved break or need to close your store temporarily, this plugin has got you covered.
With the Woo Store Vacation plugin, you can easily schedule your holiday time and utilize the vacation notice feature to inform your valued customers about your absence. By doing so, you can ensure that they are aware of any delays or changes in your shop’s operations.
One of the plugin’s key features is the ability to disable product purchases and temporarily close your store. However, you also have the option to keep some of your products available for purchase if you prefer. This flexibility allows you to tailor the shopping experience to your specific needs during your vacation.
When you choose to disable product purchases, your shop will remain online and accessible to visitors. Although new order operations will be paused and the checkout functionality will be disabled, users can still explore your products and plan for future purchases. This ensures that potential customers can visit your shop, browse your offerings, and make plans for when you resume normal operations.
Throughout this documentation, we will delve into the various settings provided by the Woo Store Vacation plugin. You will understanding how to configure and utilize these settings according to your personal preferences. So let’s get started and make the most of your vacation time with the Woo Store Vacation plugin!
Setting Up and Customizing Vacation Schedule
To ensure a seamless vacation experience, the plugin allows you to schedule your vacation in advance. Follow the steps below to schedule your vacation and personalize the vacation settings according to your holiday plans:
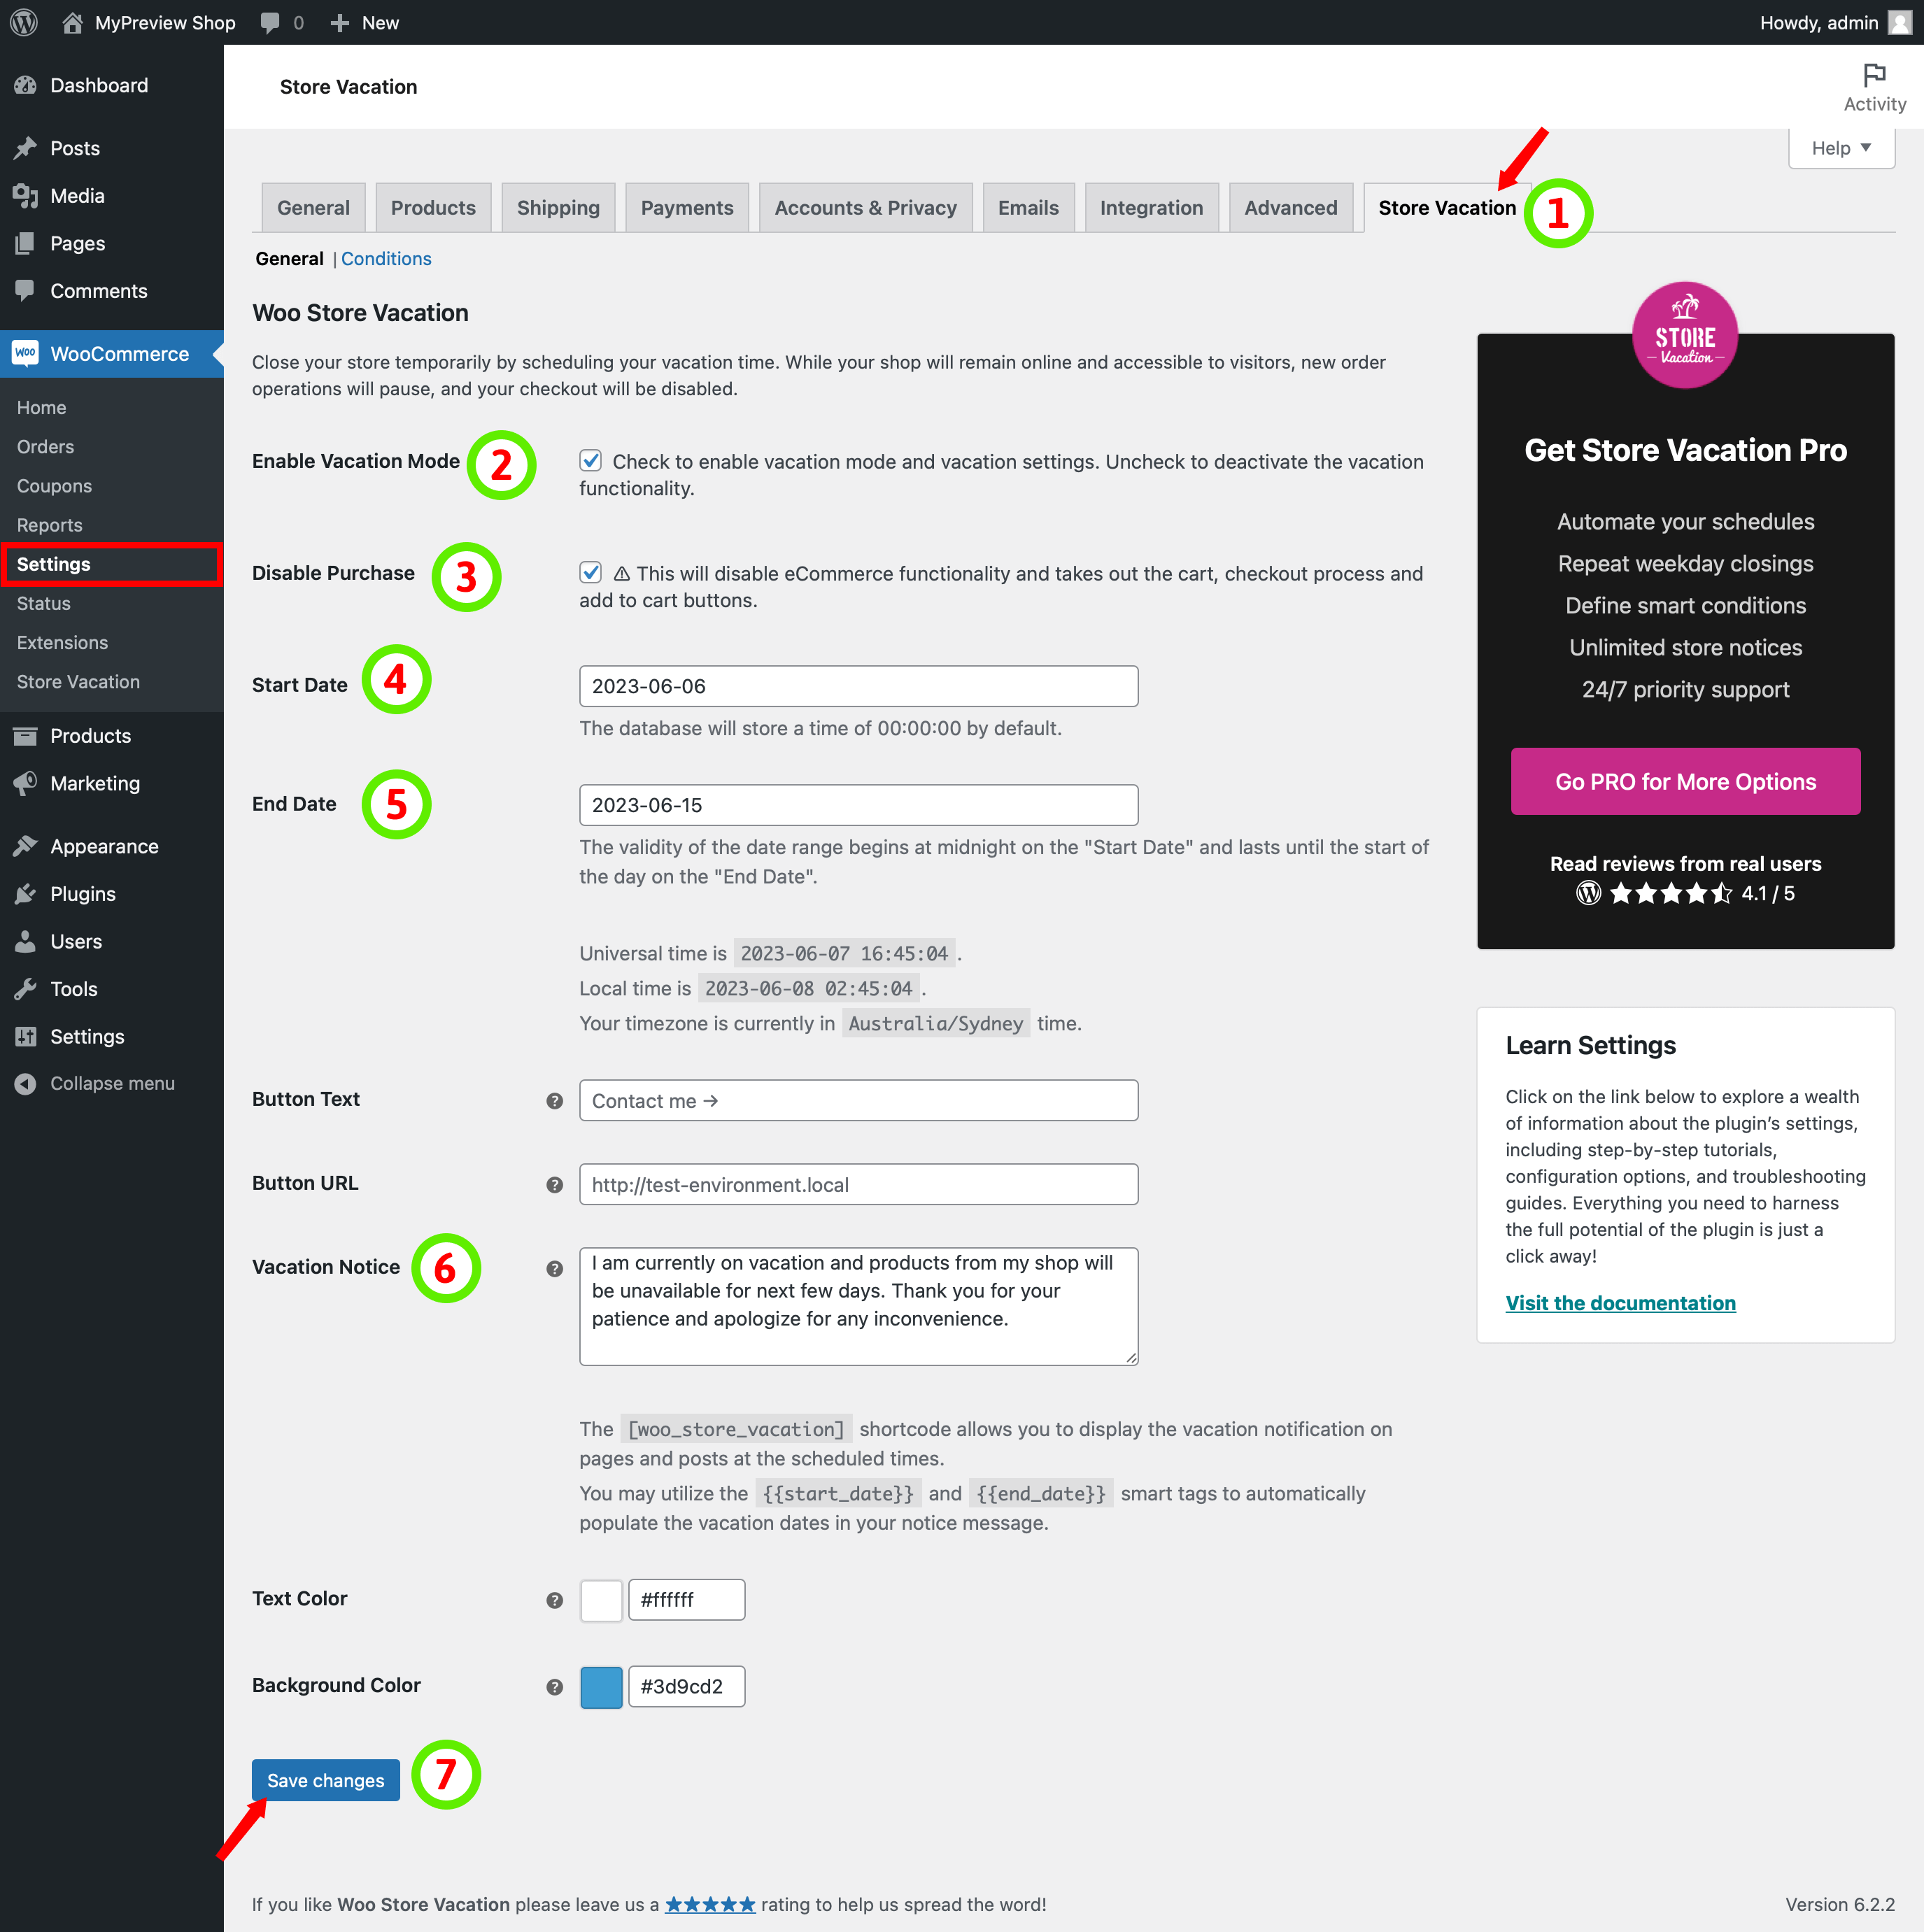
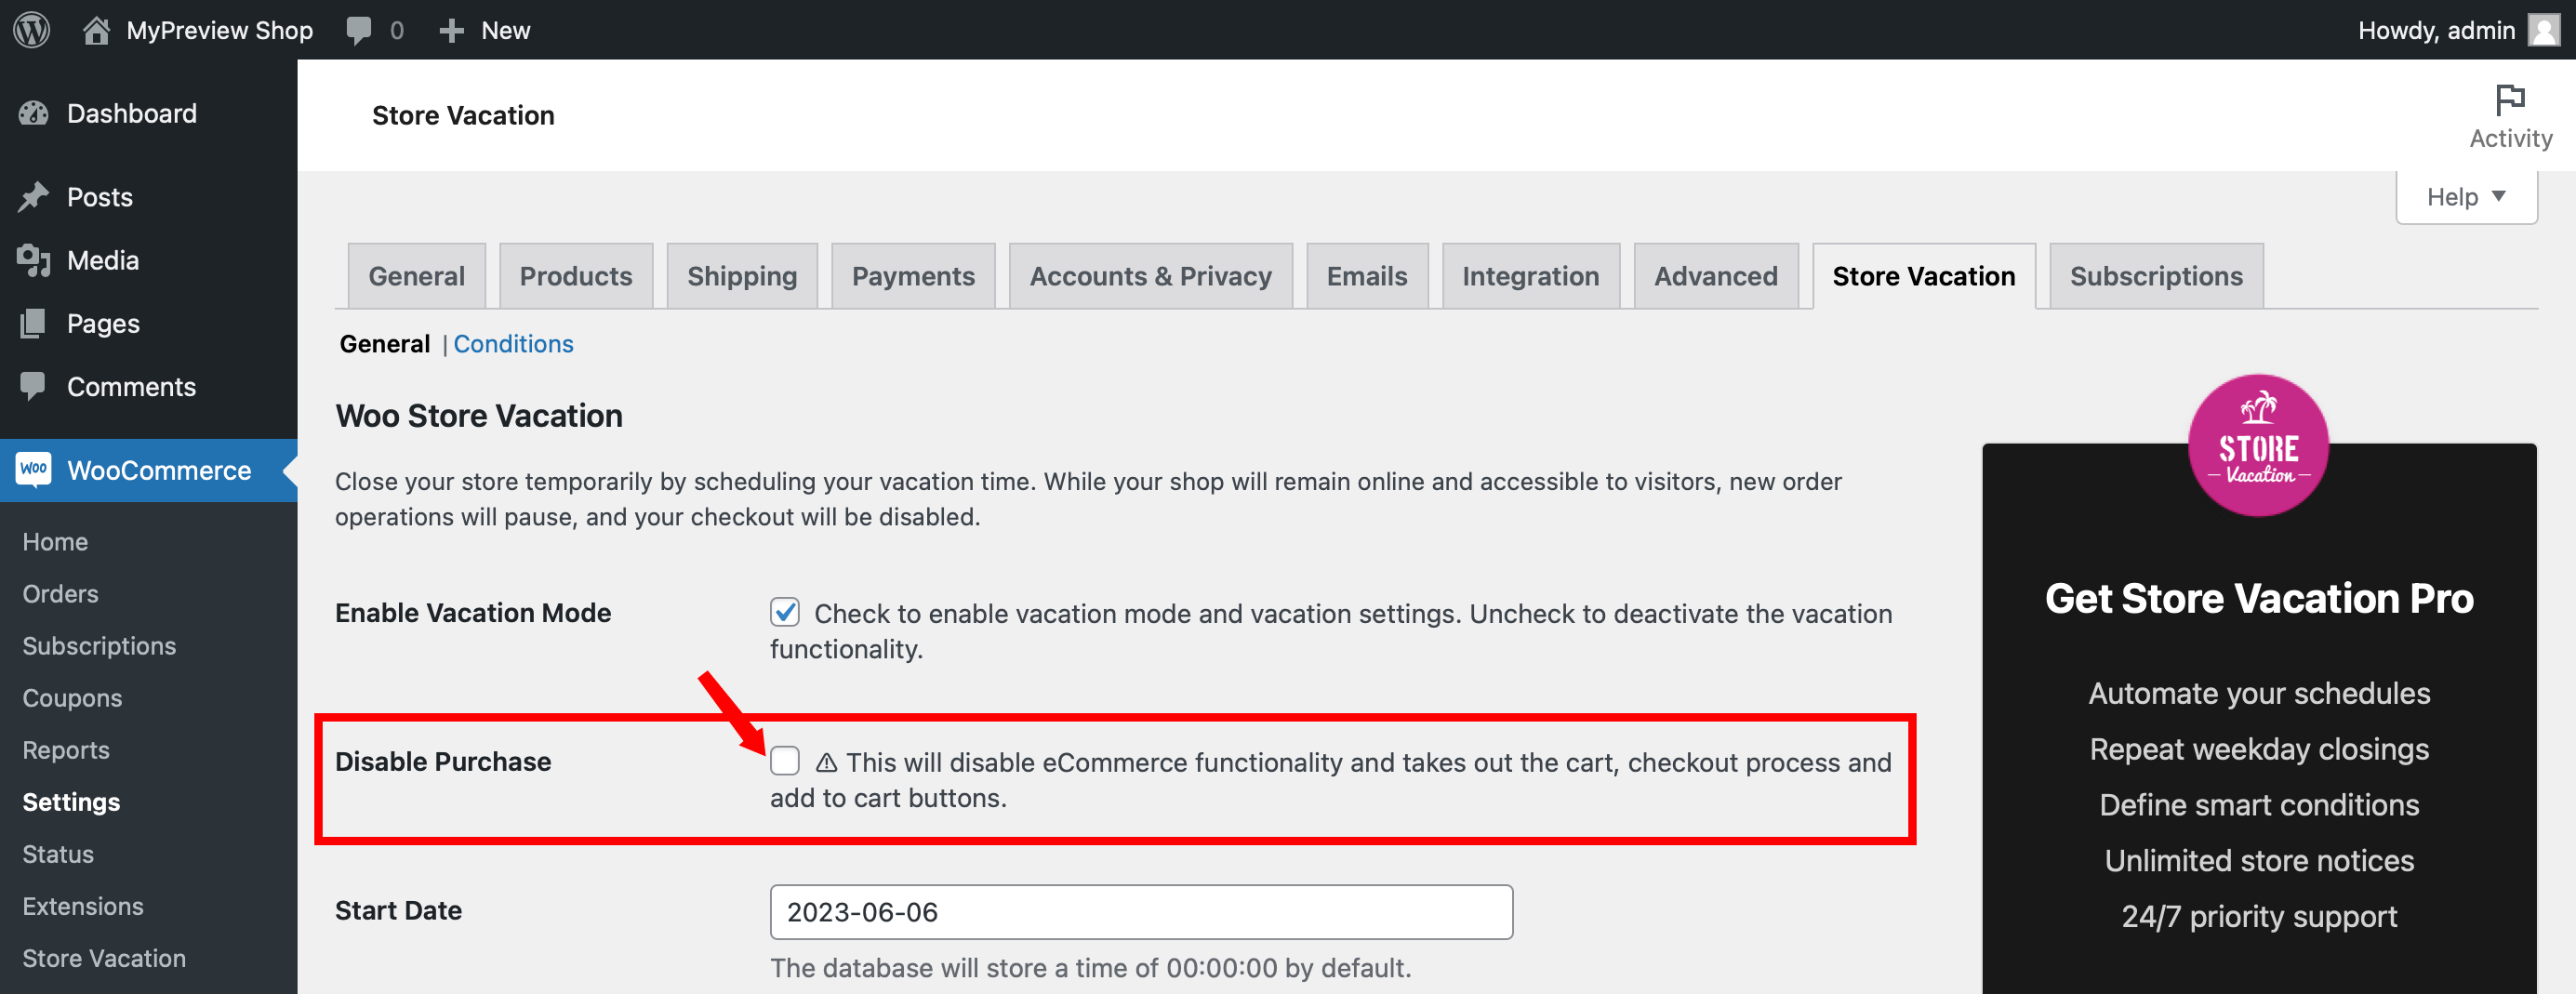
- Navigate to WooCommerce -> Settings -> Store Vacation.
- Enable Vacation Mode: Tick the “Enable Vacation Mode” checkbox to activate the vacation functionality.
- Disable Purchase: If you wish to modify your shop’s behavior during the vacation, select the “Disable Purchase” checkbox. This action will take out the cart, checkout process, and add to cart buttons.
- Set the Start Date: Choose the desired start date for your vacation using the date picker. The vacation mode will automatically begin from the selected date. By default, the database stores a time of 00:00:00.
- Set the End Date: Choose the end date for your vacation using the date picker. Once this date is reached, the vacation mode will automatically be turned off. If you disabled purchases and closed your shop for vacation, it will automatically reopen on this date. By default, the database stores a time of 00:00:00.
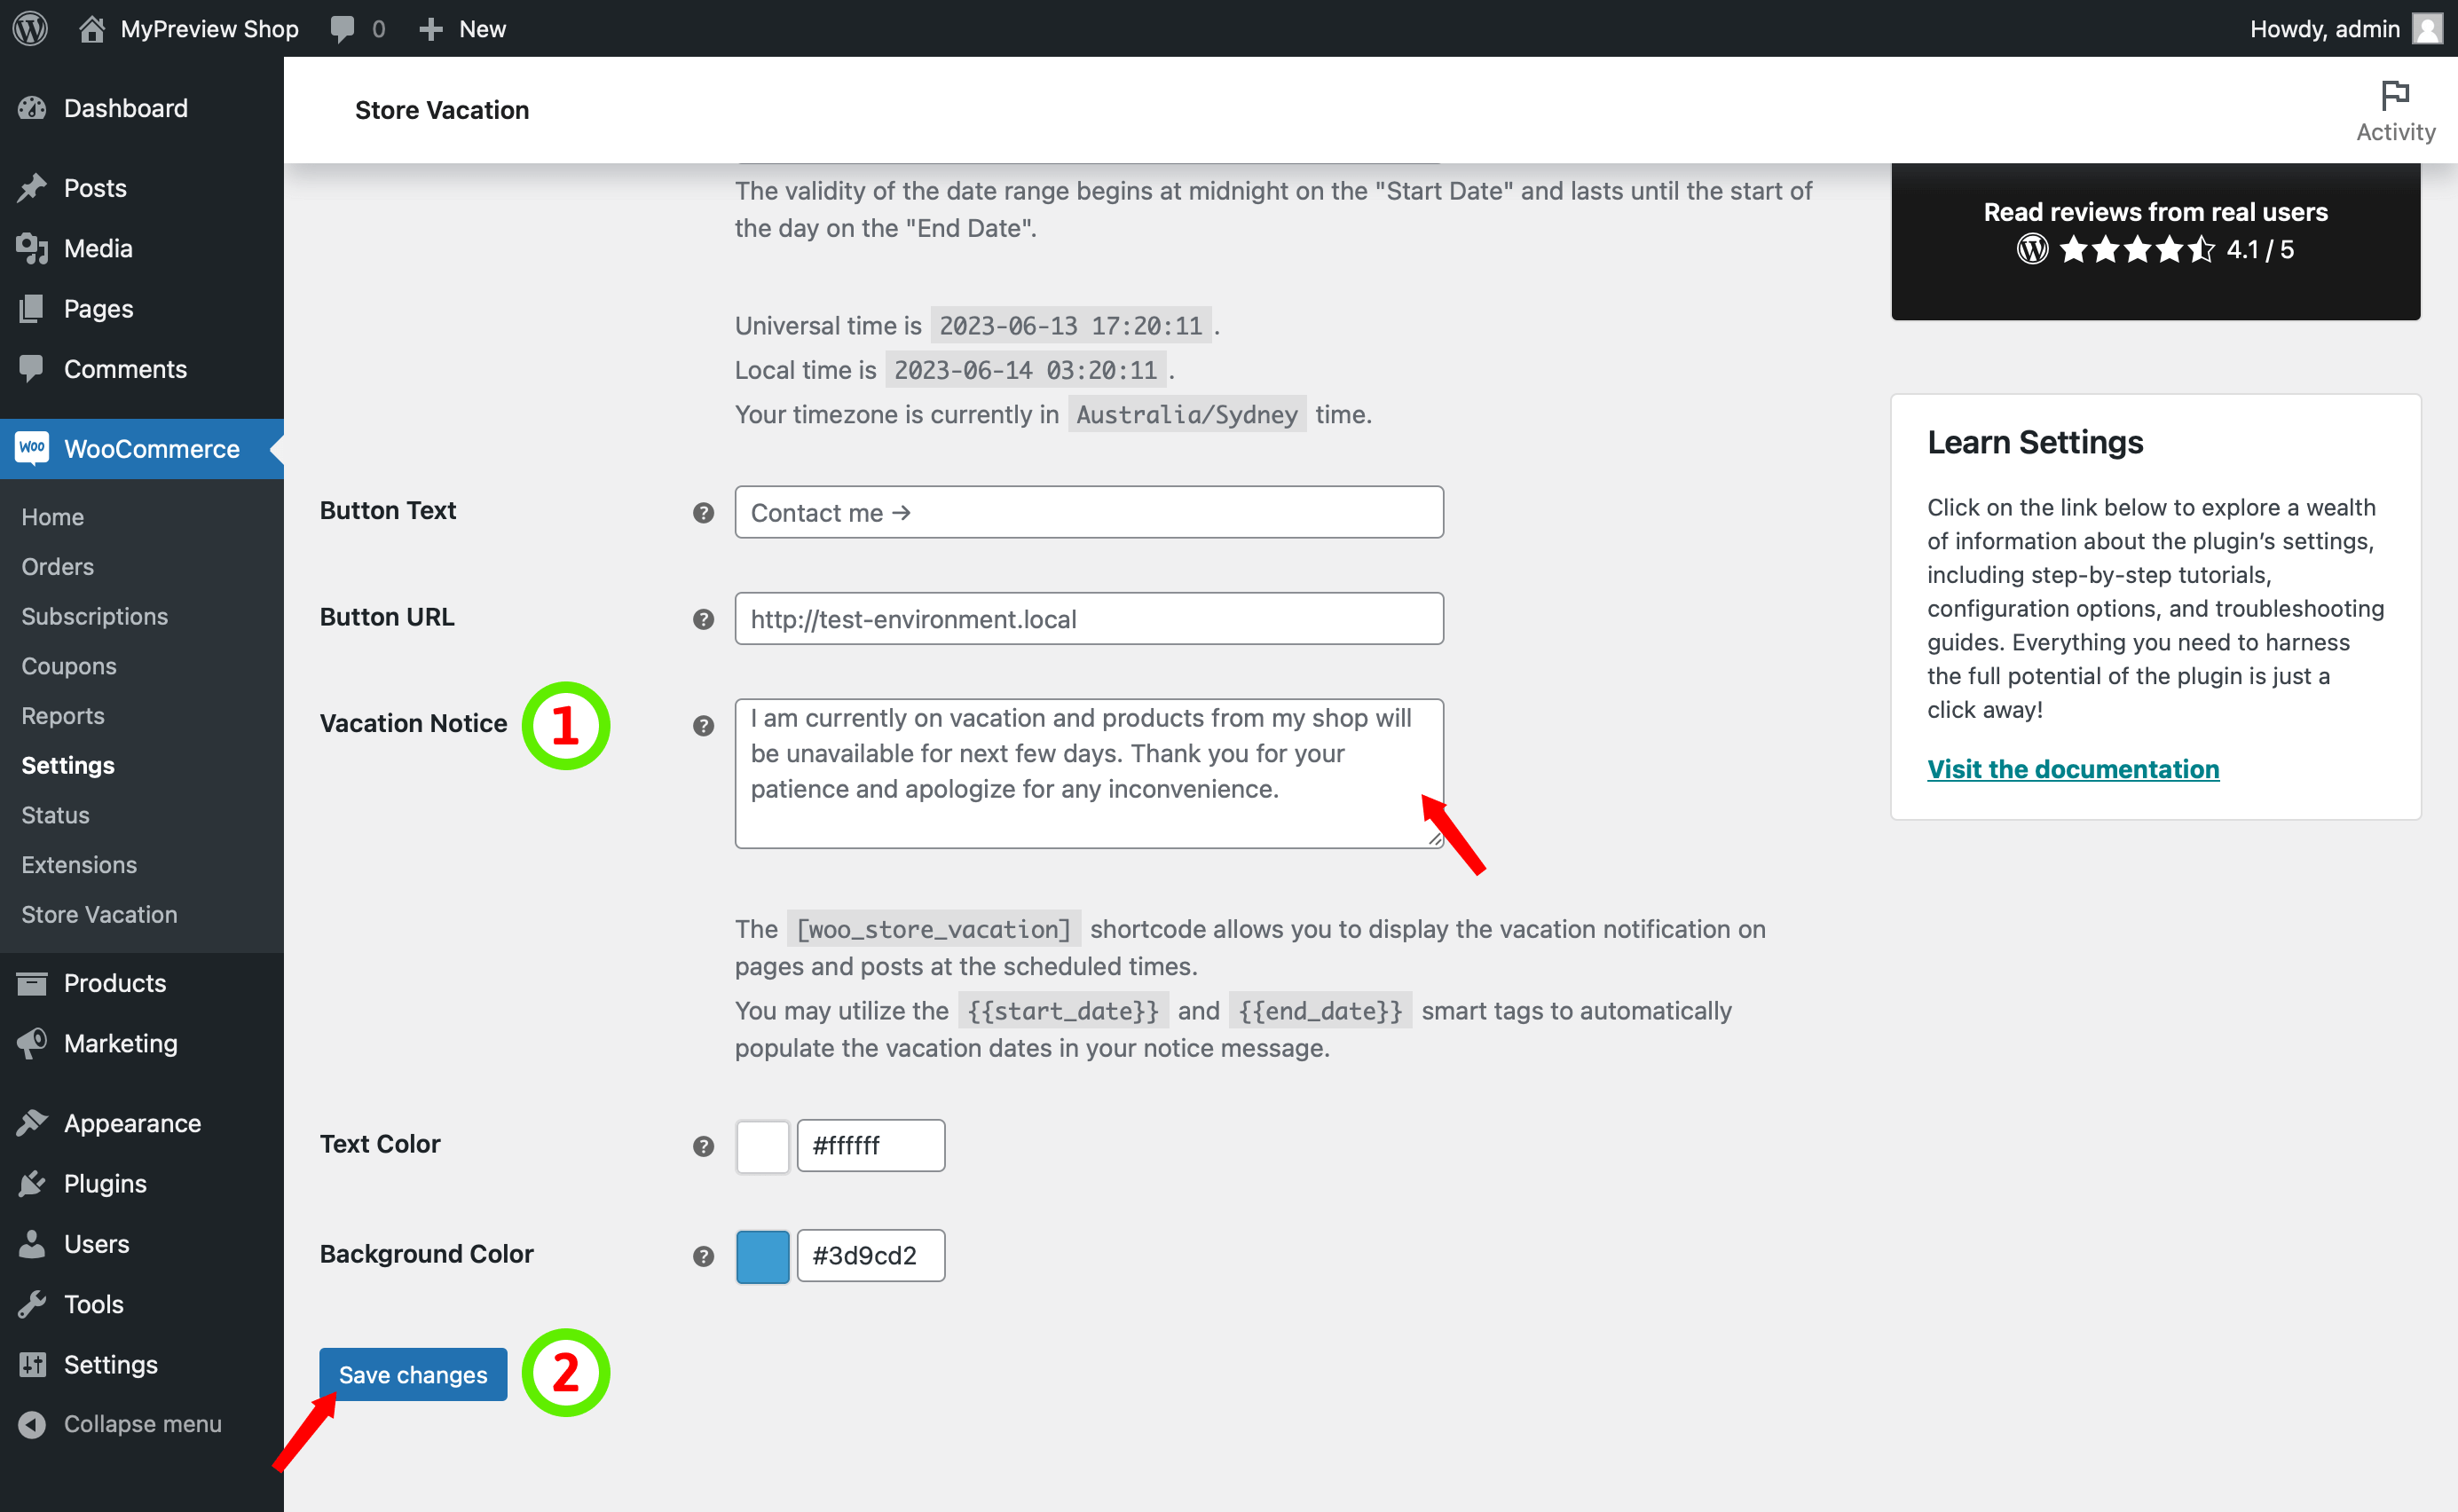
- Add Vacation Notice: Enter a message in the “Vacation Notice” field. This message will be displayed on your shop during the vacation period, informing your clients about your vacation mode and any relevant details.
- Save Changes: Click the “Save changes” button to save the modified vacation settings.
Adding Vacation Dates to Your Vacation Notice
To provide your customers with specific dates for your vacation, you can utilize smart tags within your vacation notice. By using the {{start_date}} and {{end_date}} smart tags, you can dynamically display the start and end dates of your vacation in your message. This allows your customers to have a clear understanding of the duration of your absence.
To incorporate the vacation dates into your notice, follow these steps:
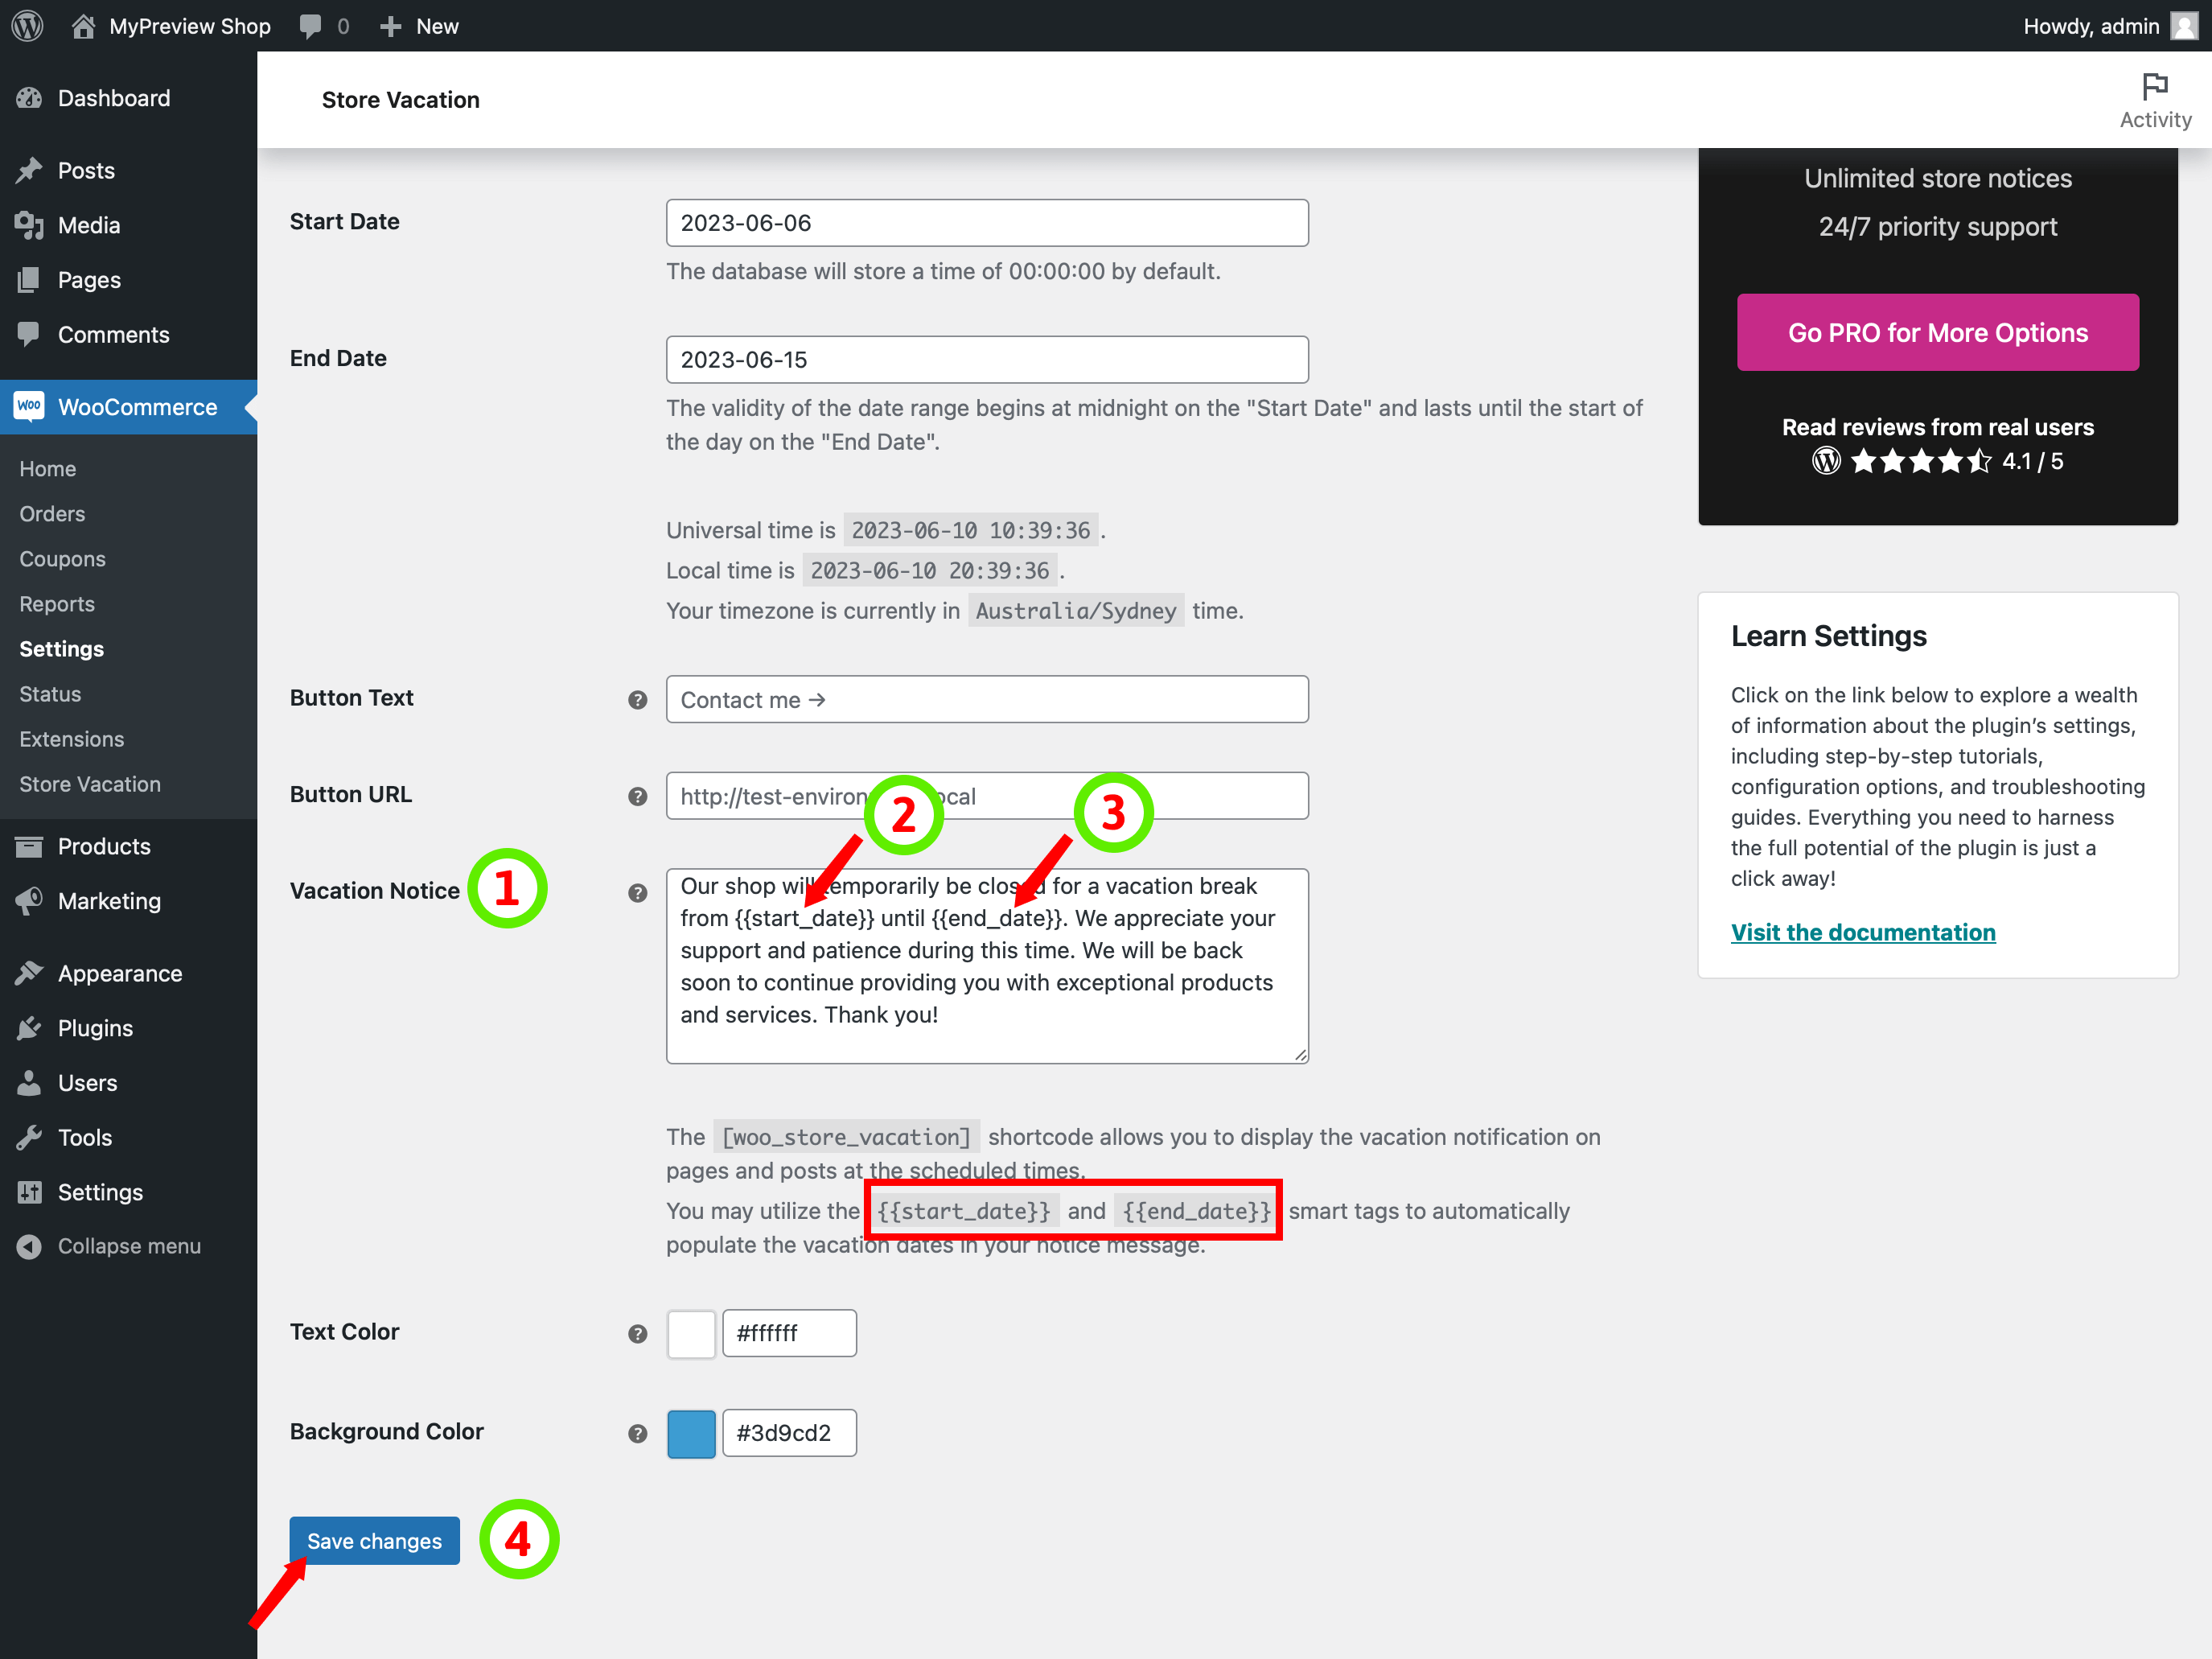
- Locate the Vacation Notice setting: Go to the General setting page of the Woo Store Vacation plugin. In this section, you will find the Vacation Notice field where you can enter and customize your vacation message.
-
Insert the start date: Within your vacation notice message, place the smart tag
{{start_date}}at the desired location where you want the start date of your vacation to appear. This smart tag will automatically be replaced with the actual start date when viewed on the notice. -
Include the return date: Similarly, insert the smart tag
{{end_date}}at the appropriate spot within your notice to indicate the date when you are returning from your vacation. This smart tag will be replaced with the actual end date when displayed on the notice. - Save Changes: Once you have customized your vacation notice with the desired content and smart tags, click on the “Save changes” button to save the modified settings.
By using the smart tags, your vacation notice will automatically display the respective dates. This way, they will have a clear understanding of when your shop will be closed and when you are expected to resume regular operations.
Remember to review your vacation notice to ensure that it provides all the necessary information and effectively communicates the dates of your vacation to your valued customers.
Adding a Call-to-Action Button to Your Vacation Notice
You can utilize the button fields in the plugin settings to provide an alternative action within your vacation notice, such as a link to contact information for customer support or additional details about your break. Adding call-to-action buttons can reduce potential inconvenience for your customers and offer them helpful resources. Here’s how you can do it:
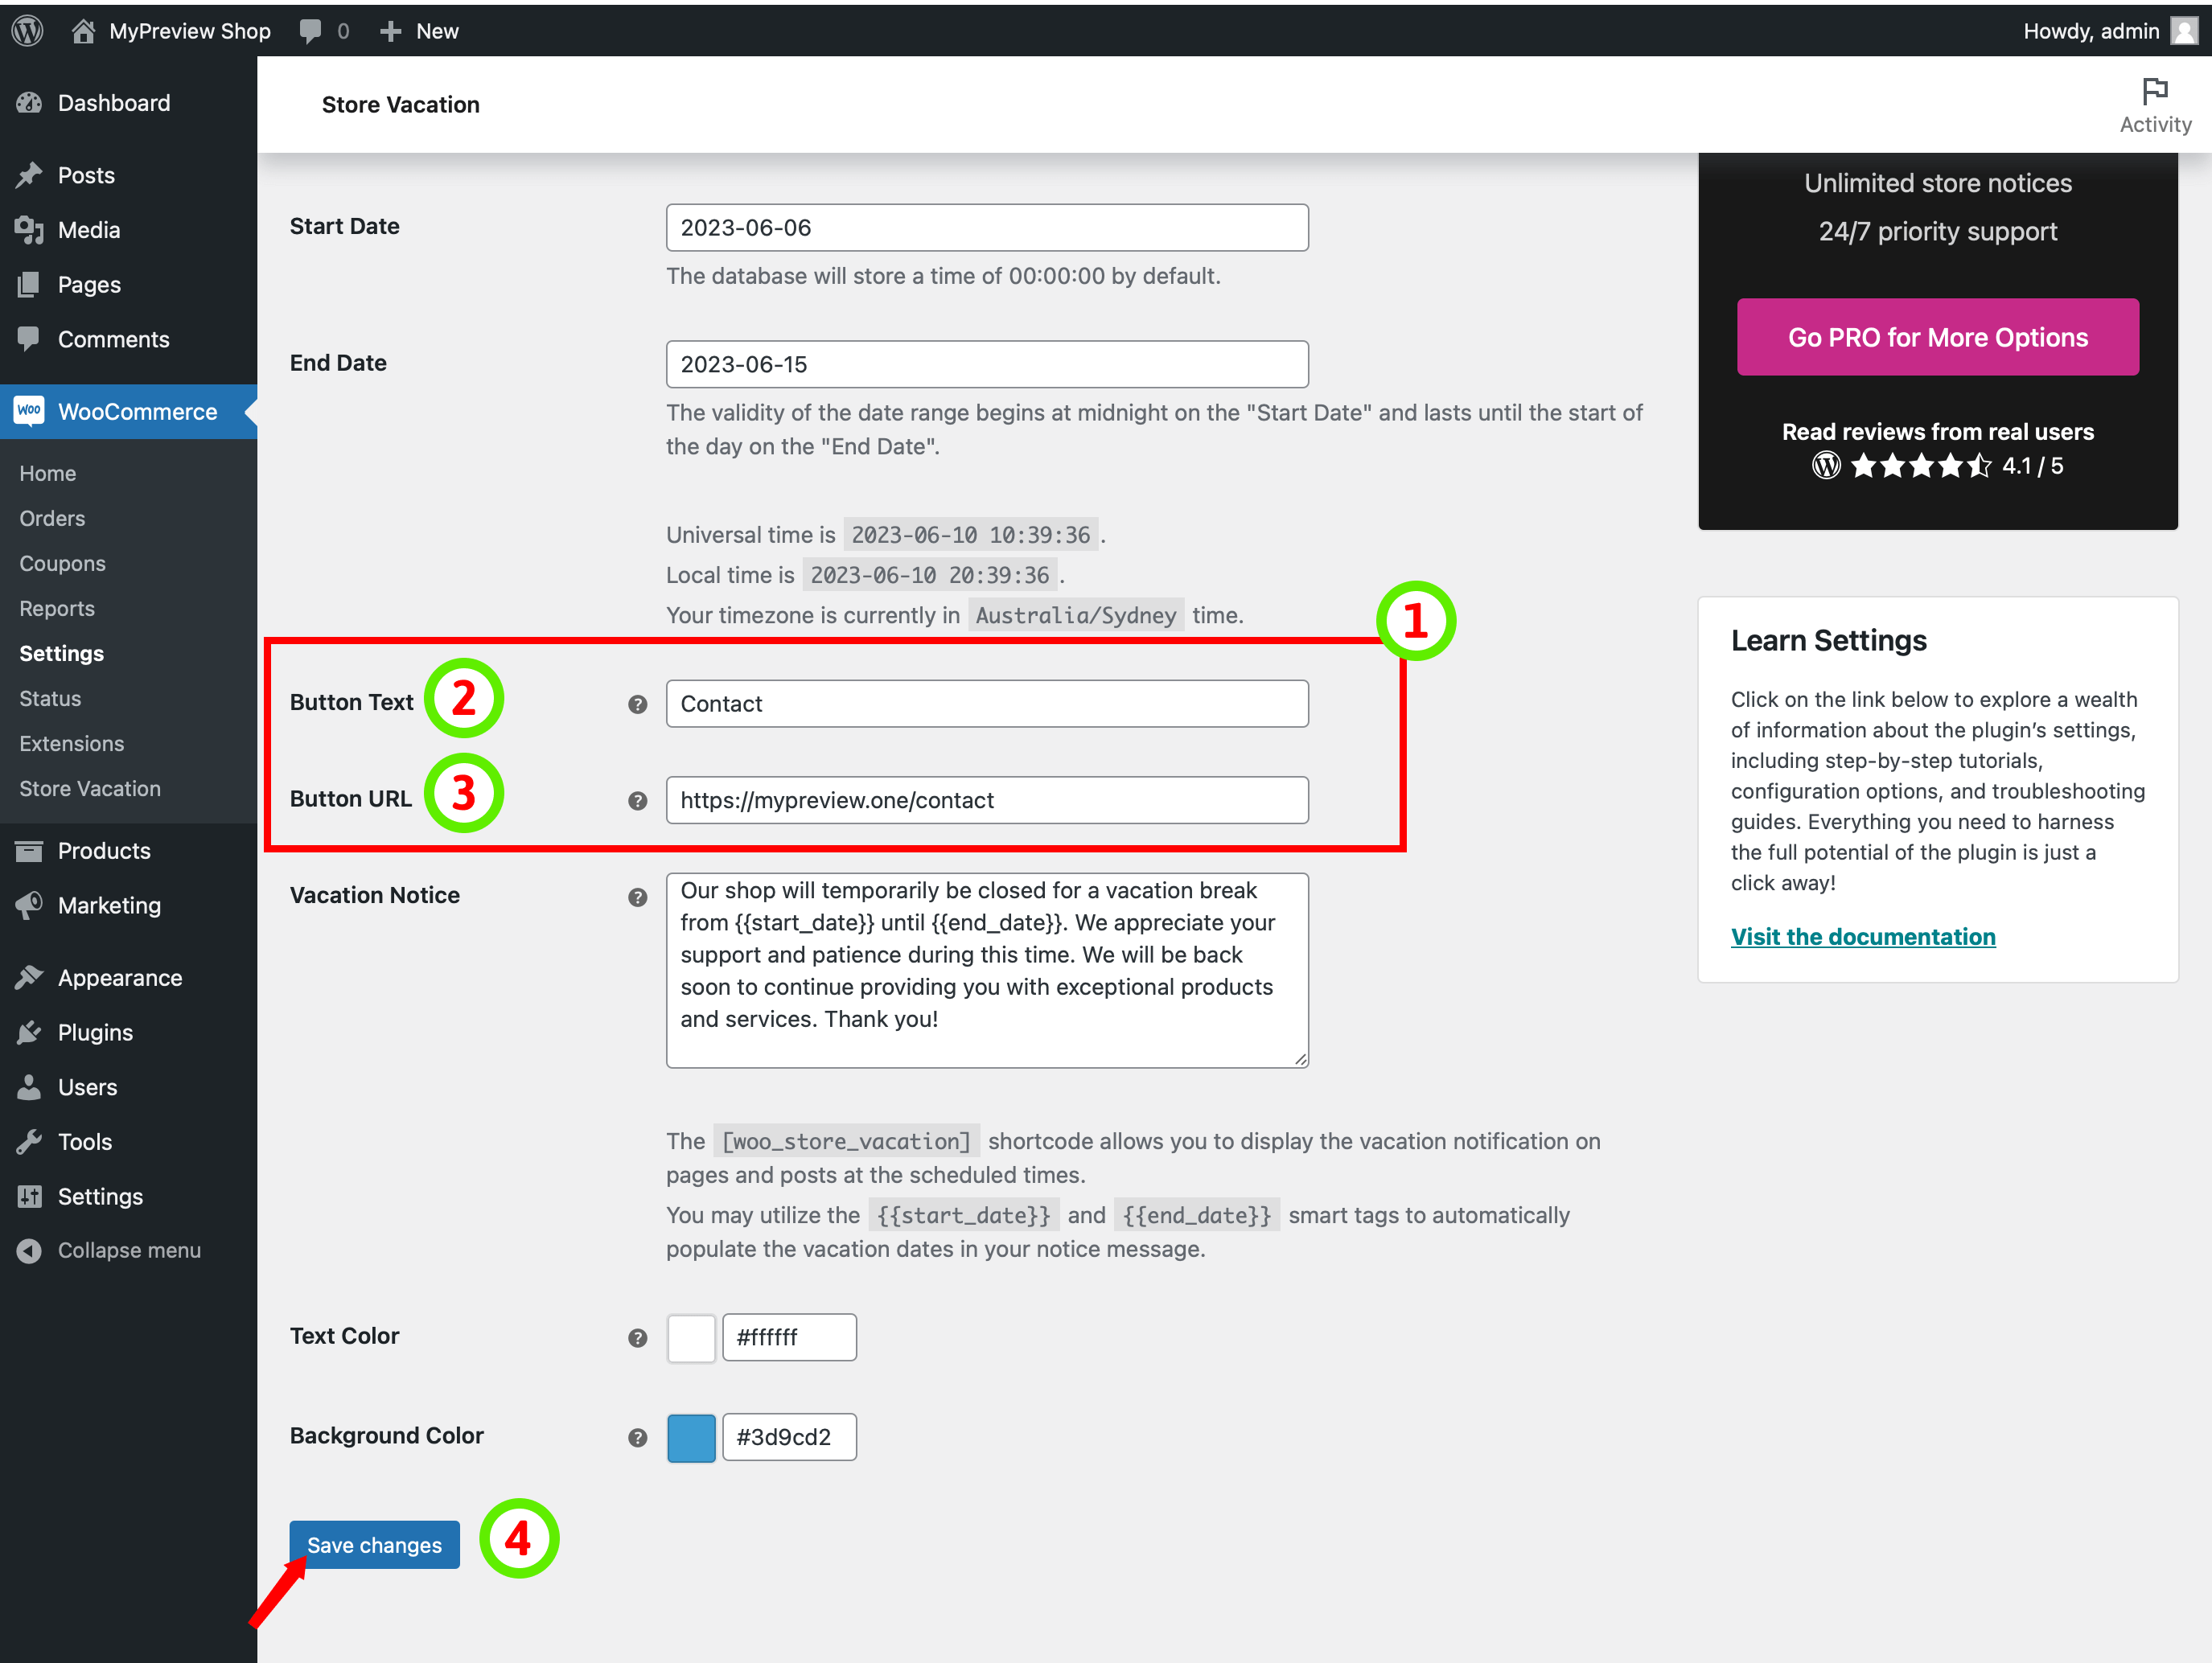
- Locate the Button fields: Visit the General setting page of the Woo Store Vacation plugin. Look for the button fields in this section, as they will allow you to add a call-to-action button to your vacation notice.
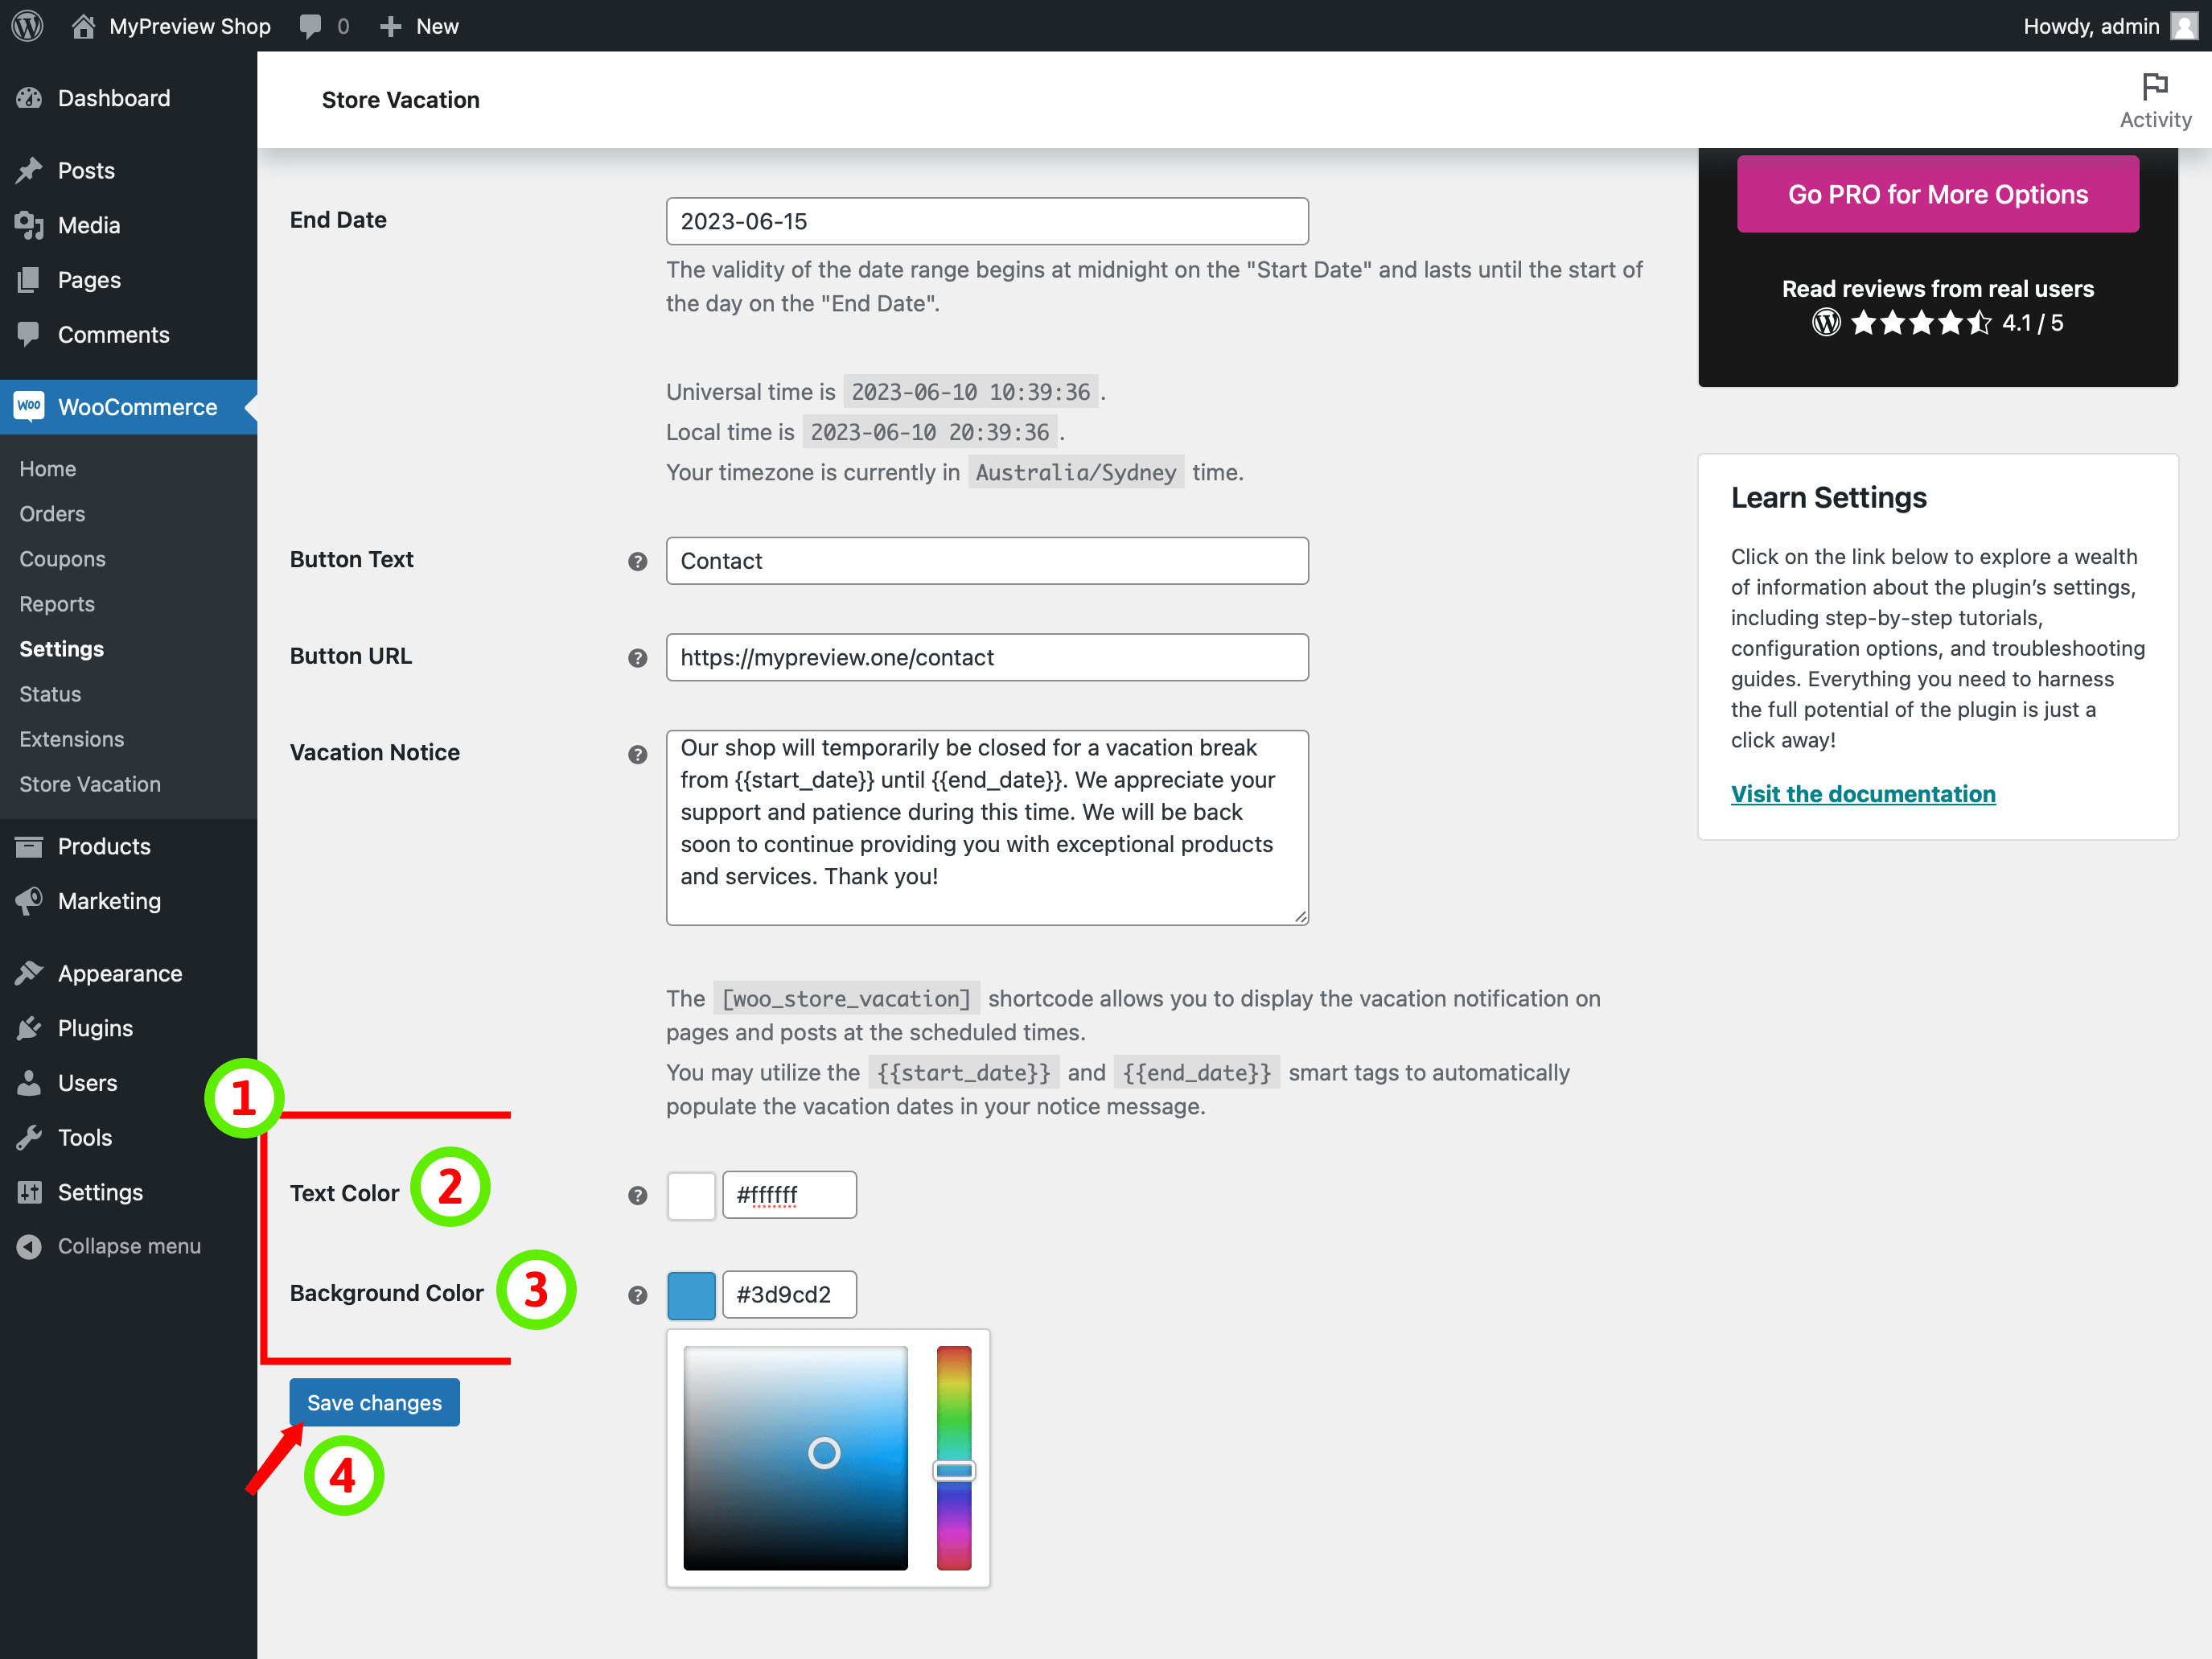
- Add Button Text: Enter the text you want to display on the call-to-action button. This text should be concise and compelling, encouraging users to take the desired action.
- Add Button URL: Provide the URL or link where you want users to be directed when they click on the button. This could be a webpage with customer support information, FAQs, or any other relevant details related to your vacation.
- Save Changes: Once you have entered the button text and URL, click on the “Save Changes” button to save your modified settings.
By following these steps, you can enhance your vacation notice by containing a call-to-action button. This button will provide users with an alternative option and direct them to a valuable resource, minimizing any potential inconvenience and improving their overall experience while you’re on vacation.
Customizing the Vacation Notice Color Scheme
To ensure your vacation notice aligns with your store’s branding, you have the option to customize the color scheme. Follow these steps to personalize the text and background colors of your vacation notice:
- Locate the Color Pickers: Navigate to the General setting page of the Woo Store Vacation plugin. In this section, you will find the text color and background color fields specifically designed for customizing the color scheme.
- Choose Text Color: Click on the text color field and select a color from the color picker or enter the hex code representing your desired text color.
- Choose Background Color: Similarly, click on the background color field, select a color from the color picker, or input the hex code for your preferred background color.
- Save Changes: Once you have selected the desired text and background colors, click on the “Save Changes” button to save your modified color scheme settings.
By following these steps, you can customize the color scheme of your vacation notice, allowing it to seamlessly integrate with your store’s branding. This customization adds a touch of personalization to your notice, ensuring it visually aligns with your overall store aesthetic.
Customizing Product Availability with Conditions Settings
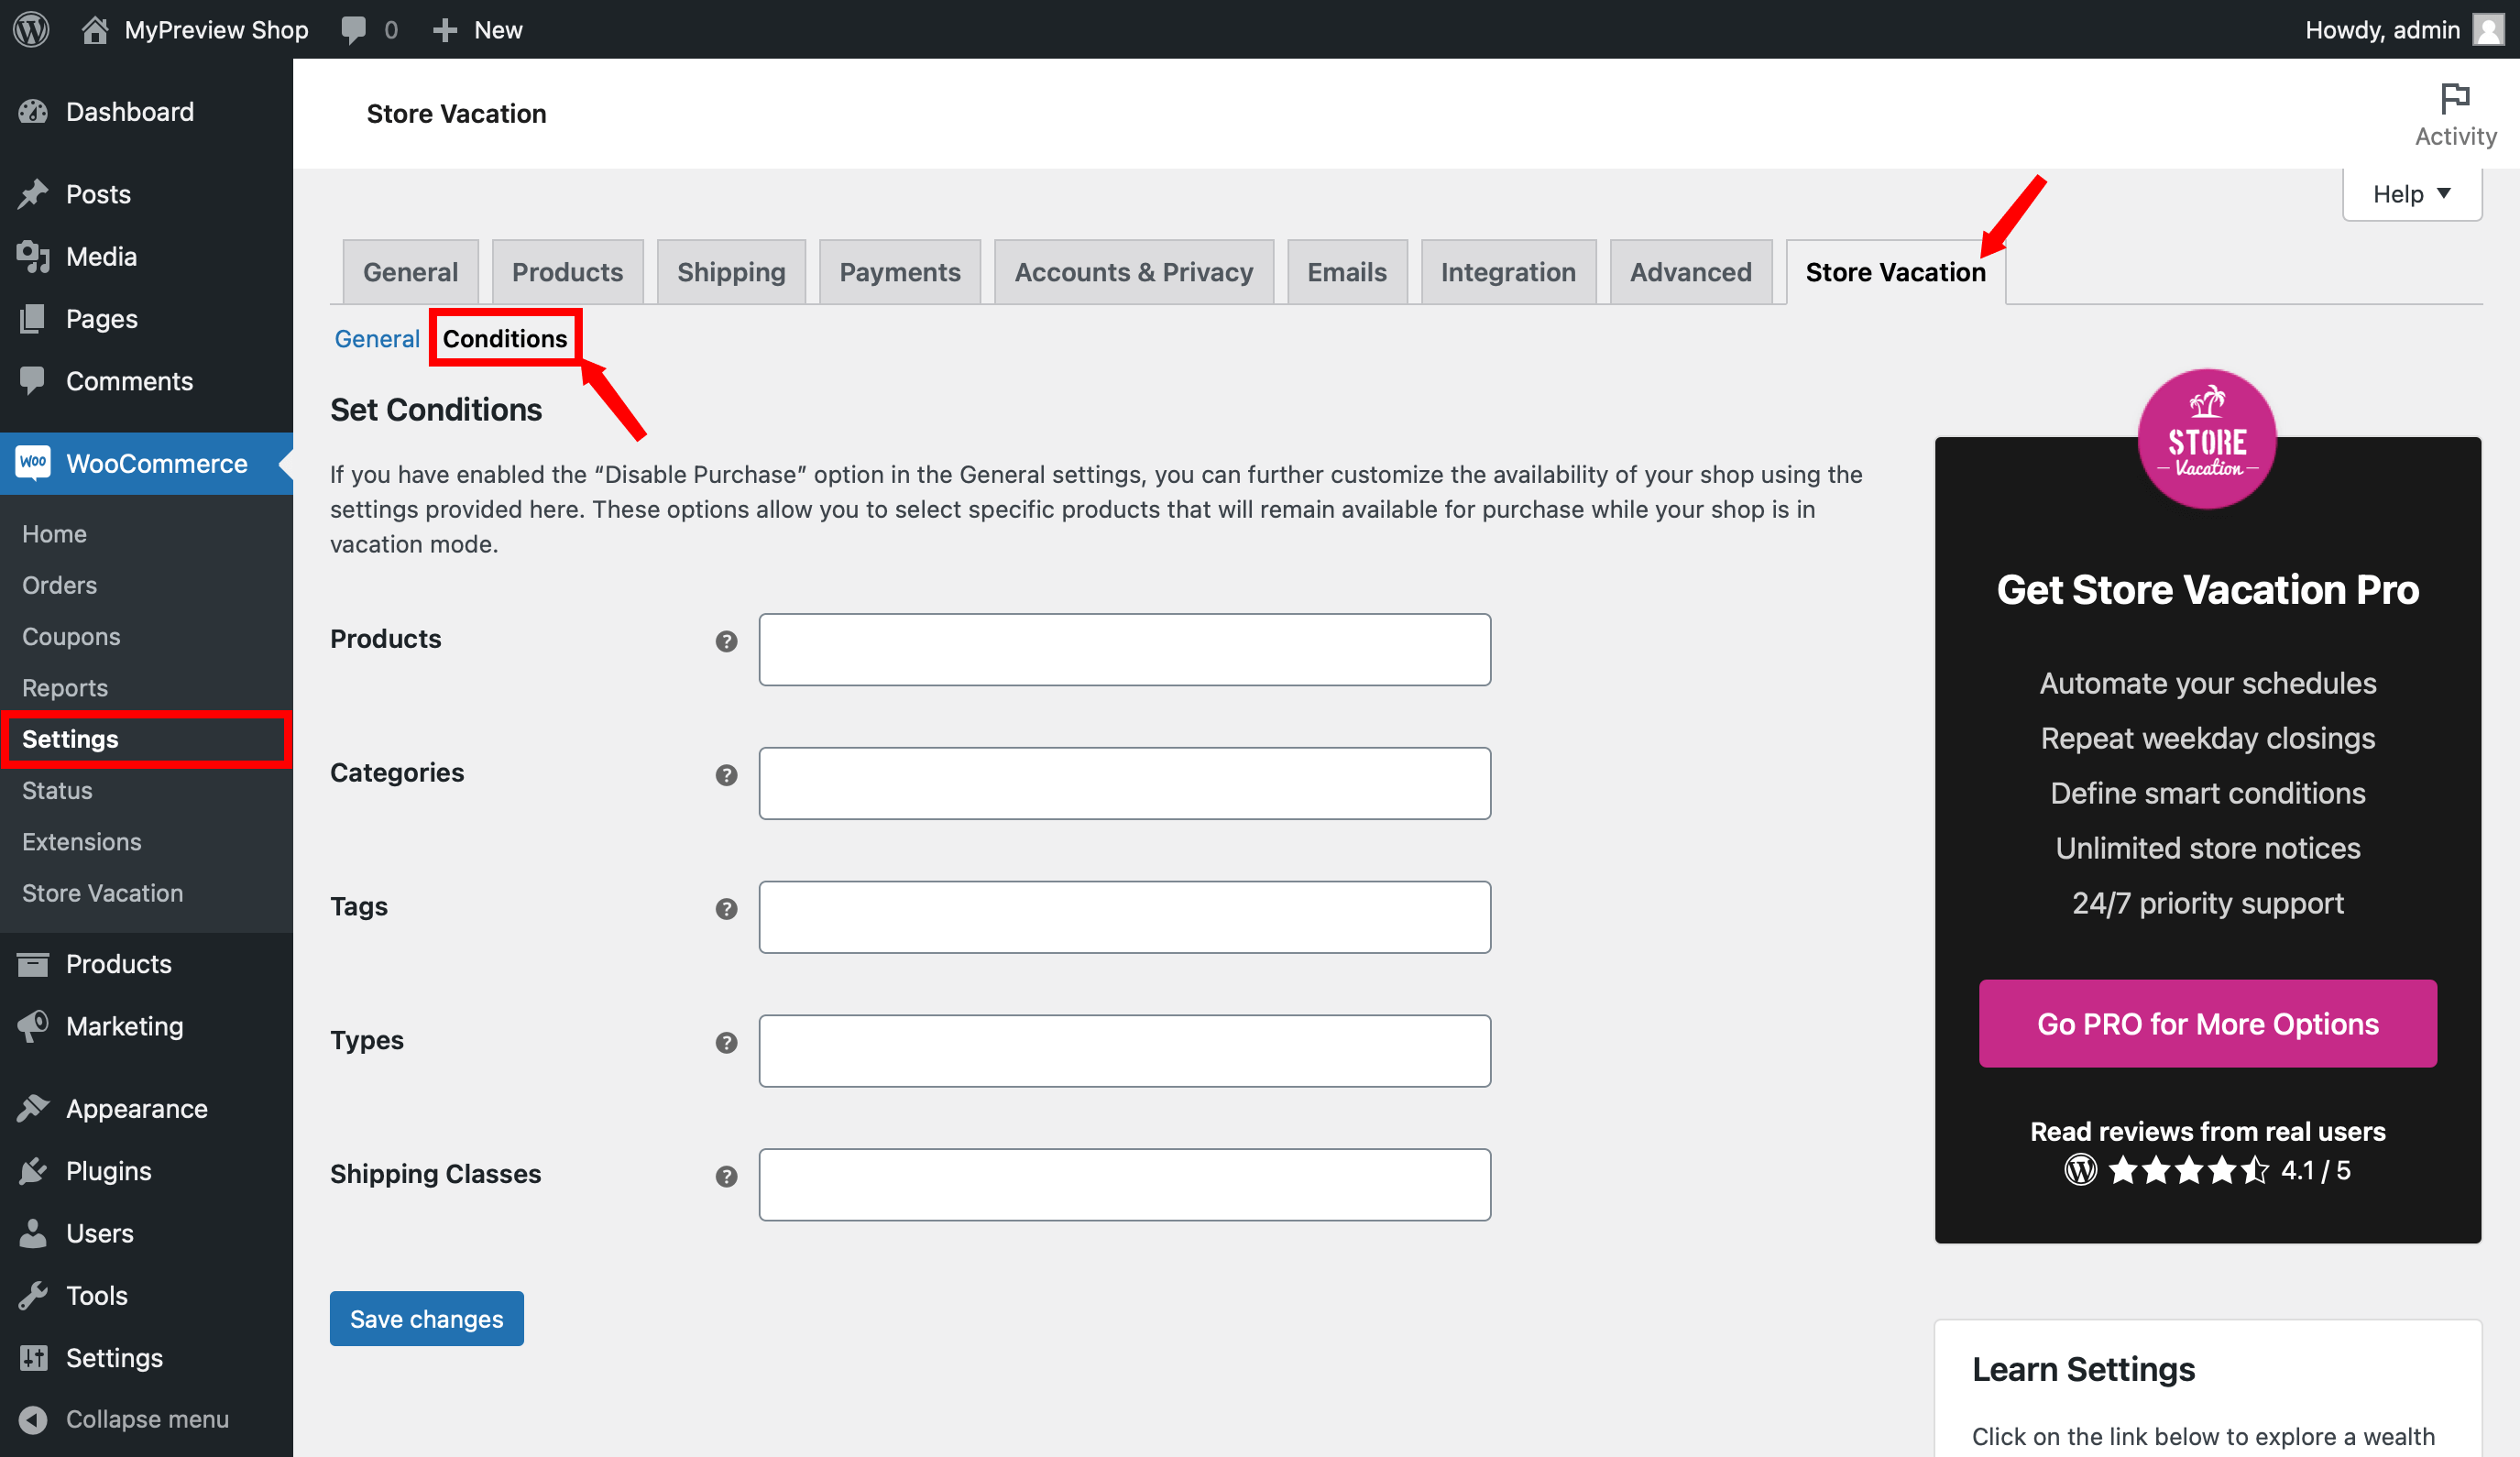
The Conditions settings in the plugin provide you with the flexibility to customize product availability during vacation mode. When you have selected the “Disable Purchase” option in the General settings to remove the ability to add products to the cart, the Conditions settings allow you to keep certain products purchasable selectively.
To reach the Conditions Settings, go to the Conditions page in the plugin’s settings. This page allows you to define specific conditions for product availability during vacation mode.
Excluding Products from Vacation Mode
You have the option to exclude specific products from being affected by the vacation mode, allowing them to remain available for purchase. By following these steps, you can utilize the Conditions settings to specify products to be excluded during the vacation period:

- Access the Conditions Page: From the store vacation settings, navigate to the Conditions page.
- Select Products: Choose the products you want to exclude from vacation mode. These selected products will still be purchasable by customers.
- Save Changes: Once you have chosen the desired products, click on the “Save changes” button to save the modified conditions settings.
By following these steps, you can customize your vacation mode to allow specific products to remain available for purchase. This gives you the flexibility to continue selling certain items, while your store is closed for vacation. Remember to review your selections and ensure they align with your intended vacation plans before saving the changes.
Excluding Categories from Vacation Mode
To ensure that specific categories of products remain available for purchase during your vacation period, you can utilize the Conditions settings to exclude them from the vacation mode. Follow these steps to specify categories to be excluded during the vacation period:
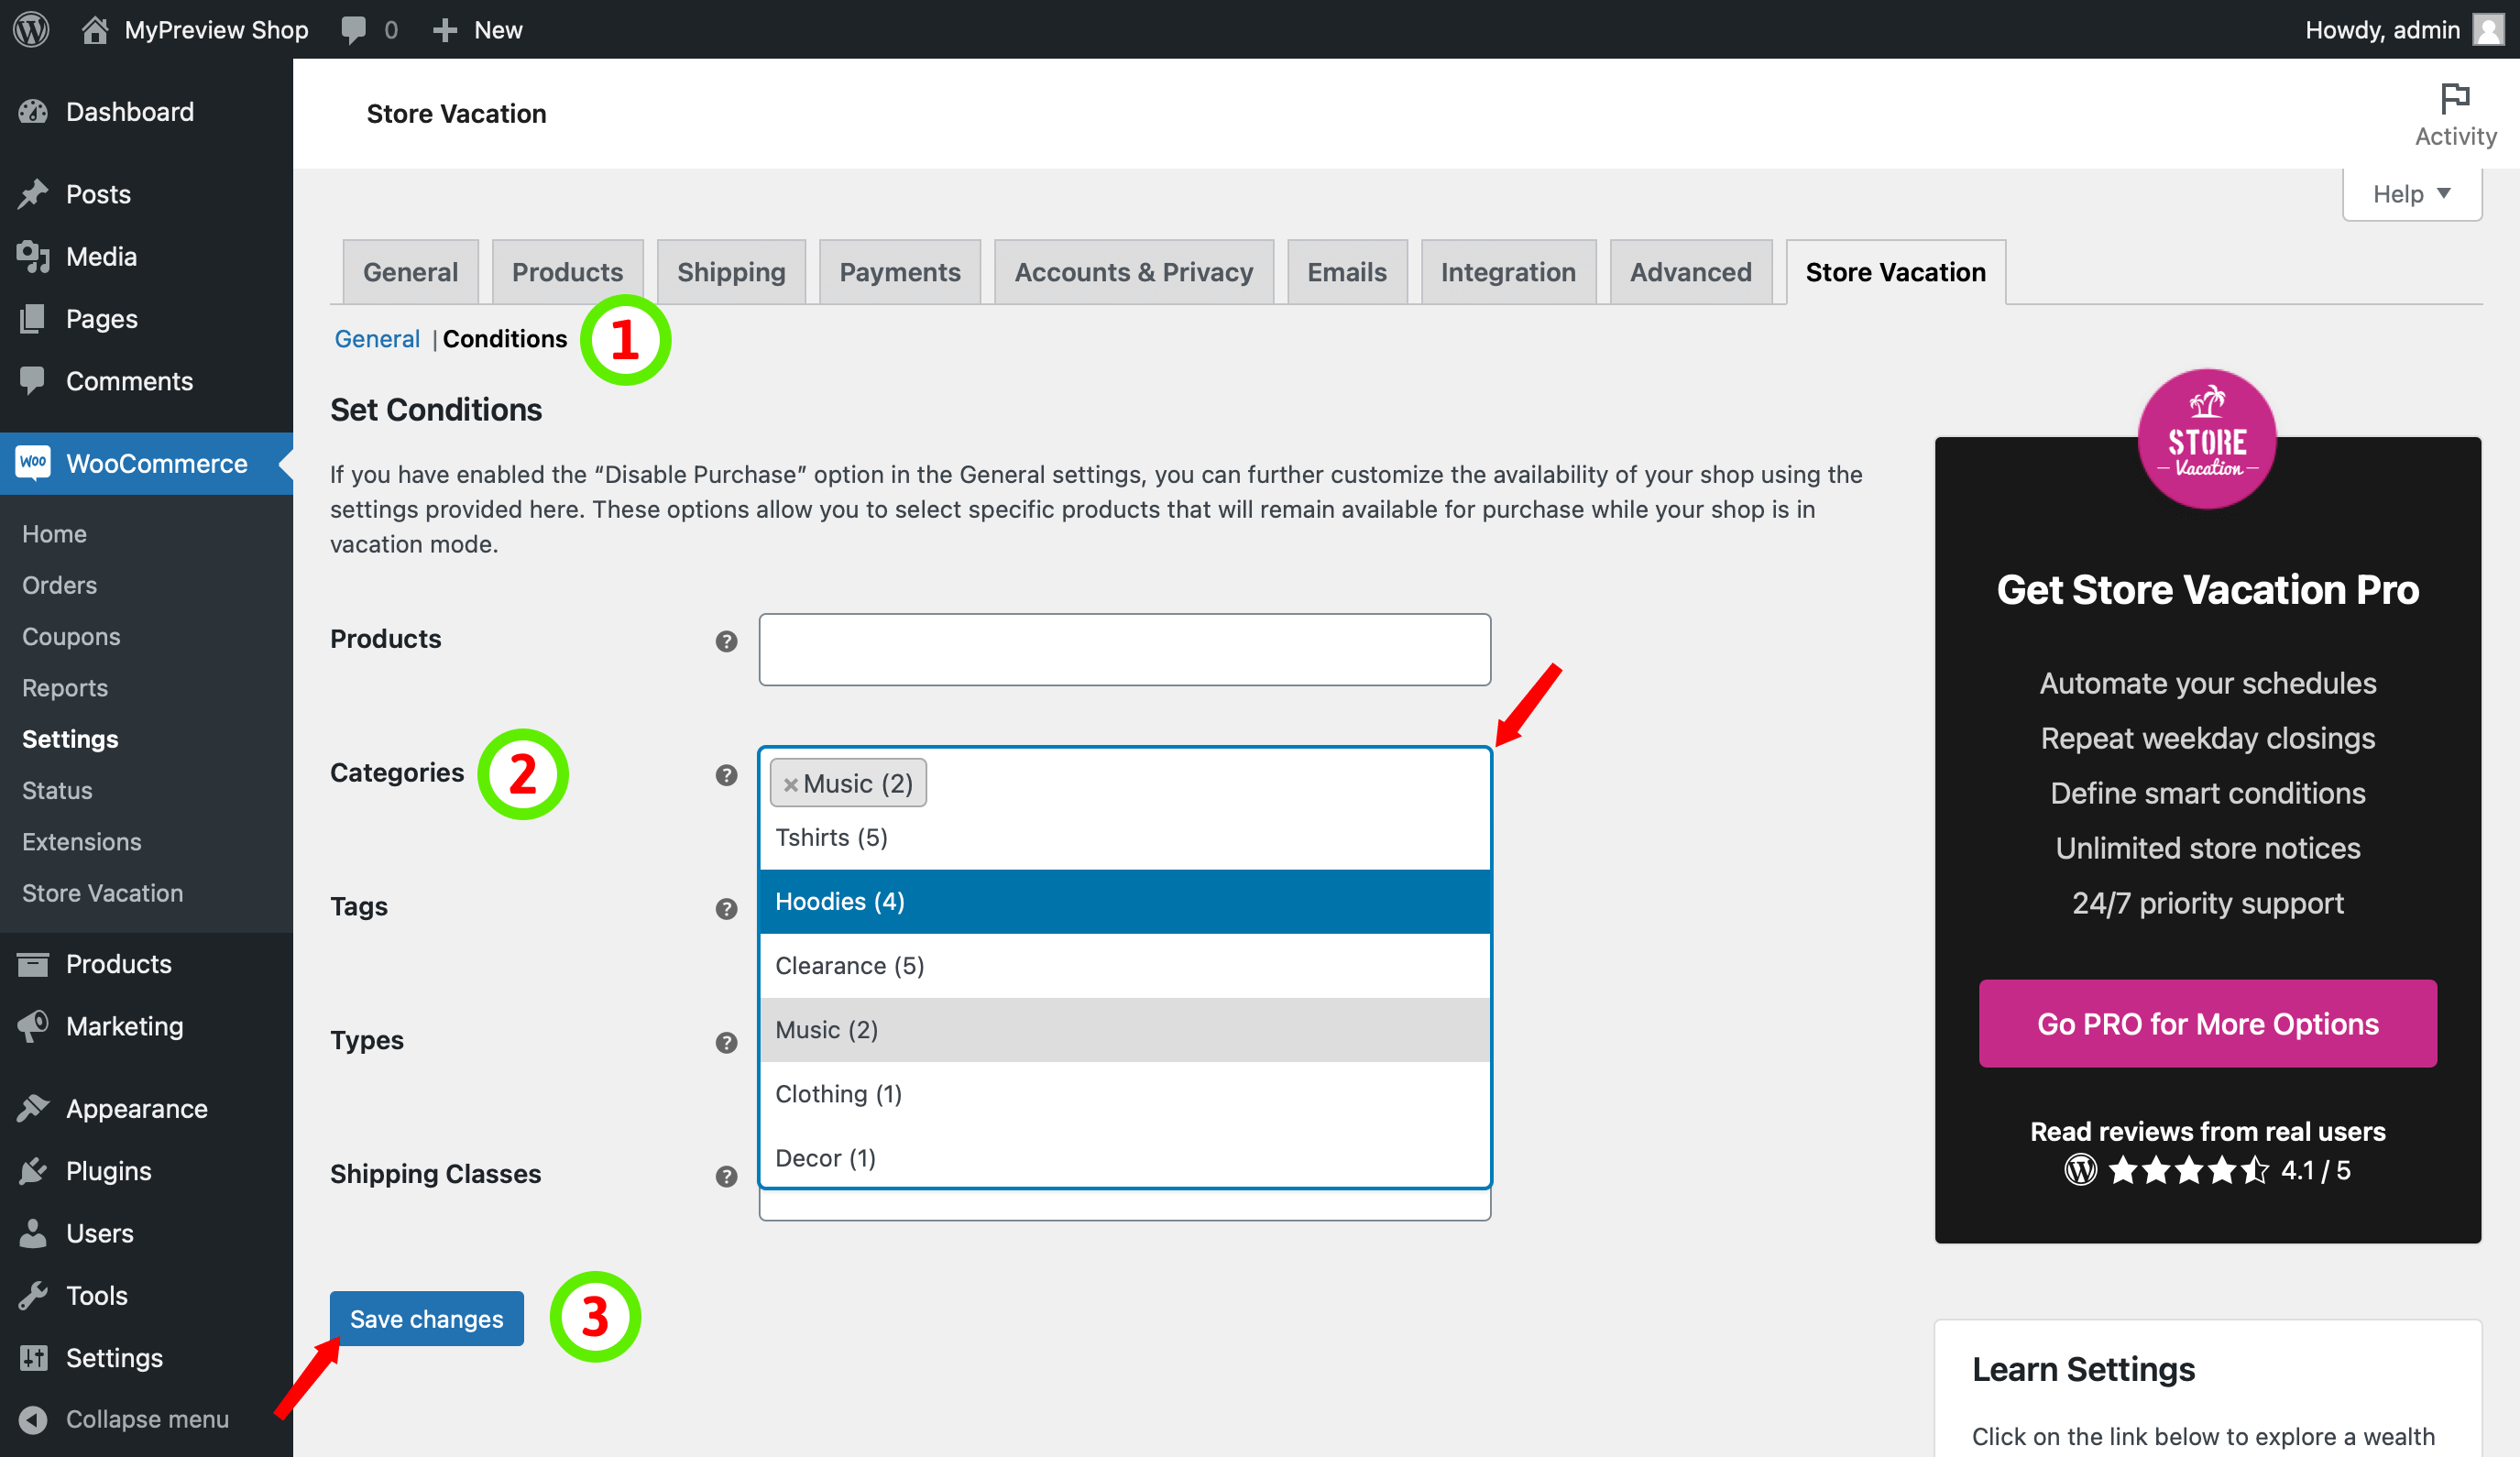
- Access the Conditions Page: Navigate to the Conditions page within the store vacation settings.
- Select Categories: Choose the categories you want to exclude from the vacation mode. By excluding these categories, the products within them will still be purchasable by customers.
- Save Changes: Once you have chosen the desired categories, click on the “Save changes” button to save the modified conditions settings.
By following these steps, you can customize your vacation mode to ensure that specific categories of products remain available for purchase. This flexibility allows you to continue selling items from these excluded categories during your break.
Excluding Tags from Vacation Mode
To maintain the availability of specific tagged products for purchase during your vacation period, you can utilize the Conditions settings to exclude them from the vacation mode. Follow these steps to specify tags to be excluded during the vacation period:
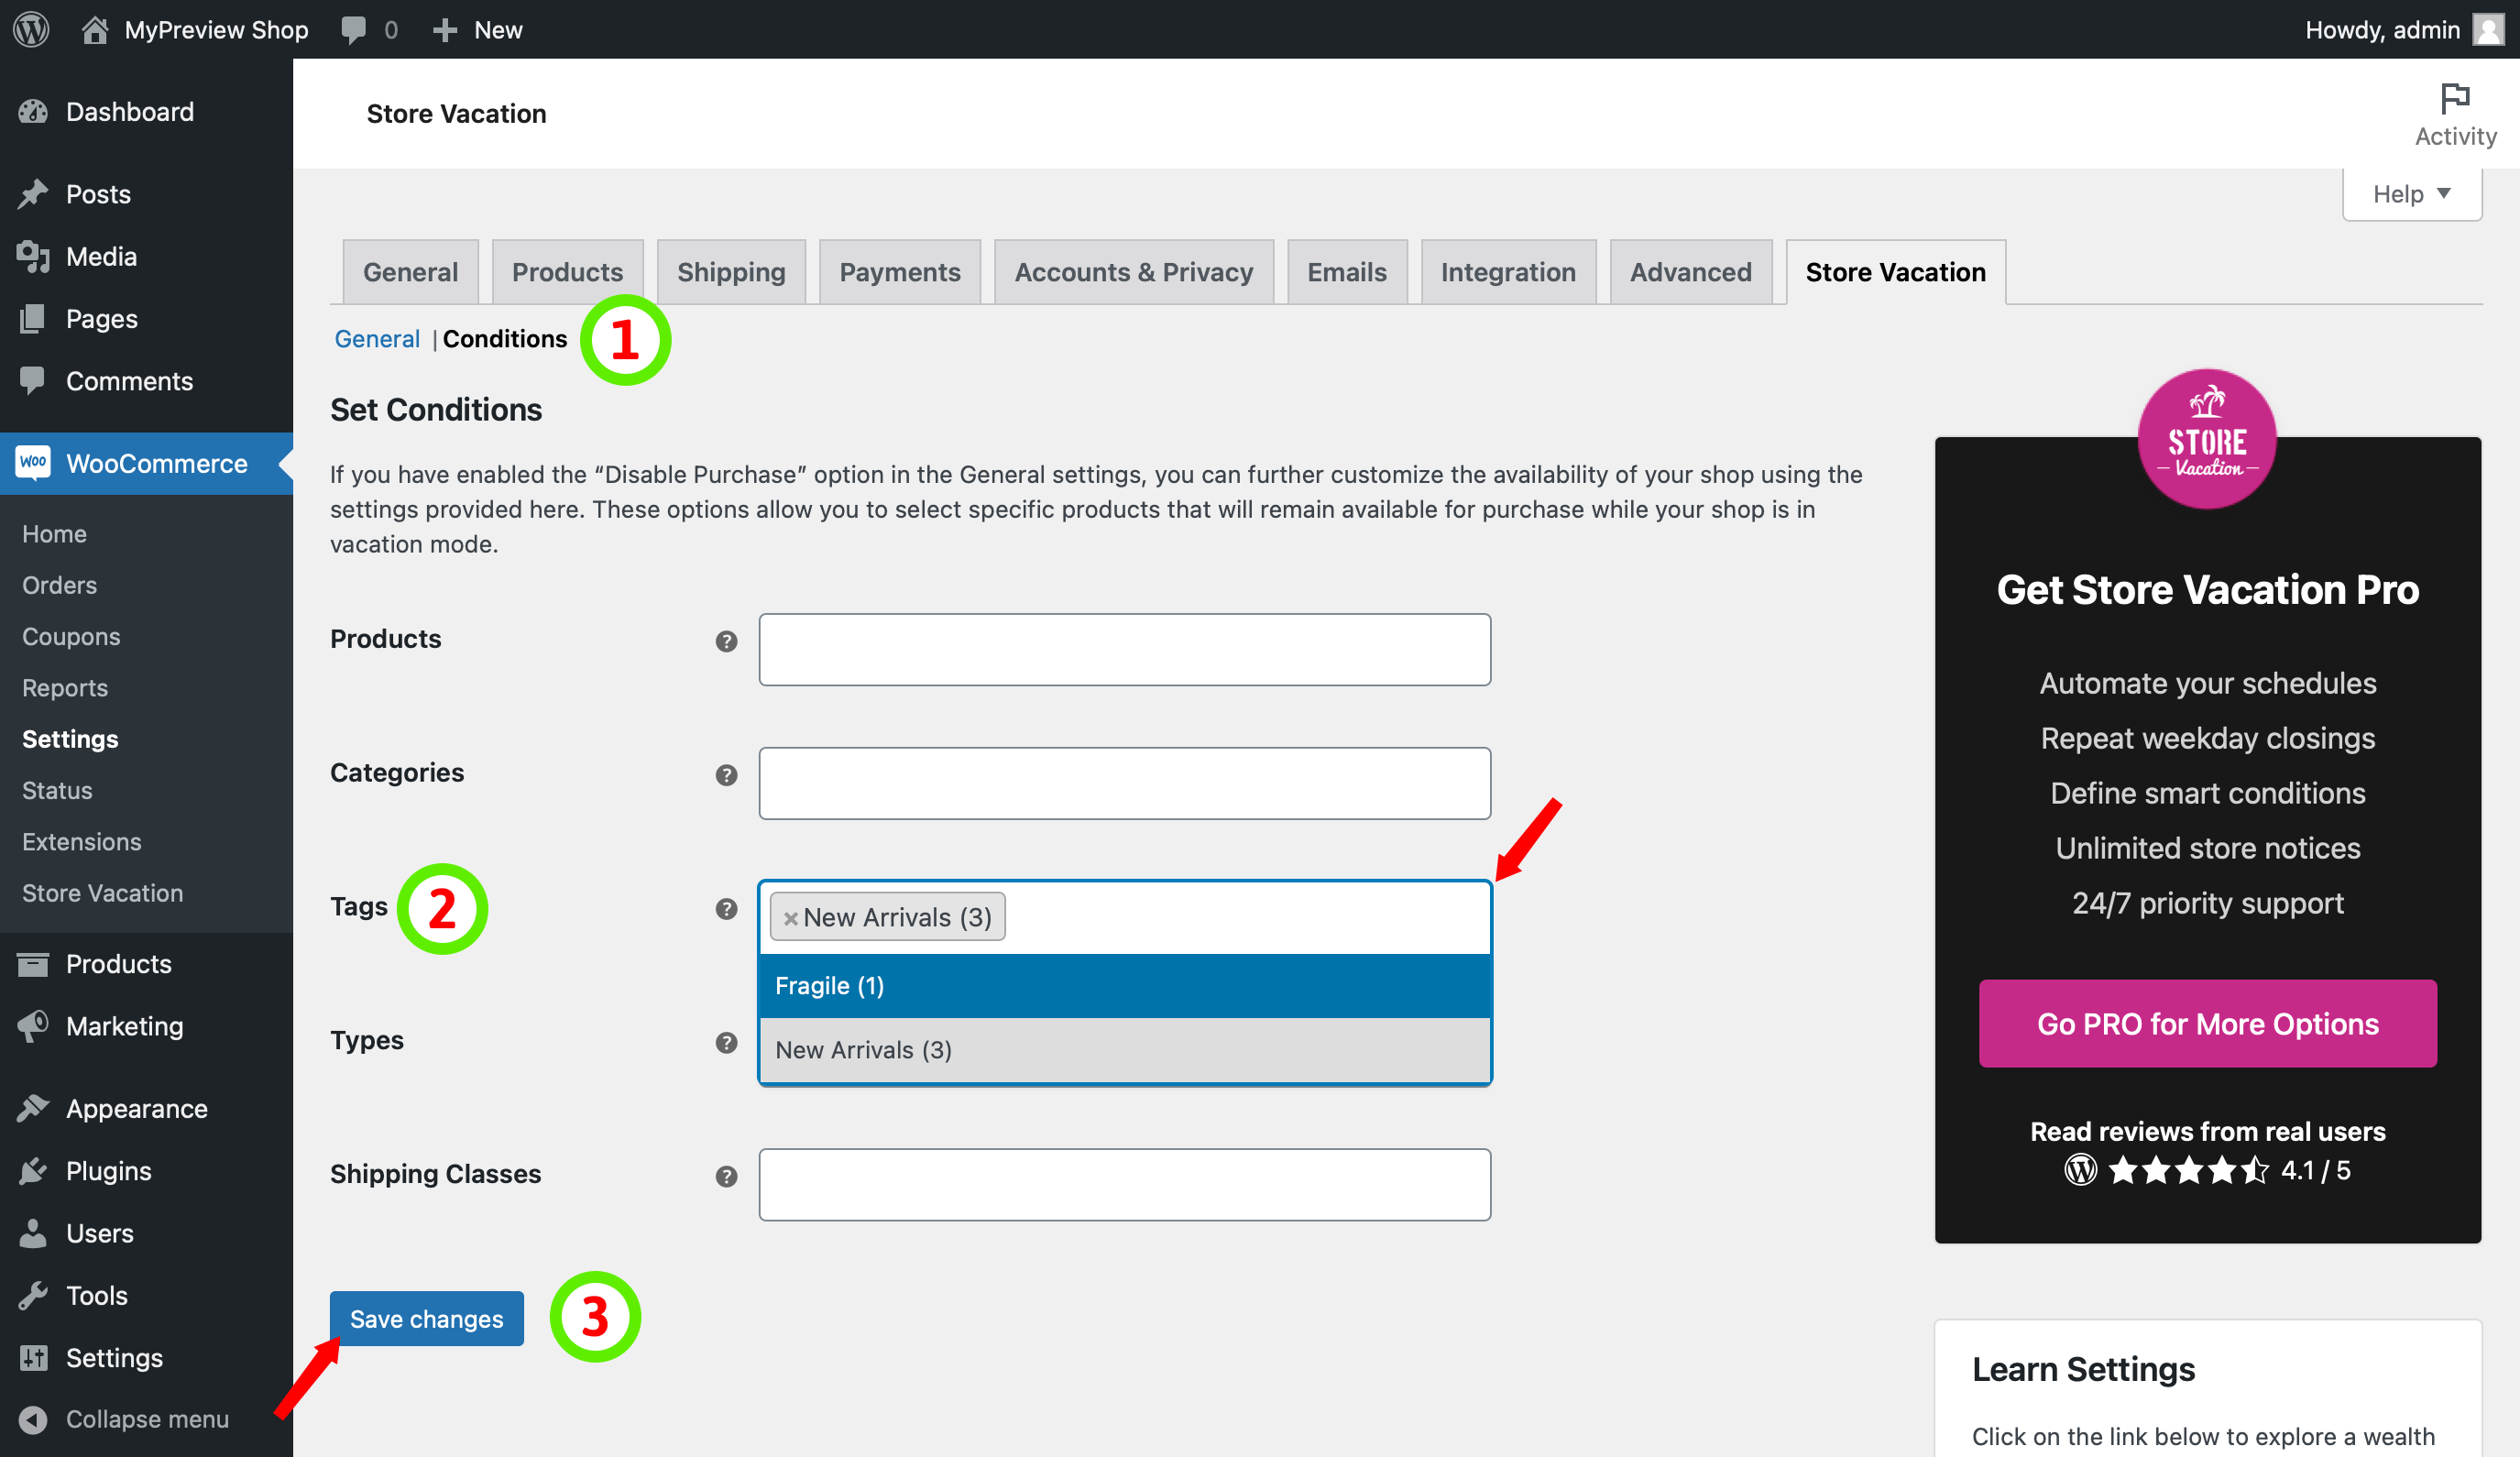
- Access the Conditions Page: Navigate to the Conditions page within the store vacation settings.
- Select Tags: Choose the tags you want to exclude from the vacation mode. By excluding these tags, the products associated with them will remain purchasable by customers.
- Save Changes: Once you have chosen the desired tags, click on the “Save changes” button to save the modified conditions settings.
By following these steps, you can customize your vacation mode to ensure that specific tags of products remain available for purchase. This flexibility allows you to continue selling items associated with these excluded tags and tailor your vacation mode according to your preferences.
Excluding Product Types from Vacation Mode
To ensure that specific types of products remain available for purchase during your vacation period, you can utilize the Conditions settings to exclude them from the vacation mode. Follow these steps to specify the types to be excluded during the vacation period:
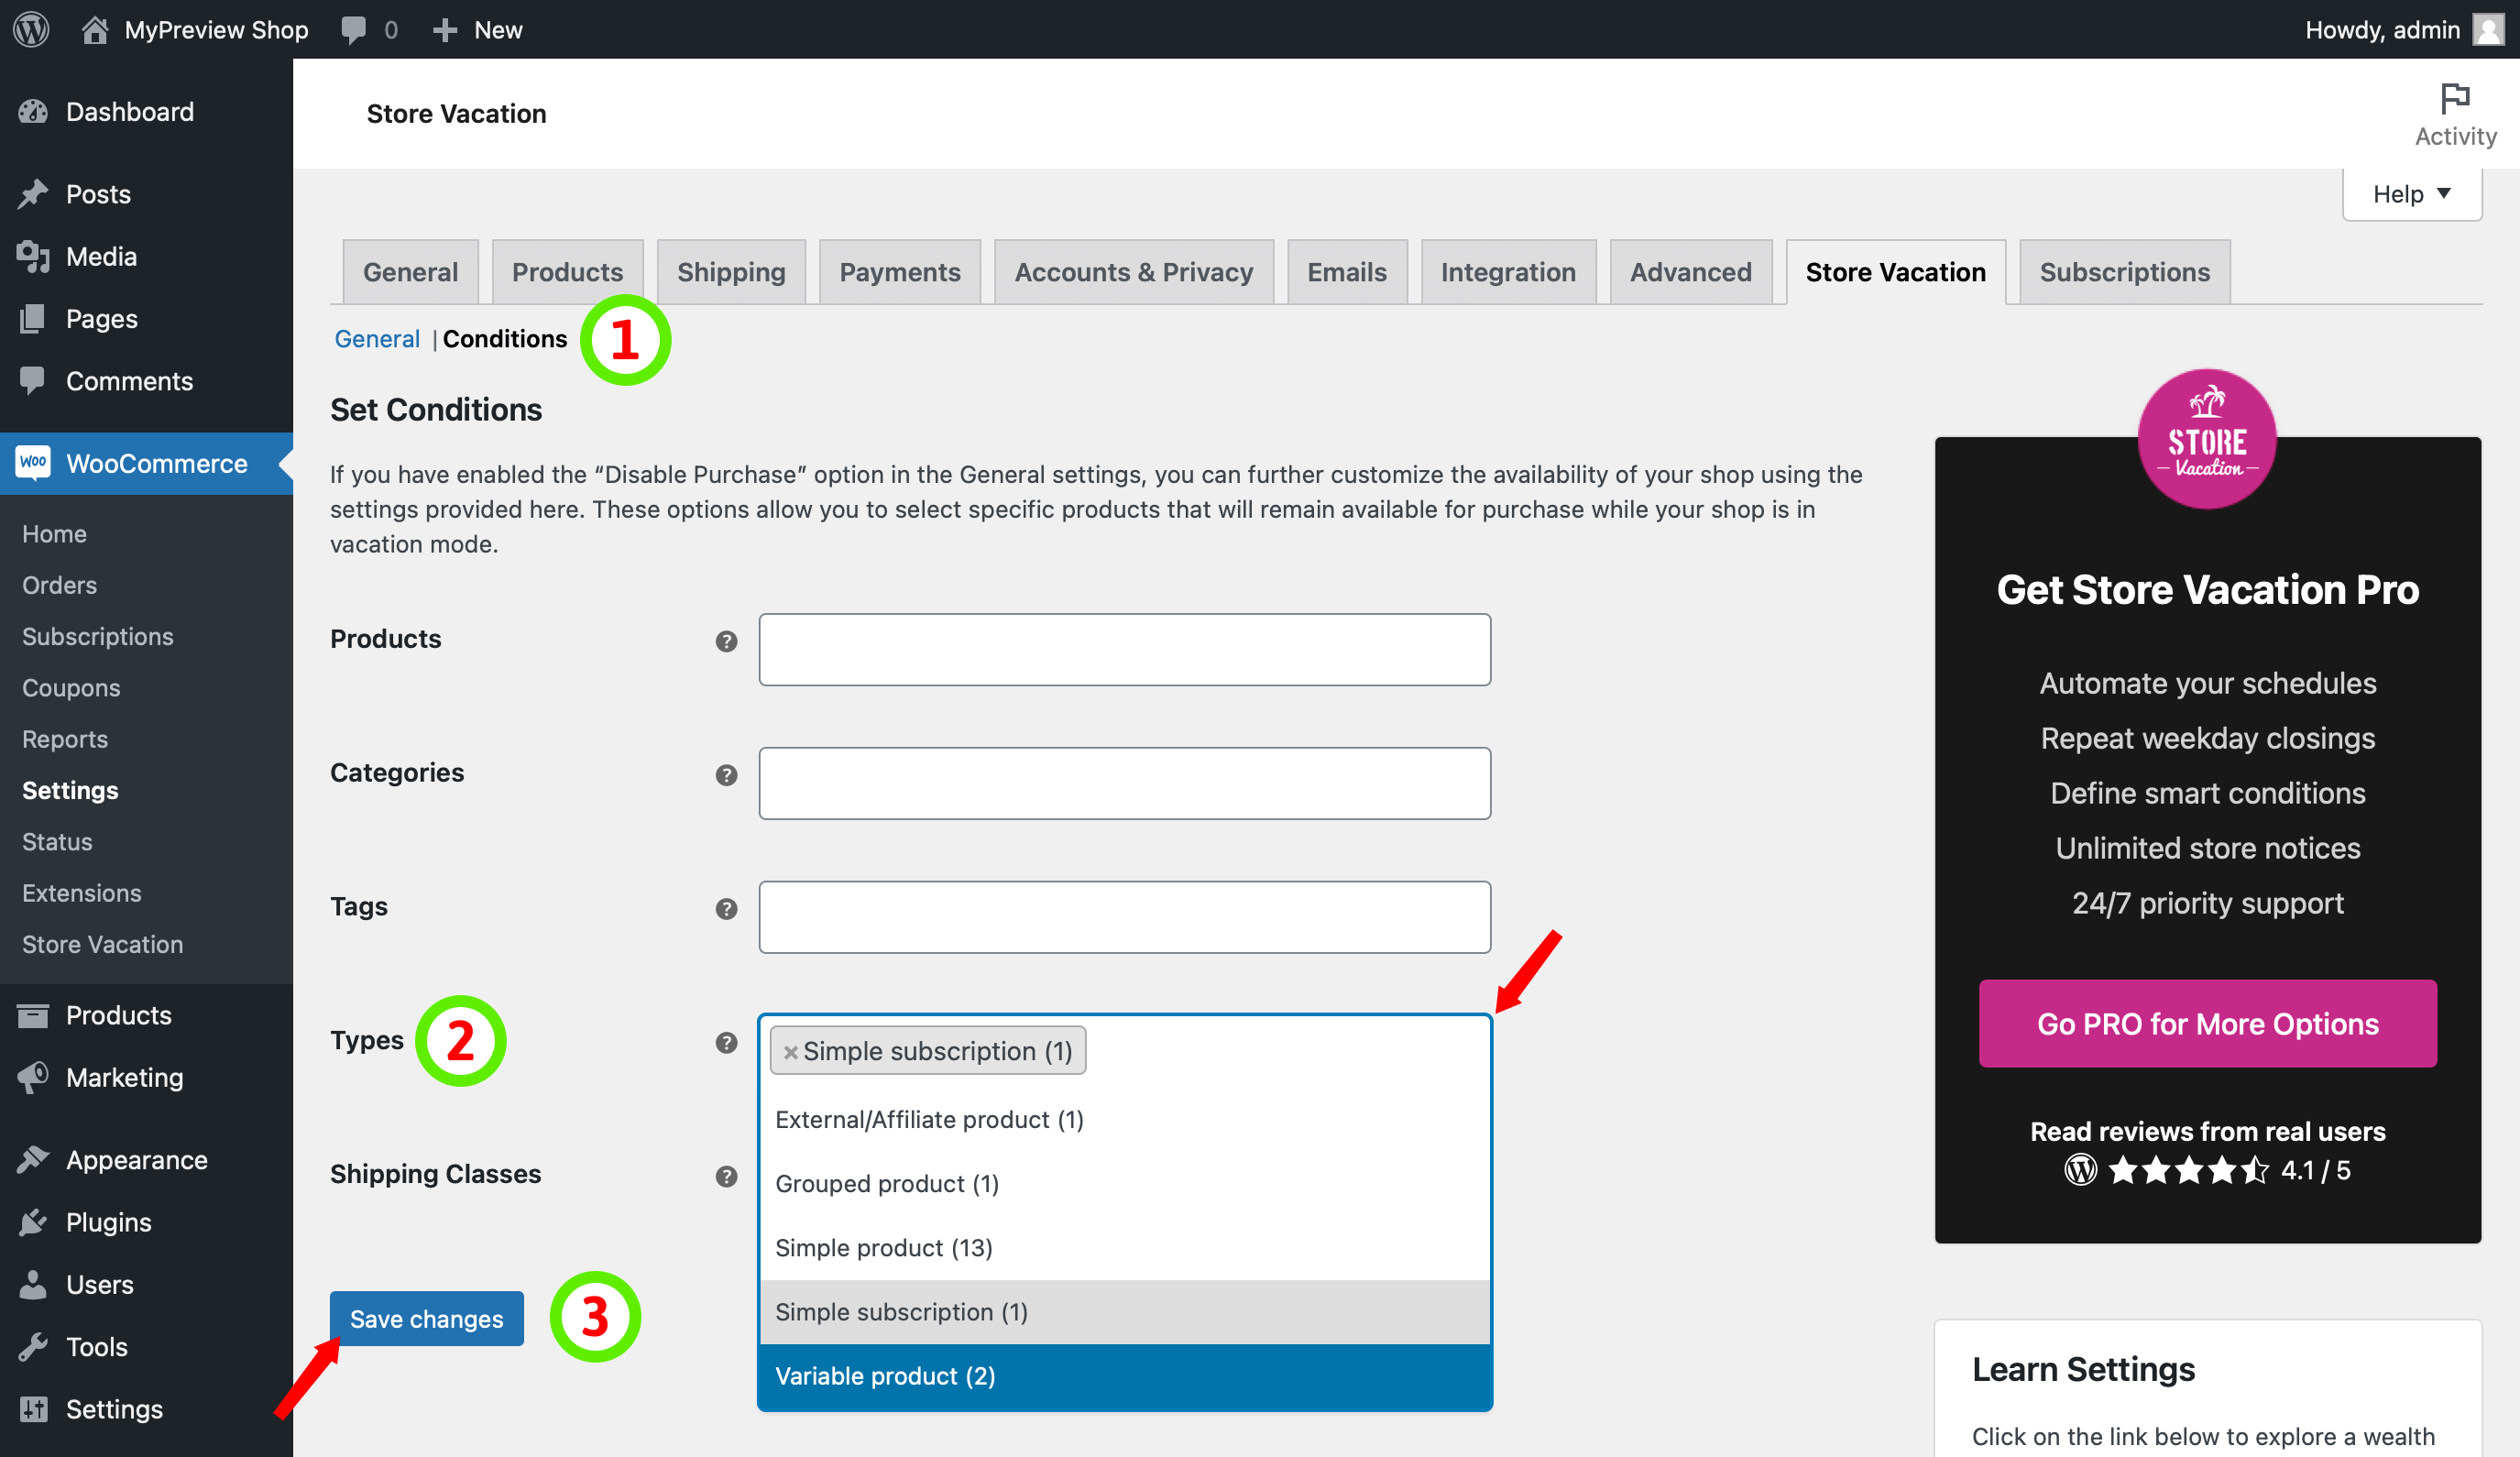
- Access the Conditions Page: Navigate to the Conditions page within the store vacation settings.
- Select Types: Choose the types of products that you want to exclude from the vacation mode. By excluding these product types, the products associated with them will remain purchasable by customers.
- Save Changes: Once you have chosen the desired types, click on the “Save changes” button to save the modified conditions settings.
By following these steps, you can customize your vacation mode to ensure that specific types of products remain available for purchase. This flexibility allows you to continue selling items associated with these excluded types, tailoring your vacation mode according to your preferences and customer demands.
Excluding Shipping Classes from Vacation Mode
To maintain the availability of specific shipping classes for purchase during your vacation period, you can utilize the Conditions settings to exclude them from the vacation mode. Follow these steps to specify the shipping classes to be excluded during the vacation period:
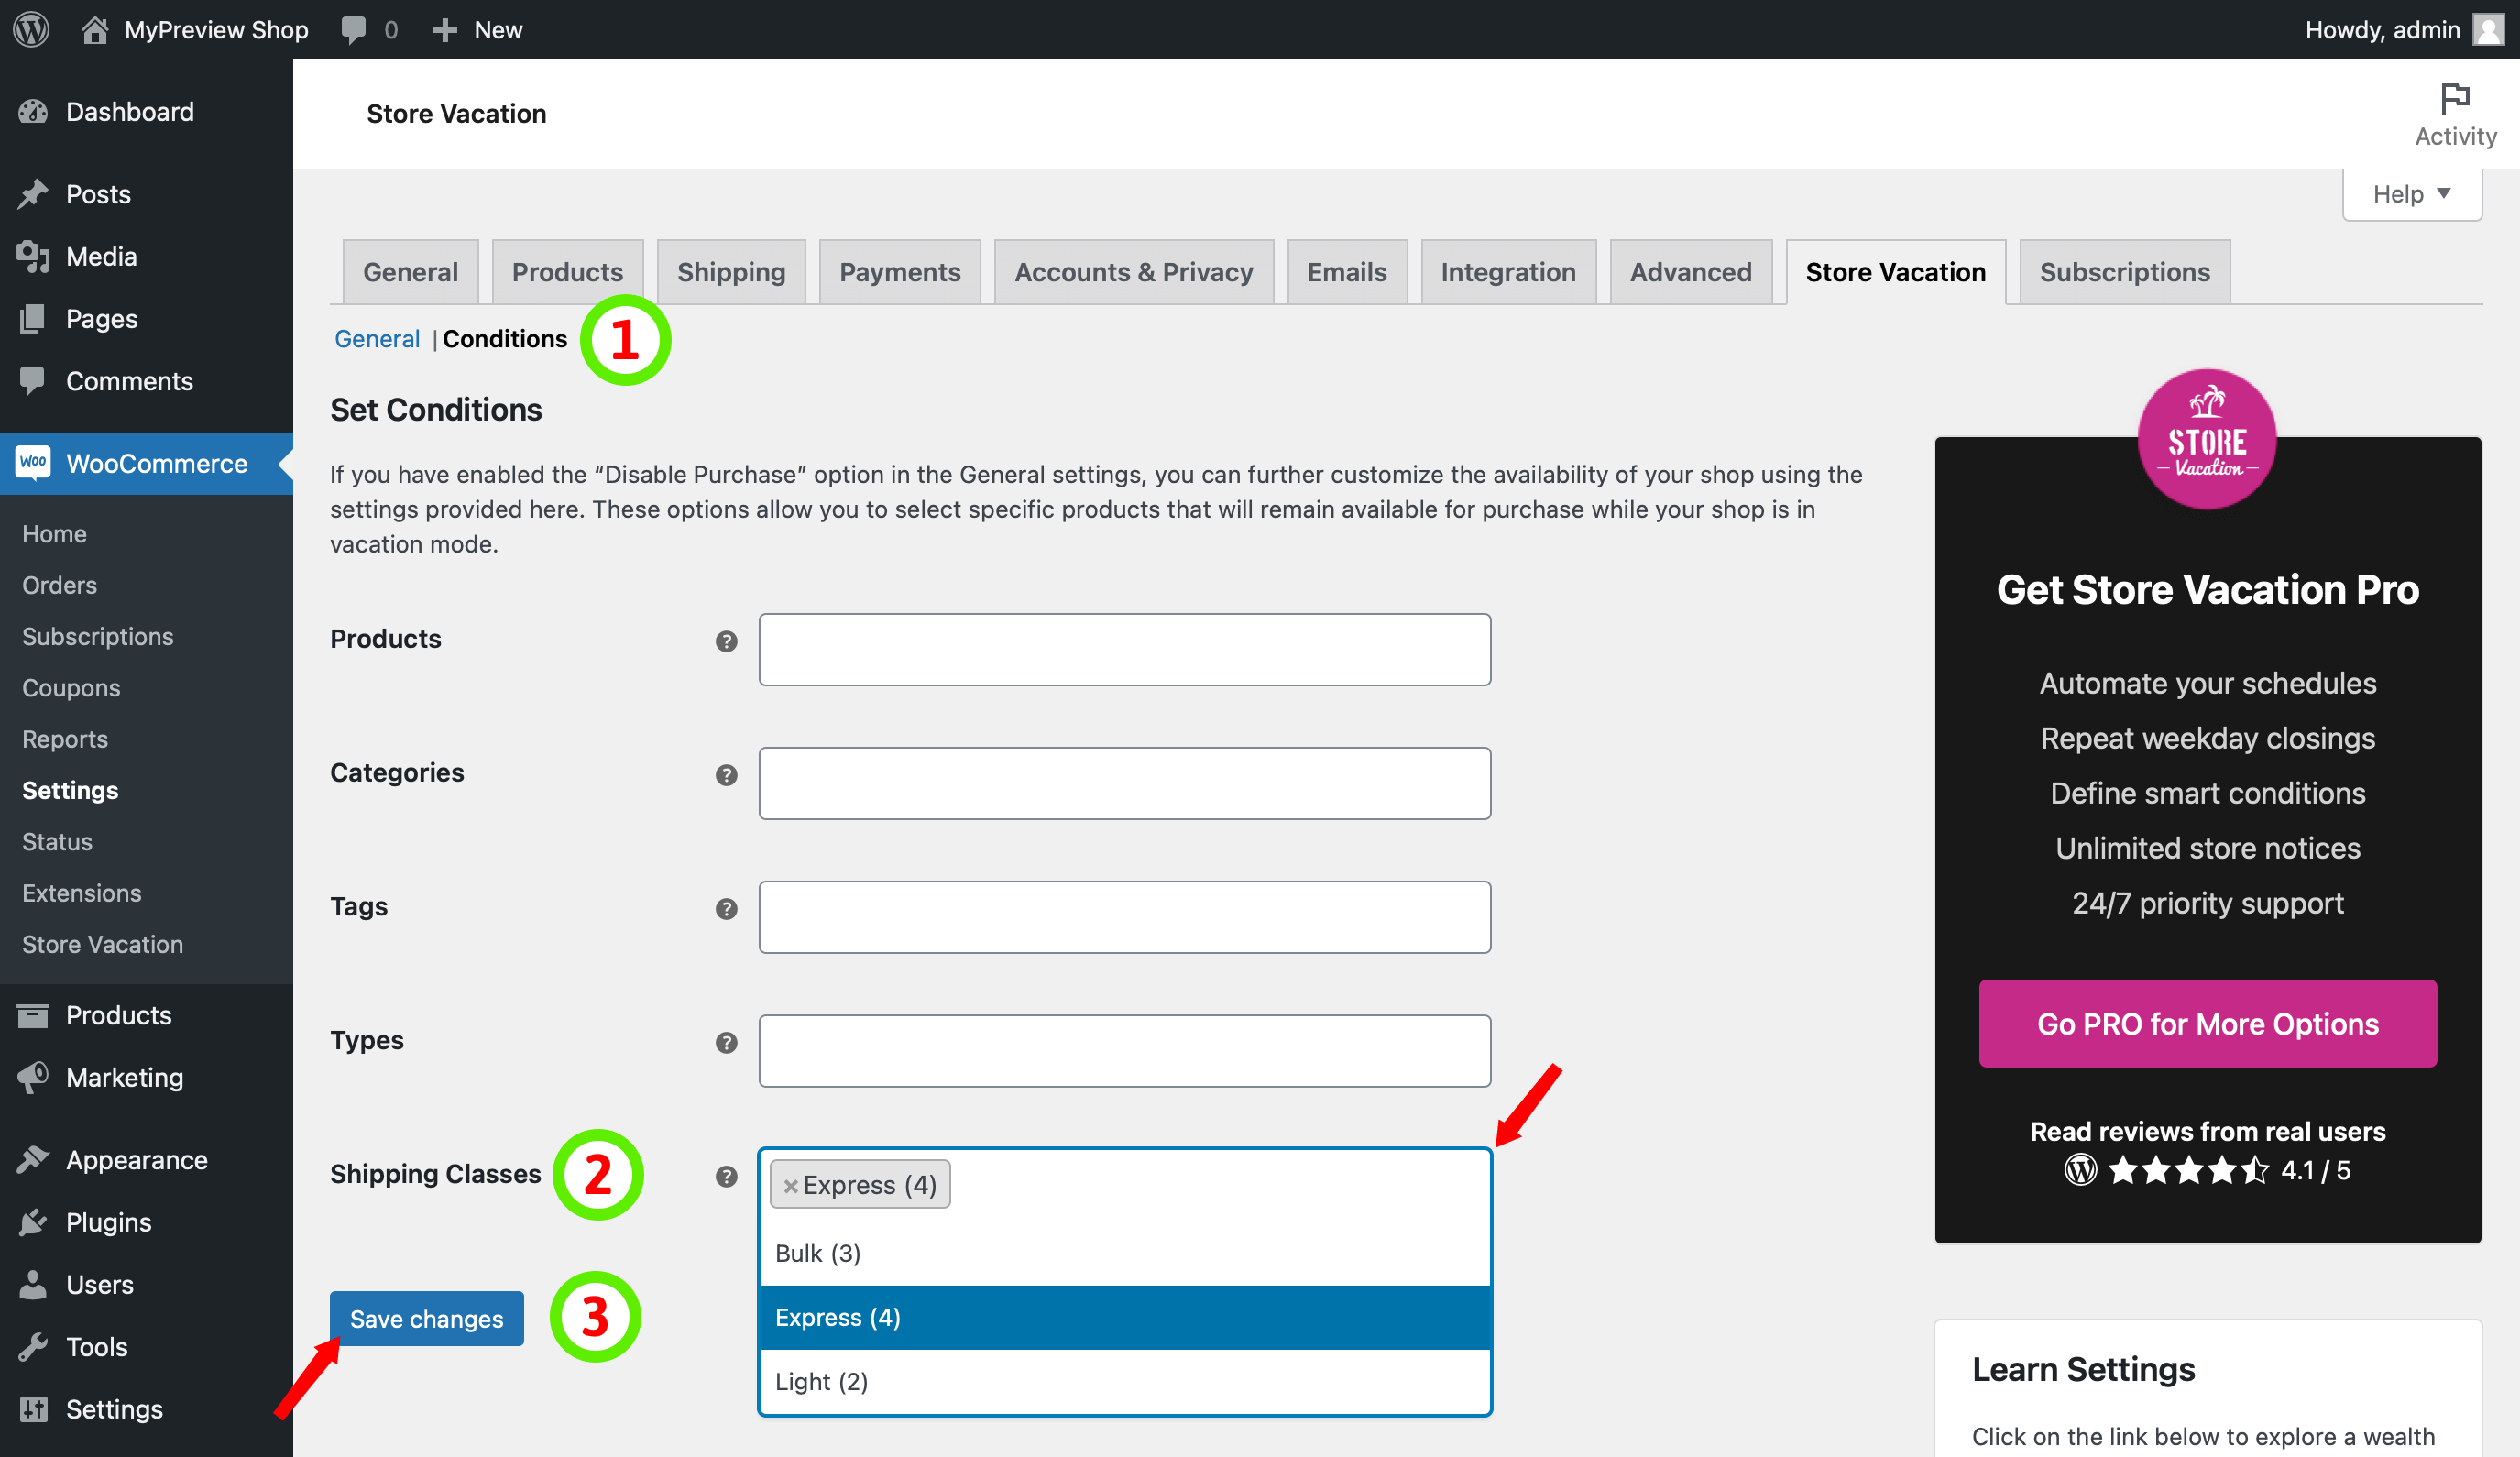
- Access the Conditions Page: Navigate to the Conditions page within the store vacation settings.
- Select Shipping Classes: Choose the shipping classes that you want to exclude from the vacation mode. By excluding these shipping classes, the products associated with them will remain purchasable by customers.
- Save Changes: Once you have chosen the desired shipping classes, click on the “Save changes” button to save the modified conditions settings.
By following these steps, You can utilize the Conditions settings to maintain control over your product availability during vacation mode, ensuring that certain shipping classes remain accessible for purchase when your store is closed for vacation.
Enhancing Your Vacation Notice Display
he vacation notice generated by the plugin is designed to be displayed on WooCommerce pages, such as the shop and product pages, during your vacation period. However, we understand that you may want to extend the visibility of your message to other pages on your website. Fortunately, our plugin offers multiple options for achieving this.
You can choose to add your message to other pages using the Store Vacation Notice block, the Elementor widget, or the shortcode.
Adding the Store Vacation Notice Block to a Page
In addition to the default WooCommerce pages, you may have pages on your website where you want to display your vacation notice. The Store Vacation Notice block allows you to achieve this by adding the block to the editor of your desired page. Follow these steps to display your vacation notice on a specific page:
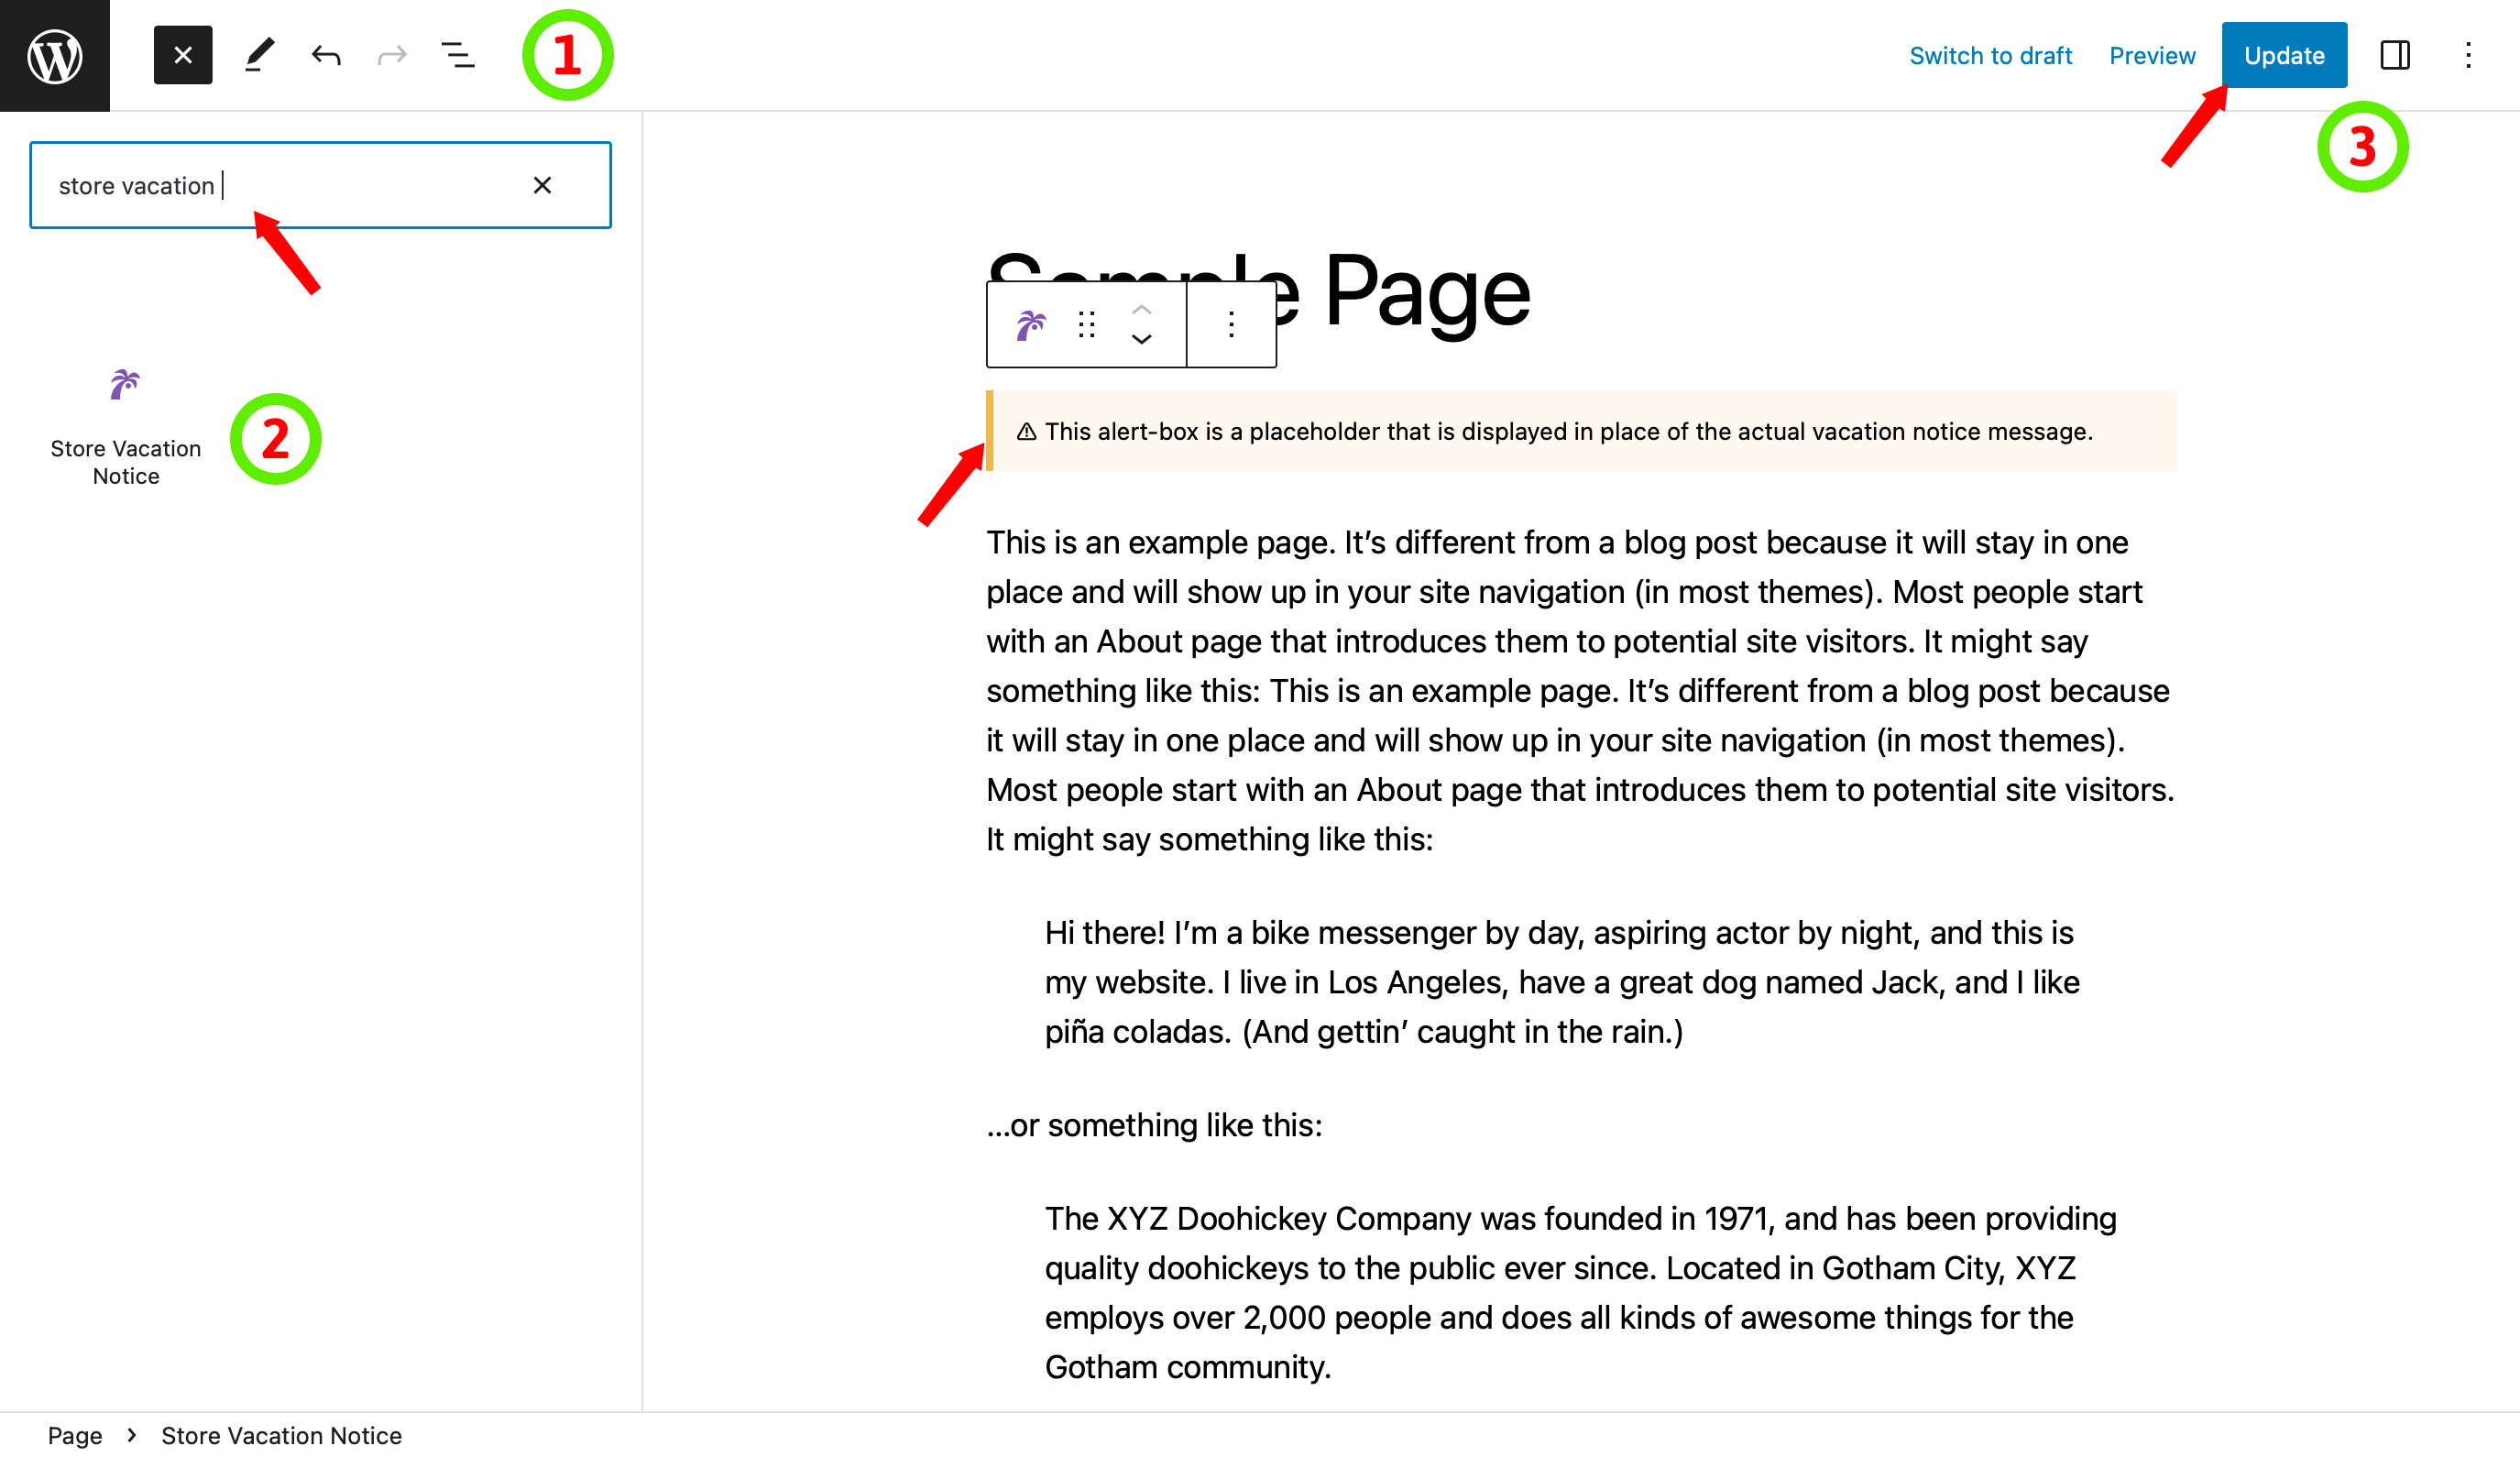
- Edit the Page: Navigate to the page where you want to display the vacation notice or create a new page for this purpose.
- Add the Store Vacation Notice Block: Click on the (+) button to add a new block in the editor. Search for the “Store Vacation Notice” block and select it from the available block options.
- Update and Publish: After adding the vacation notice block, click on the “Update” or “Publish” button to make the changes live on your page.
Adding the Store Vacation Notice Block to the editor provides you with the flexibility to display your vacation notice precisely where you want it, allowing you to communicate your absence to customers on specific pages. The Store Vacation Notice Block acts as a dynamic placeholder that generates the vacation notice based on your personalized settings in the Store Vacation plugin.
Adding the Store Vacation Notice Widget to an Elementor Page
If you use the Elementor page builder to design your website, you can easily integrate the Store Vacation Notice widget into your pages. Follow these steps to add the Store Vacation Notice widget to your Elementor page:

- Edit the Elementor Page: Navigate to the page where you want to add the vacation notice or create a new page using Elementor.
- Add the Store Vacation Notice Widget: In the Elementor editor, search for the “Store Vacation Notice” widget in the widget panel. Drag and drop the widget into the desired section of your page.
- Update and Publish: After adding the vacation notice widget, click on the “Update” or “Publish” button to make the changes live on your Elementor page.
Integrating your vacation notice seamlessly into your Elementor pages and ensuring consistent communication with your audience during your absence is made effortless with the Store Vacation Notice widget. This widget acts as a placeholder, dynamically generating the vacation notice based on your configured settings in the Store Vacation plugin.
Using the Shortcode for Adding Vacation Notice
If you are using the Classic Editor or any other page builder plugin that does not have specific integrations for the Store Vacation plugin, you can still easily add the vacation notice to your pages using the [woo_store_vacation] shortcode. Follow these steps to incorporate the vacation notice into your pages:
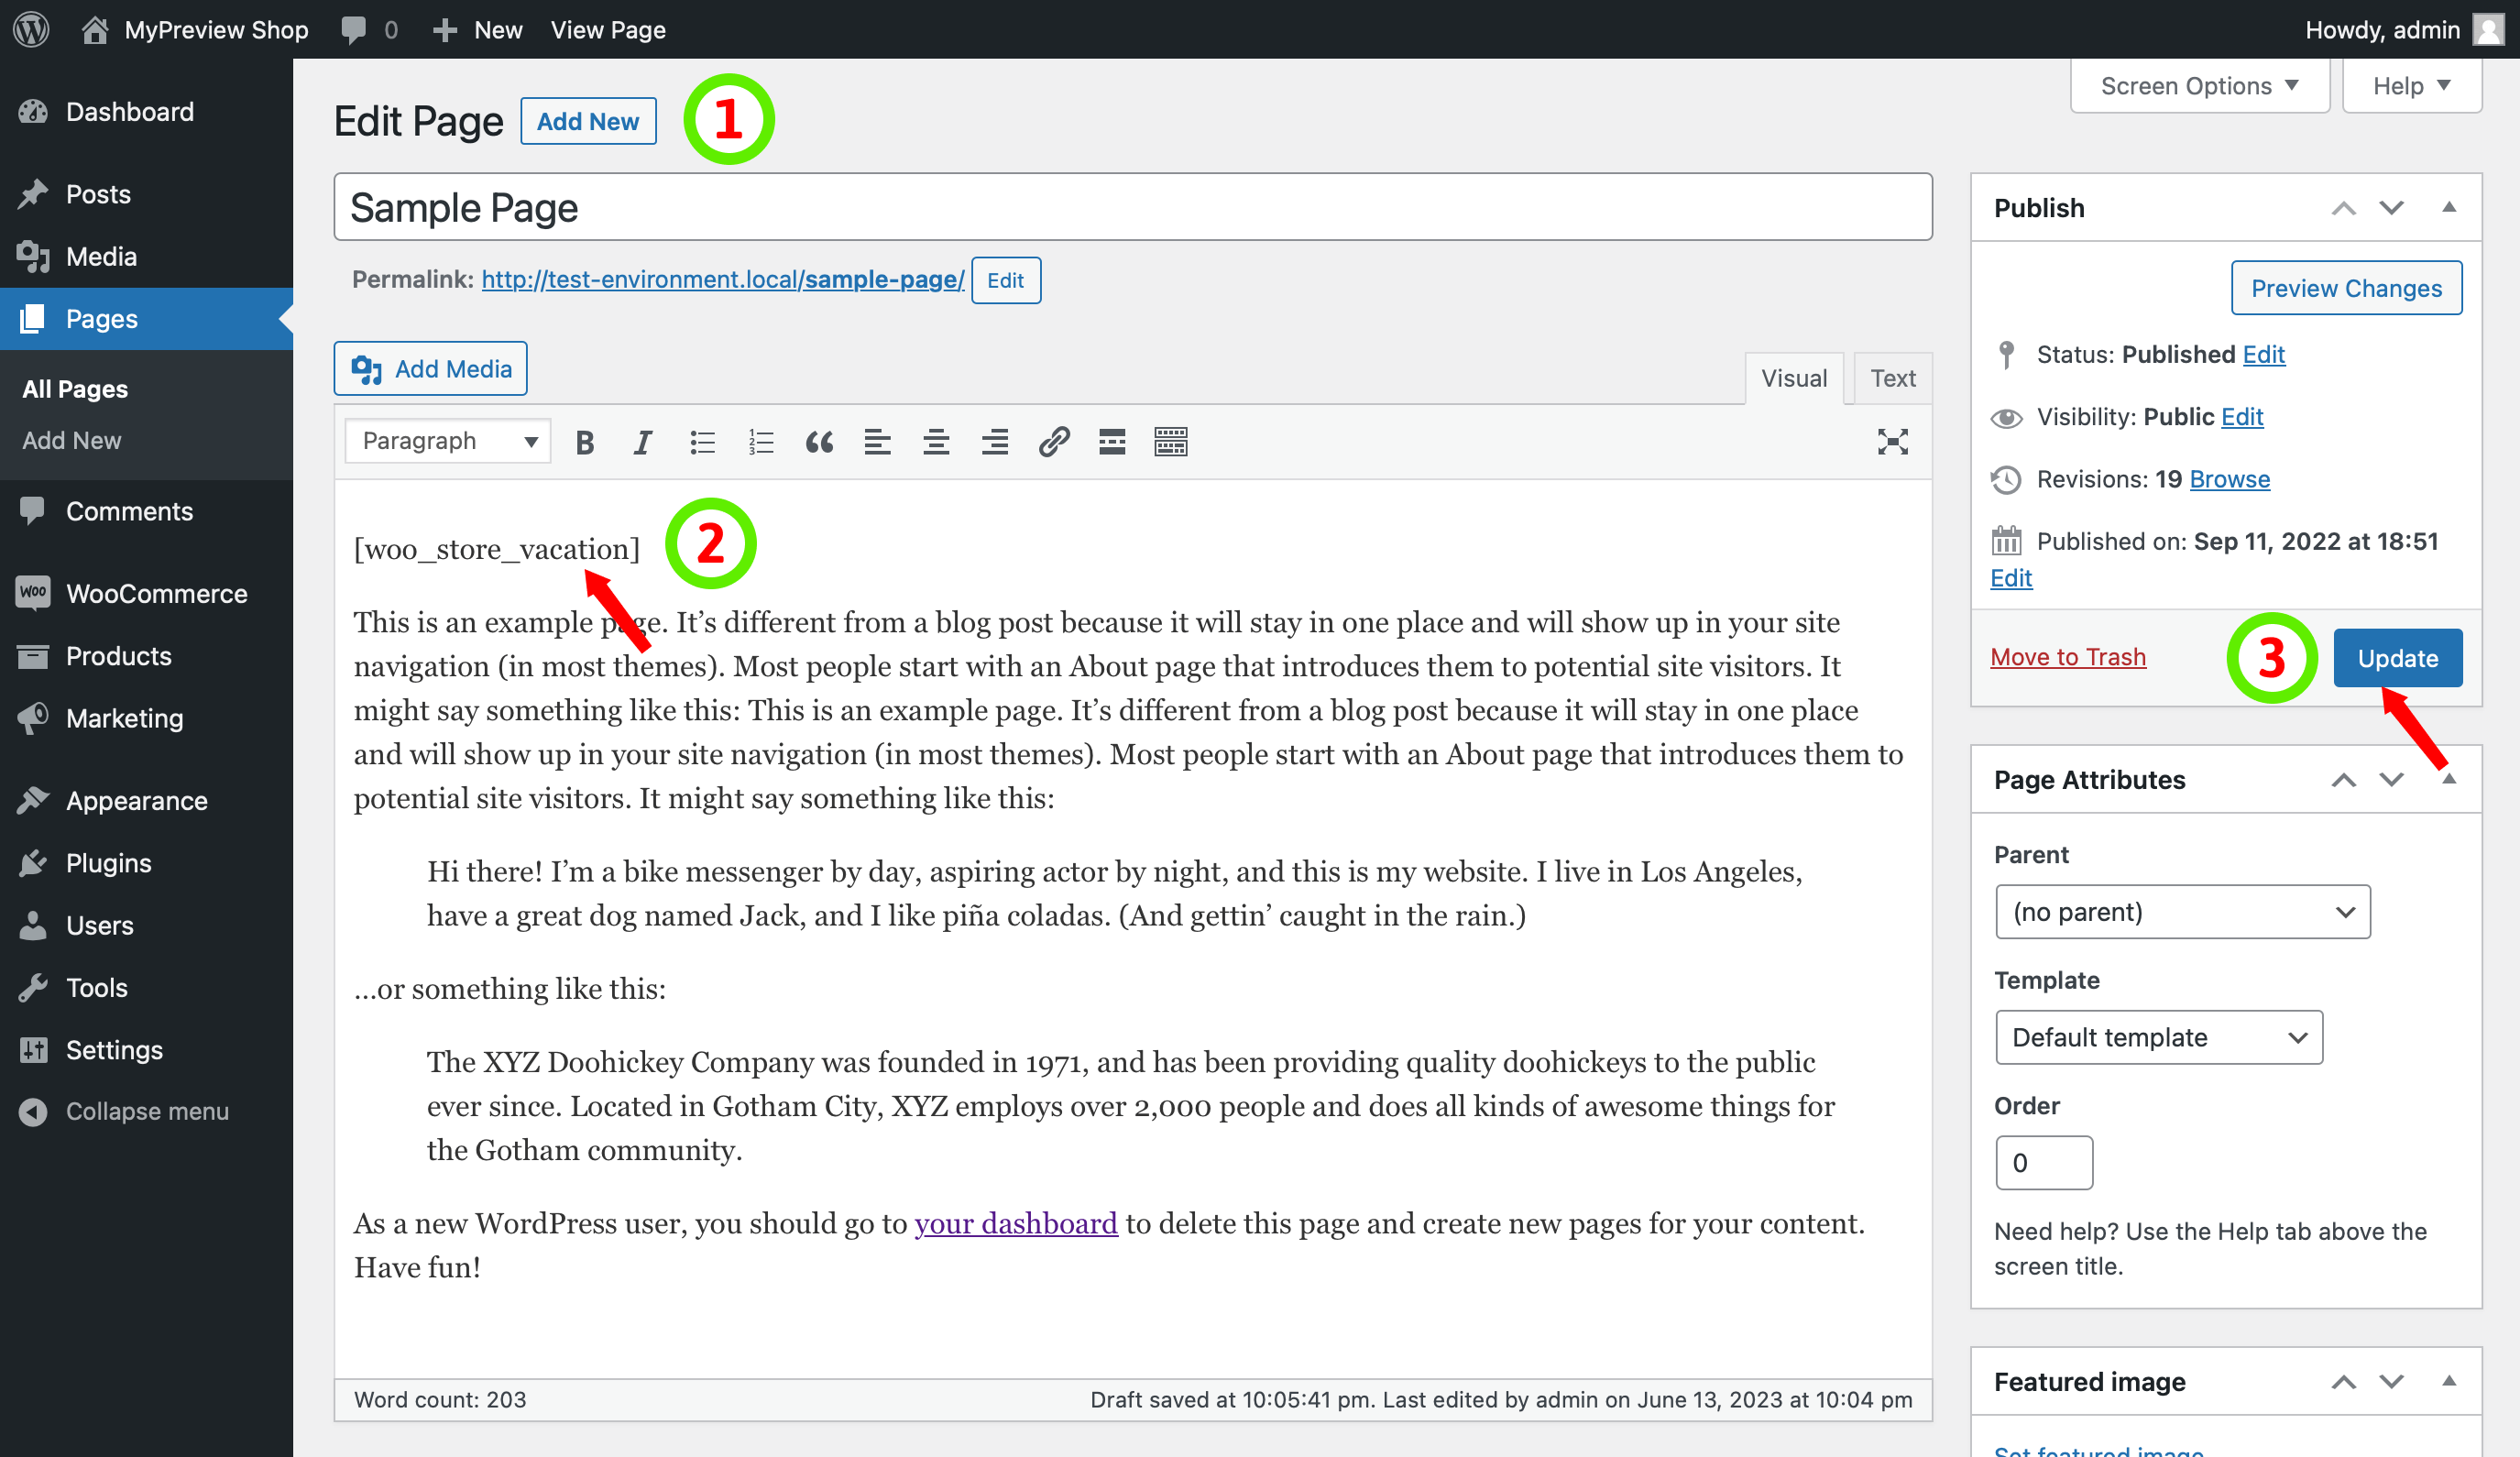
- Edit the Page: Access the page where you want to display the vacation notice or create a new page using your preferred editor.
-
Insert the Shortcode: In the editor, place the
[woo_store_vacation]shortcode at the desired location within the content of your page. - Update and Publish: Once you have added the shortcode, update or publish the page to make the changes live on your website.
Using the [woo_store_vacation] shortcode, you can effortlessly embed the vacation notice into your pages regardless of the editor or page builder plugin you are using. The shortcode will dynamically generate the vacation notice based on the settings you have configured in the Store Vacation plugin.
Troubleshooting Common Issues
While using the Woo Store Vacation plugin, you may encounter some issues or difficulties. Here are a few common problems and their potential solutions:
Vacation Notice Not Displaying:
- Check if the Enable Vacation Mode checkbox is selected in the General settings. If not, enable it and save the changes.
- Ensure that the vacation notice content is properly entered in the Vacation Notice field.
- Verify that the vacation period (start and end dates) is set correctly.
- Clear any caching plugins or server-side caching that may be interfering with the display of the vacation notice.
Inconsistent behavior of products during vacation mode:
- Double-check the conditions settings to ensure that the desired products, categories, tags, or shipping classes are excluded.
- Confirm that the vacation settings are correctly configured.
- Disable any conflicting plugins or extensions that might be affecting product availability.
Vacation Notice Not Visible on Custom Pages:
- Confirm that you have correctly added the Store Vacation Notice block, Elementor widget, or shortcode to the desired page or post.
- Check for any specific page builder settings or conflicts that may be preventing the notice from displaying.
- Ensure that the page or post is published or set to a public status.
If the above troubleshooting steps do not resolve the issues you are facing, consider reaching out to the support or consulting the plugin’s documentation for further assistance.
Frequently Asked Questions:
How can I determine if my store is closed?
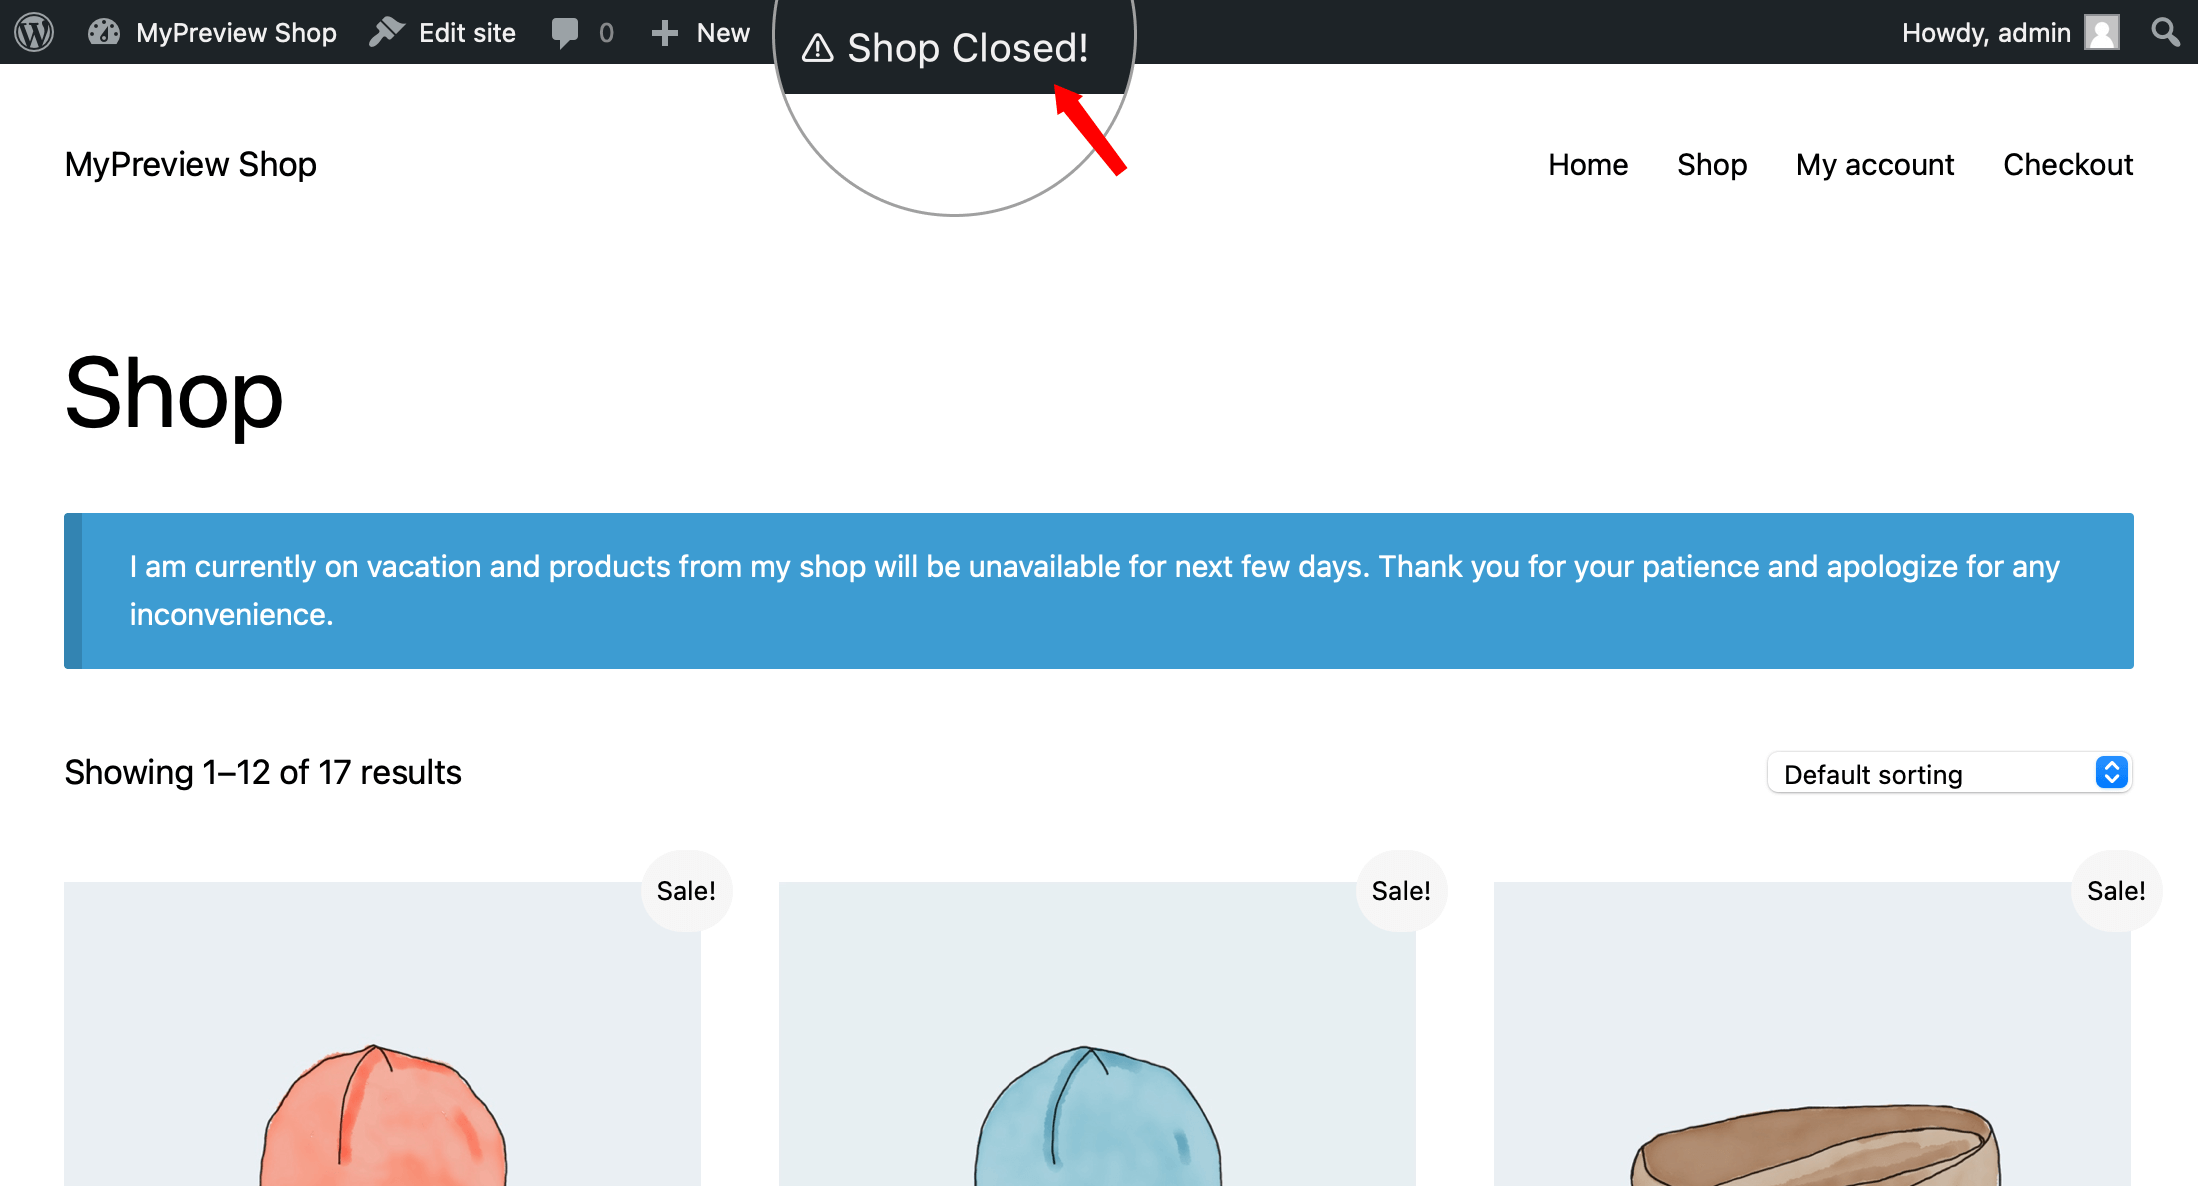
You can find the Shop Closed! status in the admin bar on the frontend of your website, indicating that your store is closed.
Can I close my shop without displaying a notice?
Yes, you can remove the notice by emptying the Vacation Notice field in the settings. This will ensure that no notice is displayed while your shop is closed during the scheduled time.
How can I display a notice but keep my shop open?
To display a notice while keeping your shop open, uncheck the Disable Purchase checkbox in the settings. This allows all of your products to remain purchasable during the vacation period while still displaying the vacation notice to your customers.
If you have any additional questions or need further assistance, please refer to the plugin documentation or contact our support for help.
Developers Guides
Customizing Closed Store with CSS and JavaScript
When your store is closed for vacation using the Store Vacation plugin, an additional class called woo-store-vacation-shop-closed is automatically added to the <body> tag of your website. This class serves as a helpful identifier for implementing specific styles or behaviors when your store is in vacation mode. By leveraging this class, you can apply customizations to enhance the visual appearance or functionality of your closed store.
To make use of the woo-store-vacation-shop-closed class, follow these steps:
-
Identifying the Class:
- When your store is closed, inspect the HTML code of your website using the browser’s developer tools.
-
Locate the
<body>tag and check if the “woo-store-vacation-shop-closed” class is present. - If the class is found, you can proceed with applying customizations.
-
Applying CSS Styles:
- Open your CSS stylesheet or the custom CSS editor.
-
Use the
woo-store-vacation-shop-closedclass as a selector to target specific elements or sections of your closed store. - Apply custom styles to modify the appearance, layout, or behavior of the targeted elements.
-
Utilizing JavaScript:
-
If you need to add specific behaviors or functionality to your closed store, you can use JavaScript in combination with the
woo-store-vacation-shop-closedclass. - Include your JavaScript code in a separate script file.
-
Use the
woo-store-vacation-shop-closedclass as a selector or check if it exists before applying your custom JavaScript logic. - Implement the desired actions or modifications based on your requirements.
-
If you need to add specific behaviors or functionality to your closed store, you can use JavaScript in combination with the
Action Hooks
woo_store_vacation_disable_purchase
The woo_store_vacation_disable_purchase action hook allows you to add custom functionality when the purchase is disabled due to a store vacation. You can use the add_action function to hook your custom function to this action.
Here’s an example of how you can use the add_action function to hook your custom function to the woo_store_vacation_disable_purchase action:
// Define your custom function
function my_custom_disable_purchase_function() {
    // Add your custom logic here
    echo "Purchases are currently disabled.";
}

// Hook your custom function to the disable purchase action
add_action( 'woo_store_vacation_disable_purchase', 'my_custom_disable_purchase_function' );
woo_store_vacation_vacation_mode
The woo_store_vacation_vacation_mode action hook is triggered when the store is in vacation mode. It allows you to add custom functionality when the vacation mode is activated. You can use the add_action function to hook your custom function to the action.
Here’s an example of how you can use the add_action function to hook your custom function to the woo_store_vacation_vacation_mode action:
// Define your custom function
function my_custom_vacation_mode_function() {
    // Add your custom logic here
    // This code will be executed when the vacation mode is activated
    echo "Vacation mode is active!";
}

// Hook your custom function to the vacation mode action
add_action( 'woo_store_vacation_vacation_mode', 'my_custom_vacation_mode_function' );
